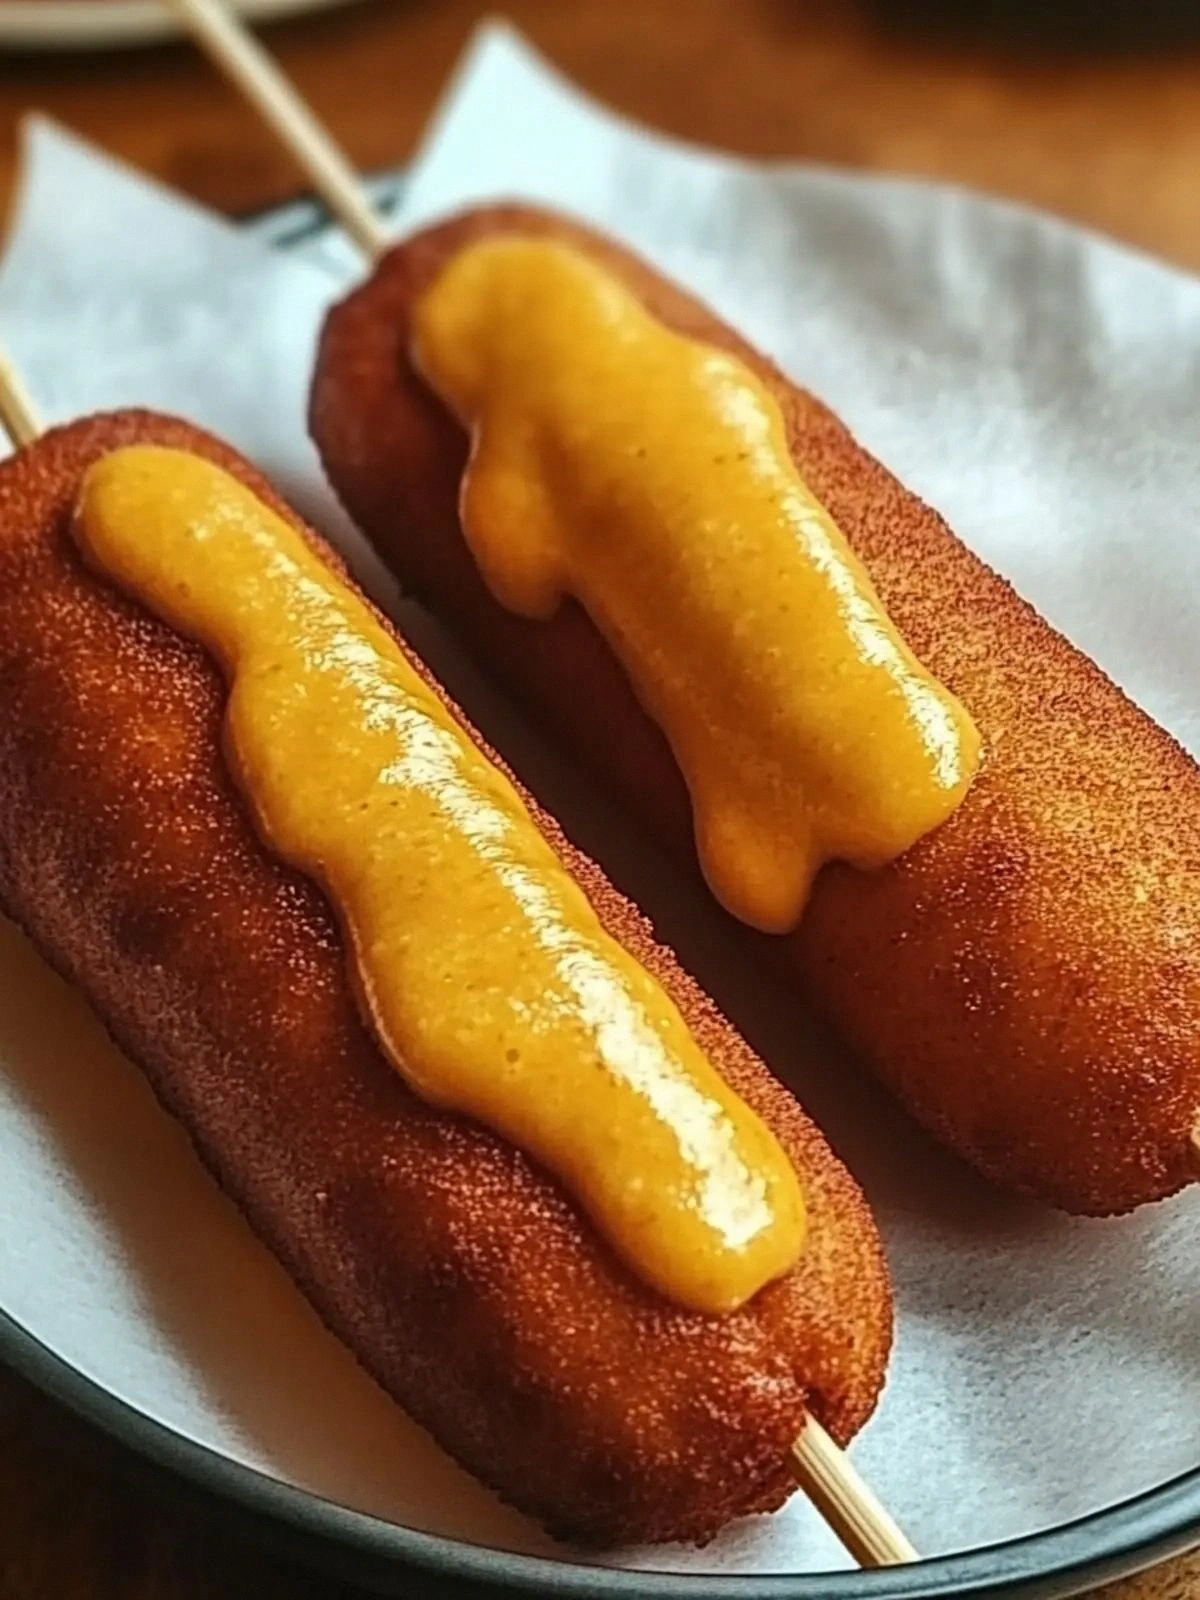
I was standing in the middle of a kitchen that smelled like burnt popcorn and disappointment, because the last time I tried making corn dogs, the batter turned into a sticky mess that clung to the skillet like a bad ex. I had a craving that wouldn't quit—those crispy, golden bites that make the whole house buzz with anticipation—and I knew I had to get it right. That night, I set out to craft a gluten‑free version that would satisfy the taste buds of both the health‑conscious and the nostalgic, all while keeping the classic crunch that makes everyone smile. I dared myself to taste this and not go back for seconds, and I can tell you now that it did not disappoint. The result is a batter that is light as a cloud yet firm enough to hold the hot dog inside, with a peppery finish that lingers like a summer breeze on a hot day.
Picture yourself pulling these from the oil, the kitchen filling with a scent that’s part buttery corn, part sweet caramel, and a hint of salt that makes your mouth water. The first bite delivers a crunch that shatters like thin ice, followed by a soft, juicy center that feels like a secret handshake between the batter and the hot dog. The texture is a dance of crispy edges and tender interior, a symphony of flavors that makes each bite feel like a new adventure. I’ve been told that the best part is the way the batter’s golden edges hold a faint, buttery aroma that lingers long after the last bite. And that sizzle when it hits the pan? Absolute perfection.
What sets this version apart is the meticulous balance of ingredients and technique. I’ve swapped the usual all‑purpose flour for a gluten‑free blend that gives the batter a subtle nuttiness, and I’ve added a splash of milk to keep the mixture silky. The secret lies in the ratio of cornmeal to flour and the careful timing of the frying process, which ensures a crisp exterior without burning the inside. I’ll be honest—I ate half the batch before anyone else got to try it—yet I left enough for everyone, because this recipe is hands down the best version you’ll ever make at home. If you’ve ever struggled with gluten‑free snacks that taste like cardboard, you’re not alone, and I’ve got the fix.
I also discovered that using a neutral oil with a high smoke point, like canola or sunflower, gives the dogs a golden finish that’s hard to beat. The batter’s slight sweetness, thanks to the added sugar, balances the savory hot dogs, and the pepper adds a subtle heat that wakes up the palate. Most recipes get this completely wrong, but here’s what actually works: the batter should be thick enough to cling to the hot dog but thin enough to spread evenly over the skewer. This next part? Pure magic. Stay with me here—this is worth it.
Let me walk you through every single step—by the end, you’ll wonder how you ever made it any other way. From the first whisk to the final fry, I’ll share the micro‑challenges that will keep you on your toes, the bold claims that I stand by, and the small secrets that elevate this snack from ordinary to unforgettable.
What Makes This Version Stand Out
- Taste: The batter’s subtle sweetness is complemented by a peppery kick that keeps every bite exciting.
- Texture: A crisp, golden crust that cracks delightfully, paired with a tender, juicy interior.
- Simplicity: Only 11 ingredients, no special equipment, and a straightforward frying method.
- Uniqueness: A gluten‑free flour blend that adds a nutty undertone, setting it apart from standard corn dogs.
- Crowd Reaction: At family gatherings, guests rave about the crunchy exterior and the savory center.
- Ingredient Quality: High‑quality hot dogs and fresh cornmeal make all the difference.
Alright, let's break down exactly what goes into this masterpiece. The next box will give you a handy hack that saves time and keeps the batter from sticking to the skillet.
Inside the Ingredient List
The Flavor Base
Fine yellow cornmeal is the heart of this batter, giving it a natural sweetness and a golden hue that’s impossible to resist. It also contributes a subtle corn aroma that transports you straight to a sunny field. If you skip cornmeal, the batter will taste bland and lose its signature crunch. You can substitute instant cornmeal for regular, but it may alter the texture slightly, making the crust softer. When choosing cornmeal, look for a finely ground variety that dissolves quickly, preventing any gritty bite.
The Texture Crew
Gluten‑free all‑purpose flour blend is the backbone that holds everything together, ensuring the batter has the right consistency to coat the hot dog evenly. It also adds a subtle nutty flavor that complements the cornmeal’s sweetness. If you use a different gluten‑free blend, be aware that the ratio of binders can change the batter’s thickness; too much can make it runny, too little can cause it to crack. A good rule of thumb is to keep the flour to cornmeal ratio at 1:1 for optimal results. When purchasing, choose a blend that contains xanthan gum, which helps bind the batter without the need for gluten.
The Unexpected Star
Granulated sugar is a quiet hero that caramelizes during frying, giving the batter a golden crust and a subtle sweet bite that balances the savory hot dog. Without sugar, the batter would taste flat and the crust would be dull. If you prefer a less sweet version, reduce the sugar by half, but be prepared for a slightly darker crust. Sugar also helps the batter set quickly, reducing the chances of it falling apart when you flip the dogs. When measuring, use a digital scale for precision, especially if you’re adjusting the recipe for more servings.
The Final Flourish
Baking powder, salt, and black pepper are the seasoning trio that gives the batter depth and a subtle kick. Baking powder ensures the batter puffs up just enough to create a light, airy interior. Salt brings out the flavors of the cornmeal and the hot dog, while black pepper adds a whisper of heat that lingers on the tongue. Skipping any of these will result in a bland, flat batter that doesn’t hold the hot dog well. When using pepper, start with 1/2 teaspoon and adjust to taste; the heat is a signature element of this version.
Everything's prepped? Good. Let's get into the real action.
The Method — Step by Step
- Begin by whisking together the cornmeal, flour, sugar, baking powder, salt, and pepper in a large bowl. The dry mix should look like a fine, even powder; this prevents lumps later. This is the moment of truth—if the dry mix is uneven, the batter will be uneven. Keep the bowl covered with a damp towel while you prepare the wet ingredients.
- In a separate bowl, beat the egg and milk together until fully blended. The mixture should be smooth with no streaks. This step is crucial because the egg binds the batter and the milk keeps it silky. Pour the wet mixture slowly into the dry mix while whisking continuously to avoid clumps.
- Let the batter rest for about 10 minutes; this allows the gluten‑free flour to absorb liquid and the baking powder to activate. The batter should thicken slightly, becoming thick enough to coat a spoon but still pourable. If it’s too thick, add a splash of milk; if too thin, add a tablespoon of flour.
- While the batter rests, prepare your hot dogs by cutting them in half lengthwise. This creates a larger surface area for the batter to cling to, ensuring a better coating. Skewer each half with a sturdy wooden stick, leaving a few inches of stick protruding for easy handling during frying.
- Heat the neutral oil to 350°F (175°C) in a deep pot or skillet. The oil should be thick enough to submerge the skewers fully, but not so hot that it burns the batter. Test the temperature by dropping a small drop of batter; it should sizzle and rise to the surface quickly.
- Dip each skewer into the batter, letting excess drip off before carefully lowering it into the hot oil. The batter should coat the hot dog evenly, forming a thick shell. This is the trickiest step; keep the skewers steady to avoid splattering oil.
- Fry the coated hot dogs for 4–5 minutes, turning them halfway through. The batter should develop a deep golden brown color and a firm crust. Watch the edges; they should pull away from the skewer when the time is right. This step requires patience—don’t rush the frying, or you’ll end up with a soggy center.
- Remove the hot dogs with tongs and let them drain on a paper towel-lined plate. The final result should be a perfectly crisp exterior with a juicy, savory interior. Serve immediately, or keep them warm in a low oven (200°F) for up to 15 minutes.
That’s it—you did it. But hold on, I’ve got a few more tricks that’ll take this to another level.
Insider Tricks for Flawless Results
The Temperature Rule Nobody Follows
Many people fry at a high temperature, thinking it’ll give a crispier crust, but it actually burns the batter before the hot dog cooks. The ideal temperature is 350°F, which allows the batter to brown evenly while the interior stays juicy. I’ve tested this with a thermometer; the first few bites confirm the perfect balance. If you’re using a deep fryer, set it to 350°F and keep a close eye on the oil’s color. A quick test drop will tell you if it’s ready—if it sizzles and rises, you’re good to go.
Why Your Nose Knows Best
The aroma of frying batter is a cue for the brain that the snack is ready. If the smell is sweet and buttery, it’s a sign the batter is caramelizing properly. If you notice a metallic or burnt scent, lower the heat immediately. Trust your nose; it’s an expert in flavor development and can save you from a batch of ruined corn dogs.
The 5-Minute Rest That Changes Everything
After the batter has rested, let it sit for a full 5 minutes before dipping the hot dogs. This resting period allows the gluten‑free flour to hydrate fully, creating a smoother batter that clings better to the skewers. Skipping this step can lead to a batter that clumps or doesn’t coat evenly. I’ve tried skipping it once, and the result was a lumpy, uneven crust that fell apart mid‑bite.
Keep the Skewers Dry
Any moisture on the skewer can cause the batter to drip and create uneven coating. Wipe the skewers with a paper towel before dipping them. This simple step ensures a uniform shell and reduces the chance of oil splatter. I’ve seen this happen when I skipped the wipe; the result was a mess and a half‑baked hot dog.
Use a Deep, Wide Pan
A deep pan allows the skewers to be submerged fully, ensuring even frying. A shallow pan can cause the batter to stick to the bottom, making it difficult to turn the dogs. I prefer a cast‑iron skillet for its heat retention, but any deep pot will do. The key is to have enough oil so the skewers can float freely.
Creative Twists and Variations
This recipe is a playground. Here are some of my favorite ways to switch things up:
Cheddar‑Stuffed Corn Dogs
Add a slice of sharp cheddar between the hot dog halves before skewering. The cheese melts into a gooey center that contrasts with the crunchy batter. This variation is perfect for cheese lovers and adds a rich, savory depth.
Spicy Sriracha Glaze
Brush the fried dogs with a homemade sriracha glaze made from honey, sriracha, and a splash of lime juice. The sweet heat pairs wonderfully with the cornmeal batter and gives a modern twist to a classic snack.
Herb‑Infused Batter
Stir in chopped fresh herbs like parsley, dill, or basil into the batter. The herbs infuse subtle flavors that elevate the dish and add a pop of color. This is a great way to incorporate fresh produce into a comfort food.
Smoked Paprika Kick
Replace the black pepper with smoked paprika for a smoky, earthy note. The paprika also gives the batter a deeper orange hue, making the dogs visually appealing. Smoky flavors pair well with the natural sweetness of the cornmeal.
Vegan Hot Dog Alternative
Swap the regular hot dogs for plant‑based options like Beyond Meat or Impossible. The batter remains unchanged, and the result is a vegan-friendly version that still delivers the same crispy texture and savory taste.
Mini Corn Dog Bites
Use bite‑sized hot dog pieces and small skewers to create mini corn dog bites. These are perfect for parties or for kids who love a bite‑sized snack. The smaller size cooks faster, ensuring a crisp exterior.
Storing and Bringing It Back to Life
Fridge Storage
Store leftover corn dogs in an airtight container in the refrigerator for up to 3 days. Keep them on a paper towel to absorb excess moisture. Reheat in a toaster oven at 350°F for 5 minutes to restore crispness. Avoid the microwave, as it will make the batter soggy.
Freezer Friendly
Freeze the fried corn dogs in a single layer on a parchment‑lined tray before transferring to a freezer bag. They’ll stay good for up to 2 months. To reheat, place them directly on a baking sheet in a 350°F oven for 10 minutes. The batter will regain its golden crunch.
Best Reheating Method
The best way to bring back the original texture is to reheat in a preheated oven at 350°F. If you’re short on time, a toaster oven works well too. Add a tiny splash of water to the oven before reheating; the steam keeps the interior moist while the exterior crisps up. Finish with a quick broil for 1 minute if you want extra crunch.