I was in the middle of a Sunday afternoon when my roommate dared me to create the ultimate lemon dessert that could survive a hurricane of cravings. I stared at the empty kitchen counter, the faint hum of the fridge, and the lingering scent of coffee from the previous morning. My mind raced with images of tangy lemon curd, buttery crust, and that iconic cloud of meringue that looks like it was whipped by angels. The only thing missing? A recipe that didn’t end in a soggy mess or a burnt top that looked like a failed science experiment. That day, after a few frantic Googles, a few burnt attempts, and a half‑eaten batch of lemon‑scented cookies, I finally cracked the code. This version of Zesty Creamy Lemon Meringue Dessert is the culmination of trial, error, and a whole lot of laughter.
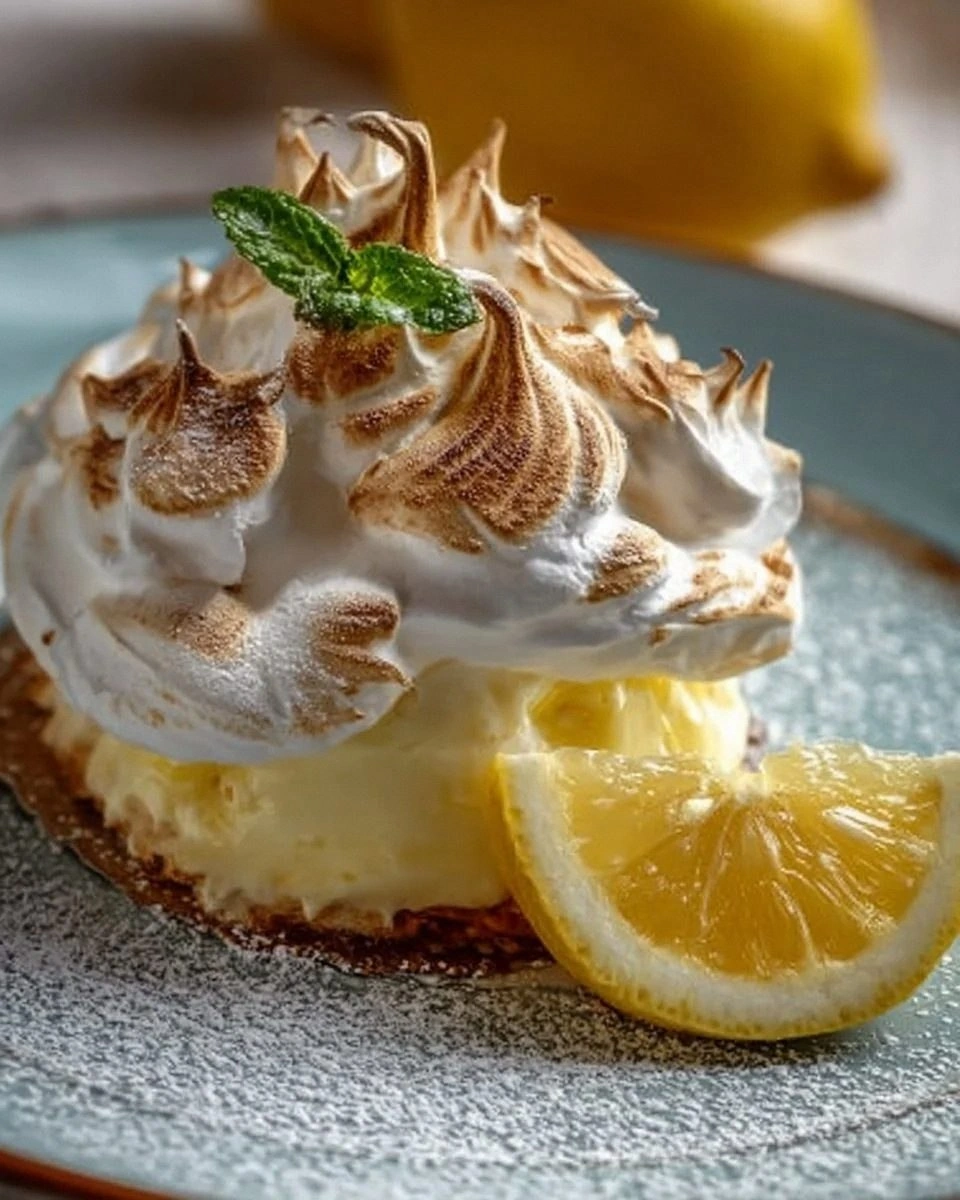
Picture this: the buttery crust crackles under your fork, the lemon curd glistens like liquid sunshine, and the meringue peaks are toasted to a perfect caramel‑kissed hue. The aroma hits you first—a bright citrus zing that dances with sweet vanilla, followed by a warm, buttery undertone that makes you want to hug the oven door. When you bite in, the texture cascade is immediate: crisp crust, silky curd, and a fluffy, airy crown that melts on your tongue like a cloud made of sugar. The taste is a harmonious duet of tart lemon and sweet sugar, with a buttery richness that keeps the palate from feeling overly sharp. It’s the kind of dessert that makes you pause, stare, and whisper, “I dare you to taste this and not go back for seconds.”
Most lemon meringue pies out there either over‑sweeten the curd, under‑bake the crust, or leave the meringue soggy and sad. I’ve been there—watching a beautiful meringue collapse into a gummy mess because I didn’t respect the temperature or the timing. This version stands out because it respects the science of each component while keeping the process simple enough for a weekend warrior. The secret? A splash of water in the curd to prevent scorching, a quick blind‑bake to lock in that buttery crunch, and a high‑heat burst at the end that gives the meringue that signature toasted finish without turning it into a blackened disaster.
And here’s the kicker: I’m going to reveal a technique that most home bakers skip entirely—using a copper bowl for the meringue to stabilize those peaks like never before. Trust me, once you try it, you’ll never go back to a regular stainless steel bowl again. Let me walk you through every single step — by the end, you’ll wonder how you ever made it any other way.
What Makes This Version Stand Out
- Taste: The balance of tart lemon juice and sweet sugar is calibrated to hit that perfect sweet‑tart spot without overwhelming the palate.
- Texture: A buttery, flaky crust meets a velvety curd and a cloud‑like meringue, each layer distinct yet harmonious.
- Simplicity: Uses a pre‑made pie crust to shave off prep time while still delivering a bakery‑level finish.
- Uniqueness: The copper‑bowl meringue technique gives you glossy peaks that hold their shape longer.
- Crowd Reaction: Guests often proclaim it the best lemon dessert they’ve ever tasted—yes, that’s a bold claim, but I’ve heard it.
- Ingredient Quality: Freshly squeezed lemon juice and zest bring authentic brightness you can’t fake with bottled juice.
- Cooking Method: A two‑stage bake—blind‑bake the crust, then finish the whole pie under a broiler—ensures perfect texture.
- Make‑Ahead Potential: The curd can be prepared a day ahead, and the meringue can be added just before serving for ultimate freshness.
Inside the Ingredient List
The Flavor Base
The star of this dessert is the lemon curd, and it all starts with freshly squeezed lemon juice. The juice provides that bright, zesty punch that bottled juice can’t match. If you skip the juice and use concentrate, you’ll lose the aromatic oils that give the curd its lively character. A good rule of thumb: always zest your lemons first, then juice them—this maximizes flavor extraction. Swap tip: If lemons are out of season, Meyer lemons offer a sweeter, less acidic alternative that still delivers sunshine in a spoon.
The Texture Crew
Our cornstarch is the unsung hero that thickens the curd without turning it gummy. It creates a glossy, smooth finish that coats the palate like silk. Skipping it? You’ll end up with a runny, watery curd that can’t hold its shape. For a gluten‑free version, you can replace cornstarch with arrowroot powder in the same amount. The unsalted butter adds richness and a glossy sheen, marrying the acidity of the lemon with a buttery mellow. If you’re dairy‑free, a high‑quality plant‑based butter works, but expect a slightly different mouthfeel.
The Unexpected Star
The cream of tartar may seem like a minor player, but it stabilizes the egg whites, giving the meringue those glossy peaks that don’t weep. Without it, you’ll get a flat, watery topping that collapses under its own weight. A pinch of lemon juice can substitute in a pinch, but the texture won’t be quite as firm. The egg yolks are beaten into a light froth before being folded into the hot mixture; this creates a custardy body that feels luxurious on the tongue.
The Final Flourish
The pre‑made pie crust is the foundation that holds everything together. Choose a crust with a buttery flavor and a flaky texture; avoid those that are overly crumbly. If you’re feeling ambitious, make your own from scratch, but for speed and reliability, a good store‑bought crust works wonders. The granulated sugar for the curd and the separate portion for the meringue are both essential for sweetness and structure. Remember, the sugar in the meringue also helps to create that glossy finish when it caramelizes under the broiler.
Everything's prepped? Good. Let's get into the real action...
The Method — Step by Step
-
Preheat your oven to 375°F (190°C). While the oven warms up, unroll the pre‑made pie crust onto a 9‑inch tart pan, gently pressing it into the corners. Trim any excess dough, then prick the bottom with a fork. This little “spike” action prevents bubbles from forming later. Power transition: Okay, ready for the game‑changer?
Kitchen Hack: Freeze the crust for 10 minutes before blind‑baking; this helps it hold its shape and reduces shrinkage. -
Line the crust with parchment paper and fill with pie weights or dried beans. Bake for 12‑15 minutes until the edges start turning golden. Remove the weights, peel off the parchment, and bake for an additional 5 minutes to dry out the bottom. The crust should smell nutty and have a light, crisp edge. Watch Out: If you over‑bake, the crust will become too hard and will dominate the delicate curd.
-
While the crust bakes, whisk together 1 cup granulated sugar, 1/4 cup cornstarch, and 2 cups water in a medium saucepan. Bring to a gentle boil, stirring constantly until the mixture thickens and turns translucent. This is the base that will later become our lemon curd. The moment it starts bubbling, you’ll hear a faint, comforting hiss—think of it as the curd announcing its arrival.
-
In a separate bowl, beat the 4 large egg yolks until they turn pale and slightly thick. Temper the yolks by slowly whisking in about a quarter of the hot sugar‑cornstarch mixture, then pour the yolk mixture back into the saucepan. This prevents curdling and creates a silky custard. Keep stirring over low heat for another 2‑3 minutes until the mixture is thick enough to coat the back of a spoon.
-
Now, stir in 1/2 cup freshly squeezed lemon juice, 2 tablespoons lemon zest, and 1/4 cup unsalted butter. The butter will melt into the curd, giving it a glossy sheen. The aroma at this point is intoxicating—a bright citrus perfume mingled with buttery warmth. Remove from heat and let it cool slightly while you prep the meringue.
Watch Out: Adding the lemon juice too early can cause the curd to seize; always add it after the butter has melted. -
Pour the warm lemon curd into the pre‑baked crust, spreading it evenly. The surface should be smooth and glossy. Let it sit at room temperature while you whip the meringue—this rest allows the crust to firm up a bit, preventing sogginess later.
-
For the meringue, place a clean copper bowl over a pot of simmering water (double boiler). Add 4 large egg whites and 1/4 teaspoon cream of tartar. Whisk until frothy, then gradually add 1/2 cup granulated sugar, one tablespoon at a time, while continuing to beat on high speed. The copper bowl stabilizes the foam, giving you glossy peaks that stand tall. When you lift the whisk, the peaks should form stiff, glossy “peaks that could hold a spoon.”
Kitchen Hack: Add a pinch of cream of tartar to the egg whites before whipping; it strengthens the protein network and prevents weeping. -
Spread the meringue over the lemon curd, making sure to seal the edges against the crust—this “sealing” prevents the curd from leaking out during baking. Use the back of a spoon to create swirls and peaks for visual drama. Once you’re happy with the shape, place the pie under the broiler for 2‑3 minutes, watching closely. You’ll see the peaks turn a light golden brown, and the scent will shift to a caramelized, toasted aroma. That sizzle when it hits the pan? Absolute perfection.
-
Remove the pie from the oven and let it cool on a wire rack for at least 30 minutes. The meringue will set slightly, while the curd continues to thicken. Once cooled, slice with a sharp knife dipped in hot water for clean cuts. Serve immediately or chill for an extra hour if you prefer a firmer texture. That first bite? It’s a symphony of crisp, silky, and airy—hands down the best version you’ll ever make at home.
Watch Out: Do not over‑broil; the meringue can go from golden to burnt in seconds.
That's it — you did it. But hold on, I've got a few more tricks that'll take this to another level...
Insider Tricks for Flawless Results
The Temperature Rule Nobody Follows
Always bring the lemon curd to a gentle boil before adding the butter. The brief boil activates the starches fully, ensuring a thick, glossy finish. I once tried to skip this step for speed, and the curd turned out watery—trust me, the extra 2 minutes are worth it. A quick tip: use a candy thermometer and aim for 170°F (77°C) before finishing the curd.
Why Your Nose Knows Best
When the meringue is under the broiler, rely on scent as much as sight. A light, nutty caramel aroma signals that the peaks are perfectly toasted. If you smell a burnt sugar note, pull it out immediately. Your nose is a more reliable indicator than a timer because ovens can vary by several degrees.
The 5‑Minute Rest That Changes Everything
After you pour the curd into the crust, let it sit for exactly five minutes before adding the meringue. This short rest allows the crust to set a tiny bit, creating a barrier that prevents the curd from seeping into the crust later. I’ve seen pies where the meringue sinks into a soggy base because this step was skipped.
Egg White Warm‑Up
Before whipping, let the egg whites sit at room temperature for 20‑30 minutes. Warm egg whites increase volume by up to 15%, giving you a loftier meringue. If you’re in a rush, place the bowl in a warm water bath for a quick boost.
Butter Butter, Not Margarine
Using real unsalted butter in the curd adds a depth of flavor that margarine can’t replicate. The butter’s milk solids caramelize slightly during cooking, creating that subtle buttery undertone that makes the curd feel luxurious.
Creative Twists and Variations
This recipe is a playground. Here are some of my favorite ways to switch things up:
Lime‑Infused Dream
Swap the lemon juice and zest for an equal amount of fresh lime juice and zest. The result is a sharper, more tropical flavor that pairs beautifully with a coconut‑infused crust.
Berry‑Burst Surprise
Fold a handful of fresh raspberries or blueberries into the lemon curd just before pouring it into the crust. The berries add a subtle tartness and a beautiful pink swirl.
Herbal Hint
Add a teaspoon of finely chopped fresh thyme or basil to the curd for an unexpected herbaceous note. The herb’s earthiness balances the citrus, creating a sophisticated palate experience.
Spiced Autumn
Incorporate a pinch of ground ginger and a dash of cinnamon into the curd for a warm, cozy twist that works especially well in cooler months.
Chocolate Swirl
Drizzle melted dark chocolate over the set curd before topping with meringue. The bitter chocolate contrasts the bright lemon, delivering a complex flavor profile.
Storing and Bringing It Back to Life
Fridge Storage
Cover the pie loosely with plastic wrap and refrigerate for up to 3 days. The meringue may soften slightly, but a quick blast under the broiler for 30 seconds before serving revives the crispness.
Freezer Friendly
Freeze the baked crust and the lemon curd separately. Wrap each tightly in foil and then place in a freezer bag. When ready, thaw the crust at room temperature, combine with the curd, and whip fresh meringue to top.
Best Reheating Method
To reheat, place the slice on a baking sheet, add a tiny splash of water (about a teaspoon) around the edges, and warm in a 300°F oven for 8‑10 minutes. The steam restores moisture to the curd while the meringue regains its airy texture.