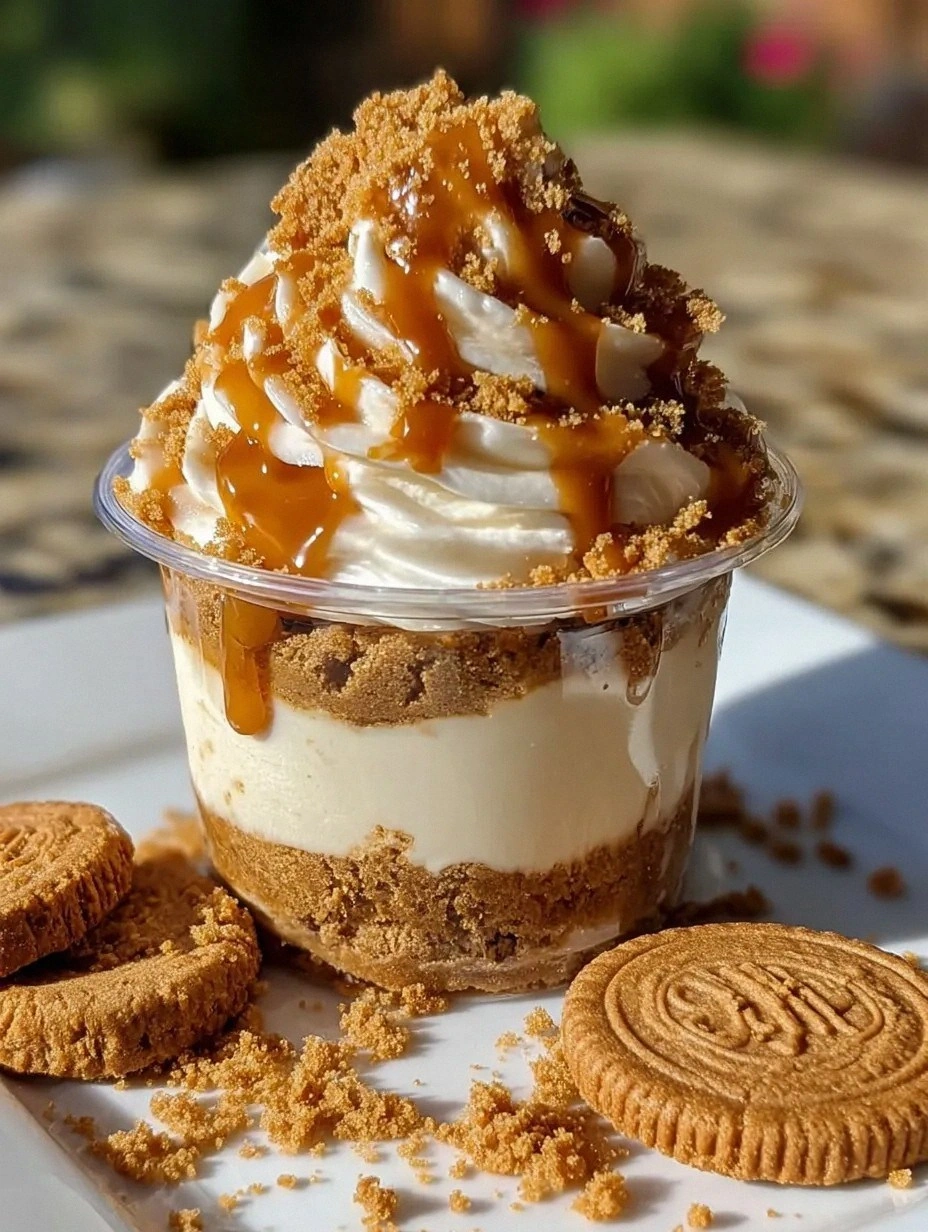
I was standing in my kitchen, staring at a half‑finished batch of cookie butter that had somehow turned into a sticky, sad puddle on the counter. My roommate had dared me to create a dessert that could survive a midnight snack raid, a post‑gym craving, and a picky‑teen’s verdict all at once. I thought, “Why not a no‑bake cheesecake that’s as indulgent as a cookie butter cookie, but in a cute, portable cup?” The result? A dessert that makes the ordinary feel like a distant memory. This is the moment I realized that the perfect balance of creamy cheesecake, crunchy cookie crust, and that unmistakable spiced caramel of speculoos could exist without an oven, without a mess, and without a single compromise on flavor.
Picture this: the buttery scent of crushed cookies mingling with the sweet, nutty perfume of cookie butter, drifting through the air as you whisk cream cheese into a silky, cloud‑like mousse. The sound of the mixer whirring is like a low‑key jazz beat, steady and reassuring. When you finally spoon the glossy, caramel‑gold mixture into chilled cups, the texture is so smooth it practically slides across the spoon, leaving a faint, buttery sheen. The first bite is a symphony—crunchy, creamy, and spiced all at once—like a warm hug from your favorite childhood snack, but with the sophistication of a five‑star dessert.
Most recipes out there either overcomplicate the process with unnecessary steps, or they skimp on the flavor, leaving you with a bland, watery mess that feels more like a diet cheat than a treat. This version stands out because it uses a single, unexpected star ingredient—real cookie butter (the kind you spread on toast, not the processed imitation)—to bind the cheesecake and elevate every bite. I’m also throwing in a secret technique: a brief chill in the freezer that sets the mousse without making it icy, giving you that perfect, melt‑in‑your‑mouth consistency.
I dare you to taste this and not go back for seconds. If you’ve ever struggled with a wobbly no‑bake cheesecake that cracks when you lift it, you’re not alone — and I’ve got the fix. Okay, ready for the game‑changer? The secret is in the timing and the temperature, and I’m about to spill the beans (and the butter). Let me walk you through every single step — by the end, you’ll wonder how you ever made it any other way.
What Makes This Version Stand Out
- Flavor Explosion: The genuine speculoos cookie butter brings a caramel‑spice depth that plain cream cheese can’t match, turning each bite into a nostalgic yet sophisticated experience.
- Texture Harmony: A crunchy cookie crust, a velvety mousse, and a glossy chocolate drizzle create layers that play together like a perfectly choreographed dance.
- Simplicity: No oven, no heavy lifting, just a few bowls and a whisk—ideal for anyone who hates heat and cleanup.
- Unique Ingredient: Real cookie butter (speculoos spread) is the secret weapon; it binds, flavors, and adds that unmistakable spice.
- Crowd‑Pleaser: Even the most skeptical sweet‑tooth will admit this looks Instagram‑ready and tastes even better than it looks.
- Make‑Ahead Magic: These cups can sit in the fridge for up to 48 hours, getting even more flavorful as the ingredients meld.
- Portion Control: Served in individual cups, you get the perfect single‑serve indulgence without the guilt of over‑eating.
- Versatile Base: Swap the cookie crust for almond flour or gluten‑free biscuits for a dietary twist without losing the essence.
Inside the Ingredient List
The Flavor Base
The star of this dessert is the cookie butter—speculoos spread that tastes like a caramelized gingerbread cookie. It’s not just a flavor enhancer; it acts as a natural emulsifier, binding the cream cheese and whipped cream into a stable mousse. Skipping it would leave you with a bland, watery mixture that never sets. If you can’t find speculoos, try a high‑quality Biscoff spread; the flavor profile is close enough to keep the magic alive.
The Texture Crew
Crushed cookies and melted butter form the crust. The butter adds richness and helps the crumbs stick together, while the cookies provide that satisfying crunch. If you’re looking for a gluten‑free alternative, use gluten‑free oat biscuits—just make sure they’re not overly sweet, or you’ll throw off the balance. For a richer mouthfeel, you can swap half the butter for coconut oil, which adds a subtle tropical note.
The Unexpected Star
Heavy whipping cream is whipped to soft peaks before being folded in, giving the mousse its airy lift. The cream’s fat content is crucial; low‑fat alternatives will result in a dense, less decadent texture. If you’re dairy‑free, coconut cream works surprisingly well, though it will add a coconut aroma that pairs nicely with the spice of the cookie butter.
The Final Flourish
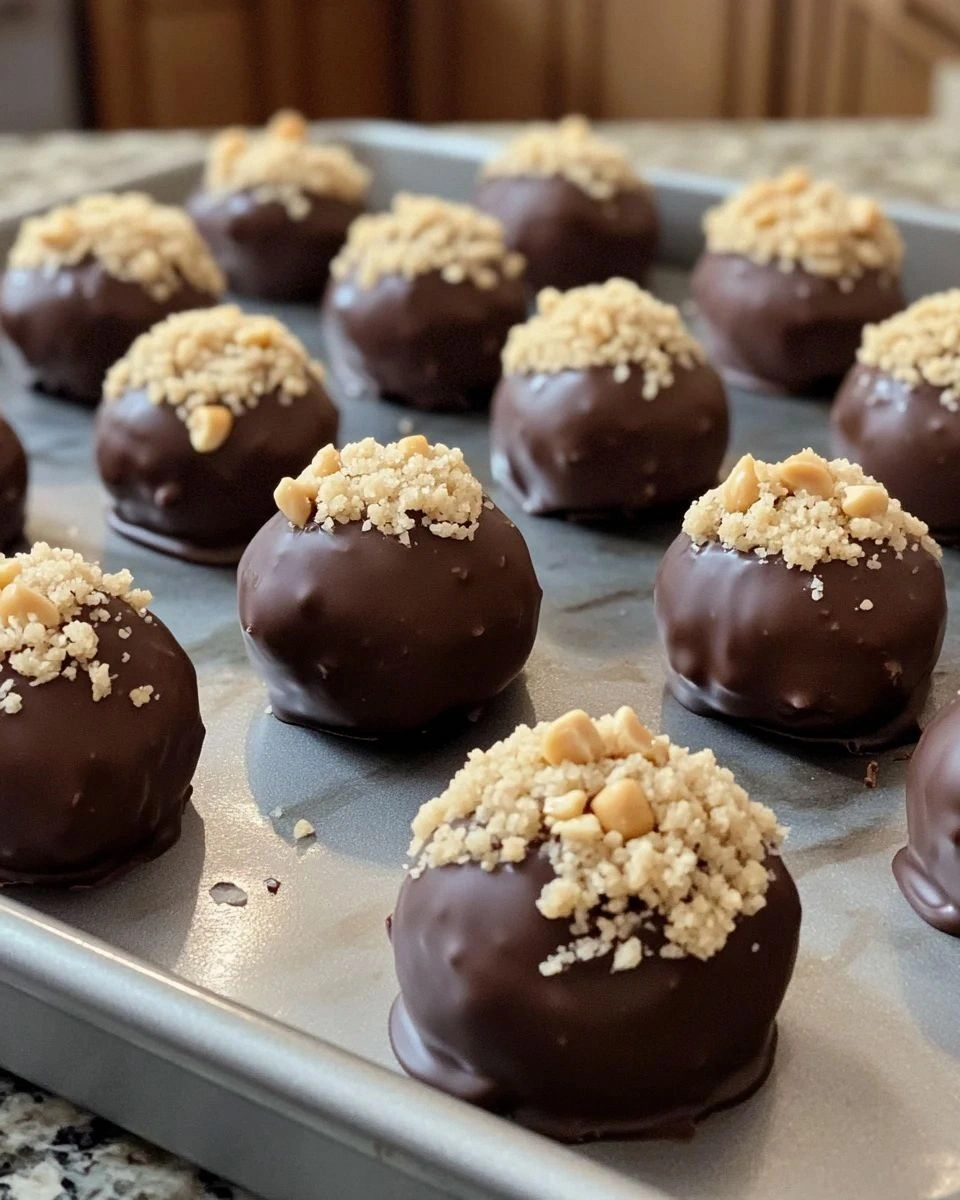
A drizzle of dark chocolate adds a bitter contrast that cuts through the sweet richness, while a pinch of sea salt amplifies every flavor note. If you love a little crunch, sprinkle toasted hazelnuts on top just before serving. These final touches turn a simple cup into a multi‑dimensional dessert experience.
Everything's prepped? Good. Let's get into the real action...
The Method — Step by Step
Start by crushing 2 cups of speculoos cookies (or any spiced cookie) into fine crumbs. I like to use a food processor for an even texture, but a zip‑top bag and a rolling pin work just as well. Once crushed, spread the crumbs onto a baking sheet and toast them in a dry skillet over medium heat for about 2 minutes, stirring constantly. You’ll hear a faint sizzle—that’s the sound of flavor deepening. When they’re golden and fragrant, set them aside to cool.
Melt ½ cup of unsalted butter until it’s just bubbling—no browning. Pour the melted butter over the cooled crumbs and stir until every particle is glossy and clinging together. This is the moment where the crust becomes a solid foundation, not a crumbly mess. Press the mixture firmly into the bottom of four 6‑ounce serving cups, using the back of a spoon to level it. Chill the crust in the freezer for 10 minutes while you prep the filling.
Kitchen Hack: Freeze the crust for a full 10 minutes; this prevents it from softening when the warm filling is added.In a large bowl, combine 16 oz (2 cups) of softened cream cheese with 1 cup of cookie butter. Using an electric mixer on medium speed, beat until the mixture is smooth and glossy—think satin, not grainy. Add ½ cup of powdered sugar and 1 tsp vanilla extract, then continue beating until the sugar dissolves completely. The aroma of vanilla mingling with the spiced butter should make your kitchen smell like a bakery on a crisp autumn day.
In a separate chilled bowl, whip 1 cup of heavy whipping cream to soft peaks. This takes about 2–3 minutes; you’ll see the cream start to hold its shape but still be slightly fluid. Gently fold the whipped cream into the cream cheese‑cookie butter mixture, using a spatula and a gentle hand. This folding technique preserves the air you just whipped in, giving the mousse its light, melt‑in‑your‑mouth quality.
Watch Out: Over‑mixing at this stage will deflate the whipped cream, resulting in a dense, heavy mousse.Now comes the “pure magic” step: spoon the airy mousse over the chilled crusts, filling each cup about three‑quarters full. Smooth the tops with the back of a spoon or a small offset spatula. The mousse should sit like a soft cloud, with the crust peeking out just at the edges. If you notice any lumps, give the bowl a quick whisk—this is the time to fix them.
Place the filled cups back into the refrigerator for at least 30 minutes, but ideally 2 hours. This chilling period allows the mousse to set without becoming icy. The texture should become firm enough that a gentle tap on the cup’s side makes a subtle wobble, like gelatin that’s just set.
While the cups are chilling, melt ¼ cup of dark chocolate (70% cacao) in a double boiler or microwave in 20‑second bursts, stirring in between. Once smooth, drizzle the chocolate over the tops of each cup in a zig‑zag pattern. The chocolate should harden quickly, forming a glossy finish that contrasts the creamy interior.
Kitchen Hack: Add a pinch of sea salt to the melted chocolate for a subtle salty‑sweet pop that elevates the flavor.Finish each cup with a final garnish: a light dusting of crushed cookie crumbs, a sprinkle of flaky sea salt, or a few toasted hazelnut pieces. This adds texture and visual appeal, making the dessert look as good as it tastes. Serve chilled, and watch as your guests’ eyes widen with anticipation.
That’s it — you did it. But hold on, I’ve got a few more tricks that’ll take this to another level, like a secret sauce that makes the mousse even silkier, or a quick freezer flash that guarantees perfect set‑up every single time. Stay with me here — this is worth it.
Insider Tricks for Flawless Results
The Temperature Rule Nobody Follows
Never, ever add cold cream cheese straight from the fridge into a warm mixture. Let it sit at room temperature for at least 30 minutes; this prevents lumps and ensures a silky base. I once tried to skip this step, and the result was a grainy mess that never set properly. The rule of thumb: if the butter is melted, the cheese should be soft, not cold.
Why Your Nose Knows Best
When the cookie butter hits the cream cheese, you’ll notice a sweet, caramel‑spice aroma intensify. Trust that nose cue—if you can smell the buttery notes blooming, the mixture is ready for the next step. If the scent is muted, give it another minute of beating; the flavors need time to meld. This sensory checkpoint saves you from a bland final product.
The 5‑Minute Rest That Changes Everything
After folding the whipped cream, let the mousse sit for five minutes before spooning it into the cups. This short rest lets any air bubbles rise to the surface, resulting in a smoother texture. Skipping this pause can leave tiny pockets that feel like unwanted bubbles on the tongue. It’s a tiny habit that makes a massive difference.
Chocolate Drizzle Discipline
When drizzling chocolate, work quickly but deliberately. If the chocolate cools too fast, it will clump and create uneven patches. Keep a small bowl of warm water nearby to re‑melt any hardened chocolate in seconds. This trick keeps the drizzle glossy and uniform, looking restaurant‑grade.
Freezer Flash for the Ultimate Set
If you’re short on time, after filling the cups, pop them in the freezer for 15 minutes instead of the full 2‑hour fridge chill. The mousse will set firm enough to serve, though it won’t develop the same depth of flavor as a slower chill. Use this hack for last‑minute parties, but remember the texture will be slightly firmer.
Creative Twists and Variations
This recipe is a playground. Here are some of my favorite ways to switch things up:
Nutty Delight
Swap half of the cookie crust for finely chopped toasted almonds. The nutty crunch pairs beautifully with the spice of the cookie butter, and the almond oil adds a subtle richness. Perfect for anyone who loves a bit of extra texture.
Coffee Kick
Add 1 tablespoon of instant espresso powder to the cream cheese mixture. The coffee’s bitterness balances the sweet cookie butter, creating a mocha‑like profile that’s perfect for an after‑dinner pick‑me‑up.
Berry Burst
Fold in a handful of fresh raspberry puree after the whipped cream is incorporated. The tartness of the berries cuts through the richness, offering a refreshing contrast that feels light yet indulgent.
Vegan Version
Replace cream cheese with a vegan cream cheese alternative, use coconut cream instead of heavy cream, and choose a dairy‑free cookie butter. The flavor shifts slightly, but the overall texture remains luxuriously creamy.
Spiced Rum Infusion
Stir in 1 tablespoon of dark spiced rum into the mousse before filling the cups. The rum adds a warm, boozy note that deepens the dessert’s complexity—ideal for adult gatherings.
Storing and Bringing It Back to Life
Fridge Storage
Cover the cups tightly with plastic wrap or store them in an airtight container. They’ll stay fresh for up to 48 hours, with the flavors continuing to meld. When ready to serve, let them sit at room temperature for 5 minutes for the perfect bite.
Freezer Friendly
These cups freeze beautifully. Place them on a baking sheet, freeze solid for 2 hours, then transfer to a zip‑top freezer bag. They’ll keep for up to 2 weeks. To re‑serve, thaw in the fridge overnight, then add a tiny splash of milk or cream before giving a gentle stir—this revives the mousse’s silkiness.
Best Reheating Method
If you prefer a slightly warmed dessert, microwave a single cup for 10–12 seconds, then drizzle fresh chocolate on top. Adding a splash of water (about 1 teaspoon) before microwaving creates a gentle steam that prevents the mousse from becoming rubbery.