It started with a burnt crust and a kitchen that smelled like regret. I was trying to impress a group of friends with a dessert that would be the talk of the night, but the pie shell collapsed into a soggy mess that looked more like a sad pancake than a polished pastry. The moment the timer dinged, I could hear the faint hiss of the oven, and the air filled with a bitter sweetness that made me question every ingredient I’d added. That disaster became the spark that lit a fire in me – a fire to create a vanilla cream pie that would never again crumble under pressure.
Picture this: the kitchen is bathed in the golden glow of late afternoon sunlight, the air carries the rich perfume of vanilla beans, and the sound of a whisk slicing through a thickened custard is punctuated by the rhythmic clink of a metal spoon. You can taste the subtle sweetness of sugar melting into milk, feel the silky texture of the filling sliding over your tongue, and see the glossy sheen of a perfectly baked crust. The sound of a fork digging into the custard releases a burst of warm, buttery aroma that makes your mouth water before you even take a bite. The feeling of holding the pie, the weight of anticipation, and the quiet hum of the refrigerator all combine into a sensory symphony that draws you into the moment.
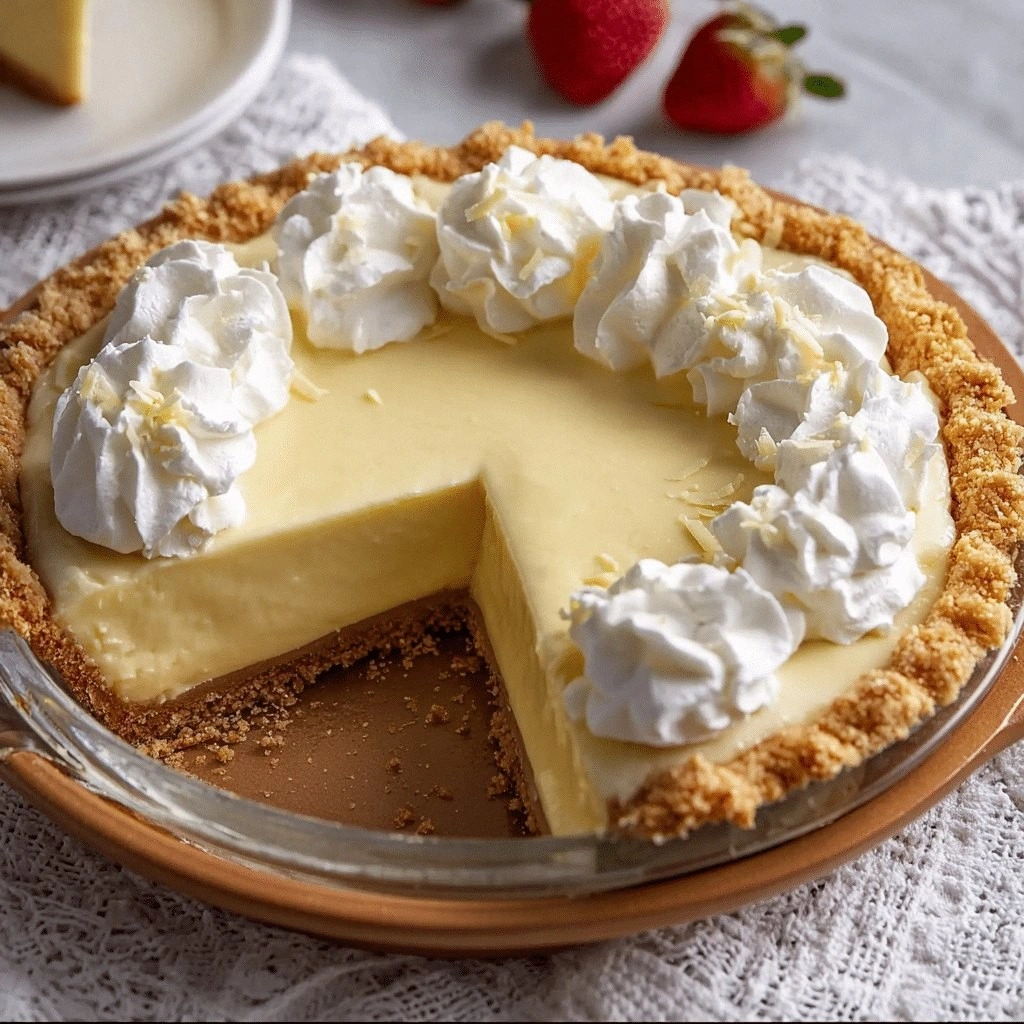
What sets this version apart is that it’s not just a recipe; it’s a manifesto for vanilla lovers. I’ve stripped away the fluff, kept the technique sharp, and added a dash of science to ensure the custard never curdles. The crust is baked to a perfect golden brown with a crisp edge that shatters like thin ice when you slice through it, while the filling is silky, airy, and holds its shape like a cloud on a spoon. The result is a dessert that feels like a hug in a cup, and the best part? It’s a piece of art you can serve at any gathering, and it will leave your guests begging for seconds.
And here’s the kicker: I’m going to show you how to incorporate a single, unexpected ingredient that turns an ordinary vanilla pie into a showstopper – a touch of espresso powder that deepens the flavor profile without making it taste like coffee. If you’re ready for a taste that will have everyone asking for the recipe, let me walk you through every single step. By the end, you’ll wonder how you ever made it any other way.
What Makes This Version Stand Out
- Flavor: The combination of fresh vanilla extract and a hint of espresso creates a depth that ordinary pies lack, giving each bite a nuanced, almost velvety richness.
- Texture: The custard is light and airy, achieved by whisking the eggs with sugar until they reach a pale, fluffy consistency before cooking, preventing any gritty surprises.
- Crust: A pre-baked, buttery crust with a slightly crisp edge adds contrast, while the interior remains tender and buttery, balancing the filling’s silkiness.
- Simplicity: With just eight core ingredients, the recipe is approachable for beginners yet refined enough for seasoned bakers.
- Make‑ahead: The pie can be assembled up to a day ahead, allowing flavors to meld while you focus on other dishes.
- Presentation: A final swirl of whipped cream and a dusting of powdered sugar turns a simple dessert into a gallery-worthy centerpiece.
- Audience: Whether you’re hosting a family dinner or a casual brunch, the pie’s sweet, comforting profile appeals to all ages.
Alright, let’s break down exactly what goes into this masterpiece. And before we dive into the ingredient details, here’s a quick kitchen hack that will save you time and effort.
Inside the Ingredient List
The Flavor Base
At the heart of this pie is the vanilla. I use a combination of vanilla bean paste and vanilla extract to double the flavor intensity. The paste adds a natural, unadulterated vanilla note, while the extract brings a smooth finish that ties the custard together. Skipping either one will leave the filling tasting flat, like a song missing its chorus.
The Texture Crew
Cornstarch and eggs work together to create that silky custard that doesn’t clump. Cornstarch thickens the mixture without adding any grit, while eggs provide structure and a glossy sheen. If you substitute cornstarch with flour, the custard will be denser and may develop a chalky texture. I recommend using whole eggs for a richer flavor, but if you prefer a lighter bite, use just the yolks.
The Unexpected Star
Espresso powder is the secret ingredient that elevates this pie. A teaspoon of finely ground espresso powder deepens the vanilla’s sweetness and adds a subtle, almost chocolatey undertone. If you’re a coffee aficionado, this is your moment to shine. If you’re not a fan of coffee, simply omit it; the pie will still be divine.
The Final Flourish
Heavy cream and butter finish the custard, giving it a luscious mouthfeel and a buttery aftertaste that lingers. The cream’s fat content ensures a smooth, velvety texture, while the butter adds a subtle richness that balances the sweetness. A pinch of salt is the unsung hero that enhances every flavor note, so don’t skip it.
Everything's prepped? Good. Let’s get into the real action.
The Method — Step by Step
- Preheat the Oven. Set your oven to 375°F (190°C) and let it settle. The heat needs to be consistent to ensure a perfectly baked crust. I dare you to taste this and not go back for seconds once the first slice arrives on your plate.
- Prepare the Crust. If you’re using a store-bought crust, pre-bake it for 8 minutes to set the base. For a homemade crust, roll out your dough to a 9-inch diameter, line a pie tin, and bake for 12 minutes or until the edges turn golden. Watch out: overbaking will lead to a dry center that clings to the filling.
- Whisk the Custard. In a medium saucepan, combine milk, heavy cream, and vanilla bean paste. Heat over medium heat until a light steam rises, but avoid boiling. Meanwhile, in a separate bowl, whisk eggs, sugar, and a pinch of salt until pale and fluffy. This airy base will keep the custard from curdling.
- Incorporate Cornstarch. Stir cornstarch into the milk mixture until fully dissolved. This step is crucial; any lumps will ruin the silky texture. I’ve learned that a fine-mesh sieve helps to eliminate clumps, ensuring a flawless custard.
- Combine Wet and Dry. Slowly pour the milk mixture into the egg mixture, whisking constantly. This gradual integration prevents the eggs from scrambling. The custard should thicken to a consistency that coats the back of a spoon, like a thick glaze.
- Add Espresso. Stir in the espresso powder until fully incorporated. The aroma of coffee will mingle with vanilla, creating a complex bouquet. This is the moment of truth—if you’re hesitant, taste a small spoonful; the depth will convince you.
- Finish with Butter. Gently melt butter and fold it into the custard. The butter’s sheen will give the filling a glossy finish and a buttery aftertaste. Allow the mixture to cool slightly before pouring into the crust to avoid cooking the eggs prematurely.
- Fill and Bake. Carefully pour the custard into the pre-baked crust, smoothing the top with a spatula. Bake for 25–30 minutes, or until the filling is set but still slightly wobbly in the center. The edges should pull away from the crust, indicating readiness.
- Cool and Chill. Remove the pie from the oven and let it cool on a wire rack for 10 minutes. Then refrigerate for at least 2 hours, preferably overnight, to allow the custard to set fully. A well-chilled pie offers a dramatic contrast between the cold custard and the warm crust.
- Serve with Style. Before serving, top the pie with a generous swirl of whipped cream and a dusting of powdered sugar. A few fresh berries or a drizzle of caramel sauce can add visual flair. And there you have it—an indulgent vanilla cream pie that will have everyone asking for the recipe.
That’s it— you did it. But hold on, I've got a few more tricks that'll take this to another level.
Insider Tricks for Flawless Results
The Temperature Rule Nobody Follows
Many bakers bake the crust at too high a temperature, causing it to brown too quickly and become brittle. I recommend baking at 375°F (190°C) for the first 10 minutes, then reducing to 350°F (175°C) for the remaining time. This gentle approach ensures a golden, buttery base that holds up to the custard without cracking.
Why Your Nose Knows Best
The aroma of vanilla and espresso is a reliable indicator of flavor development. If you notice a faint, burnt smell, the custard is overcooked. The scent should be warm, sweet, and slightly nutty—like a freshly brewed cup of coffee mingling with a vanilla cake.
The 5‑Minute Rest That Changes Everything
After baking, let the pie rest on a rack for exactly 5 minutes before cutting. This pause allows the custard to set just enough so the slices stay intact. Cutting too early can cause the filling to spill over, turning a masterpiece into a messy mishap.
Using a Pie Shield
If you’re worried about the crust overbrowning, place a pie shield over the edges during the last 10 minutes of baking. This shield protects the delicate crust while still allowing the custard to set perfectly.
Refrigeration Trick
For a smoother finish, chill the pie for at least 4 hours before serving. If you’re short on time, a quick 30‑minute chill will still yield a firm custard that’s easy to slice. The cold temperature enhances the buttery flavor and makes the pie feel like a chilled dessert.
Creative Twists and Variations
This recipe is a playground. Here are some of my favorite ways to switch things up:
Caramel Swirl Delight
Drizzle caramel sauce over the custard before baking, then swirl with a fork to create a marbled effect. The sweet, buttery caramel pairs beautifully with the vanilla, adding a caramelized crunch to each bite.
Almond Crunch Upgrade
Fold toasted almond slivers into the custard before baking. The nutty crunch contrasts with the silky filling, creating a delightful textural play that’s perfect for nut lovers.
Chocolate‑Vanilla Fusion
Replace half of the milk with dark chocolate‑infused milk and add a pinch of sea salt. The chocolate deepens the flavor while the sea salt balances the sweetness, resulting in a decadent dessert.
Berry‑Infused Twist
Add a handful of fresh blueberries to the custard before baking. The berries release their juices, adding a subtle tartness that cuts through the richness, making the pie refreshing on a hot day.
Spiced Pumpkin Variation
Stir in a tablespoon of pumpkin puree and a dash of cinnamon into the custard. This variation transforms the pie into a cozy, autumnal treat that’s perfect for holiday gatherings.
Cheesecake Layer
Layer a thin slice of cream cheese over the custard before the final bake. The creamy layer adds a tangy contrast that elevates the dessert to a sophisticated, multi‑layered experience.
Storing and Bringing It Back to Life
Fridge Storage
Store the pie in the refrigerator for up to 3 days, covered loosely with plastic wrap. The custard will firm up, making it easier to slice. When you’re ready to serve, let it sit at room temperature for 10 minutes to soften slightly.
Freezer Friendly
Wrap the pie tightly in plastic wrap and then aluminum foil before freezing. It can be stored for up to 2 months. When you’re ready to enjoy, thaw in the refrigerator overnight. A quick 10‑minute heat‑up in a 350°F oven will restore its fresh, warm texture.
Best Reheating Method
To reheat the pie, preheat the oven to 350°F (175°C). Place the pie on a baking sheet and bake for 10 minutes. Add a tiny splash of water before reheating—it steams back to perfection, keeping the custard moist and preventing it from drying out.