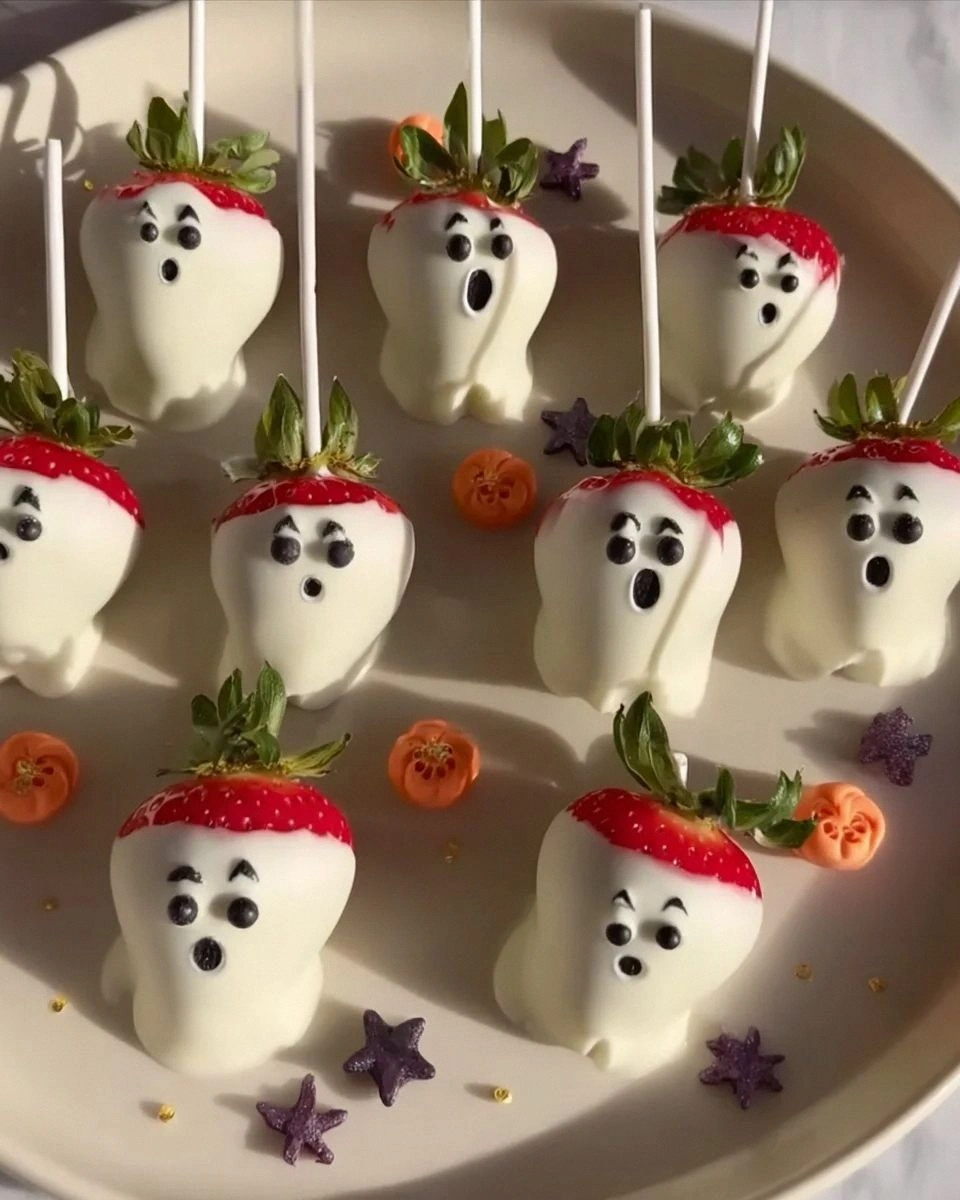
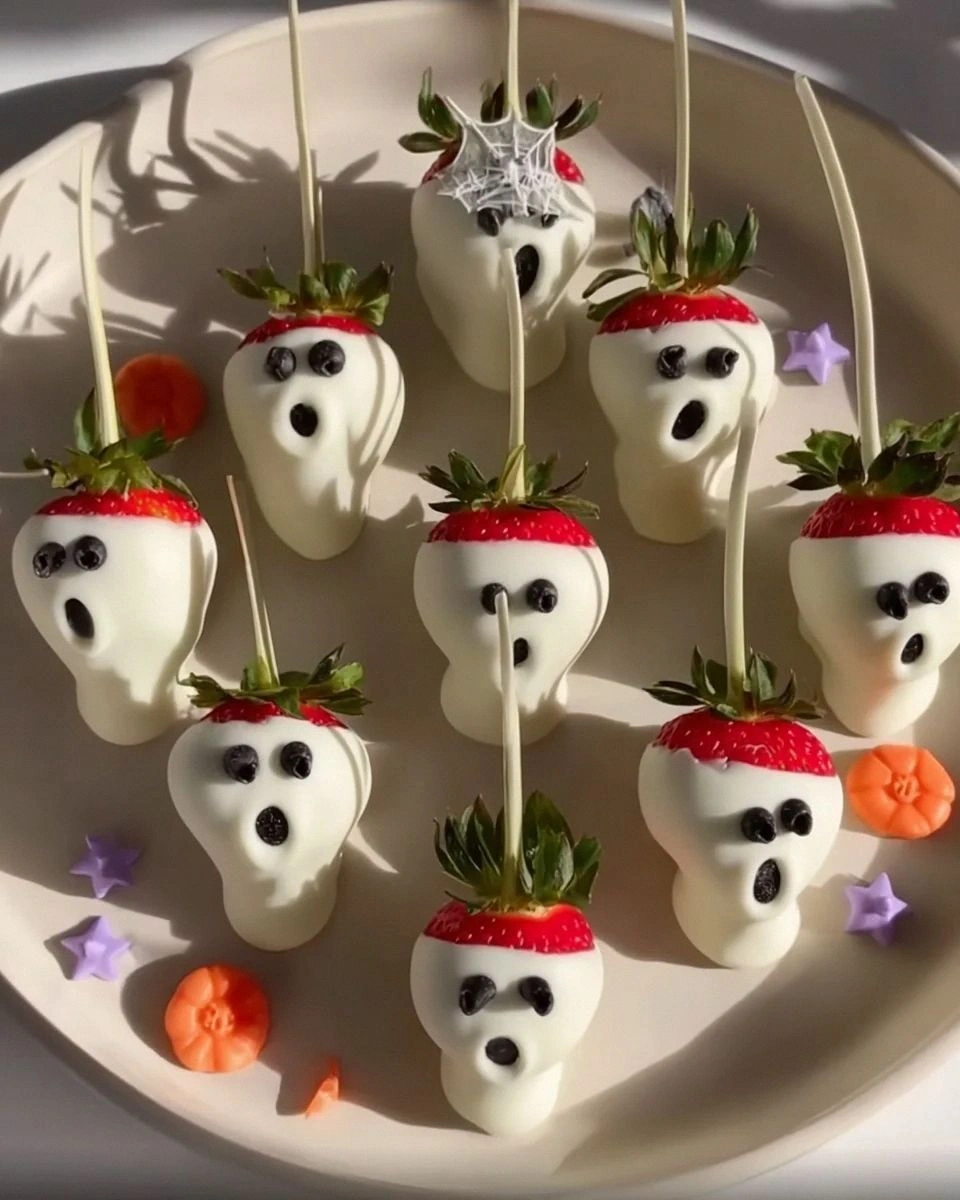
I still remember the Halloween potluck where my "adorable" ghost strawberries turned into a melted white-chocolate crime scene. The chocolate seized, the berries wept juice like they'd watched a sad movie, and my ghosts looked more like lumpy mummies after a rainstorm. I laughed it off, but inside I was plotting revenge—on the recipe, not my coworkers. Fast-forward through three grocery runs, two thermometers, and one very patient dog who taste-tested every batch, and here we are: Scary Berry Ghosts that actually float (metaphorically) above the rest. Picture crisp, cold berries wearing silky white-chocolate cloaks that snap when you bite, their faces drawn in dark-chocolate smiles sharp enough to make a jack-o'-lantern jealous. The kitchen smells like a vanilla bean had a wild night with a cacao plantation, and the only thing scary is how fast they disappear.
This version is the culmination of every late-night spatula flip, every "why is my chocolate gray?" Google spiral, and every swear word muttered over a seized bowl of expensive couverture. We're talking glossy shells that hold up in humid October air, berries that stay juice-locked instead of bleeding out, and expressions so cute-slash-creepy that even the teenager who thinks everything is "lame" will grab three. I dare you to taste one and not immediately start plotting how many trays you can fit in your fridge. If you've ever struggled with chocolate that clumps like wet sand or ghosts that look like they melted in a microwave, you're not alone—and I've got the fix.
Okay, ready for the game-changer? We're going to temper chocolate without a marble slab or fancy probe, using just your microwave, a grater, and a secret "seed and stir" rhythm that feels like a kitchen magic trick. The berries get a pre-game ice bath so they sweat confidence instead of juice. And the faces? A simple snip of a sandwich bag turns you into the Tim Burton of dessert. Stay with me here—this is worth it. By the end you'll wonder how you ever made it any other way.
What Makes This Version Stand Out
Ghost-White Shell: We're using a sneaky microwave-seeding method that gives bakery-level gloss without candy thermometers or swearing. The chocolate sets snappy and room-temperature stable, so your ghosts won't pull a sad-droopy scare before the party starts.
Zero Weep Berries: A five-minute ice-water shock plus a fan-dry step locks in crimson juice so your white canvas stays pristine. Most recipes skip this and wonder why their ghosts look like they survived a horror-movie bloodbath.
Speed Demon: From fridge to finished in twenty minutes active time—faster than carving a pumpkin that refuses to cooperate. Perfect for the friend who texts "bring something spooky" two hours before the party.
Kid-Proof Face Art: One sandwich bag, one snip, endless expressions—no pastry-school piping skills required. Even my left-handed nephew who can't draw a stick figure managed mischievous grins on his first go.
Make-Ahead Friendly: These ghosts happily haunt your fridge for three days or freeze for a month, stacking between parchment like edible playing cards. Future you will feel smug when guests assume you slaved all day.
crowd Gasps: They look boutique-bakery fancy but cost pocket change per ghost. I watched a roomful of food-snob adults fight over the last tray like it was the last lifeboat on the Titanic.
Inside the Ingredient List
The Flavor Base
Start with the strawberries themselves—choose medium berries about the size of a ping-pong ball. Too small and your ghosts look like anemic jelly beans; too large and they're melon-headed monsters. The surface should be ruby-red, glossy, and free of bruises because chocolate magnifies every dent like high-definition TV for fruit. If you can only find mammoth berries, just slice a sliver off the bottom so they stand upright without toppling like drunk ghosts. And please, buy them the day you plan to dip; strawberries are drama queens that age faster than avocado toast on Instagram.
The Texture Crew
White chocolate gets a bad rap, but use one with real cocoa butter (check the label—if it says "palm kernel oil," back away slowly). The cocoa butter crystals are what give that satisfying snap when you bite through the ghostly robe. I reach for a bar that's 30% cocoa solids; anything paler tastes like sugary plastic. If you're dairy-free, coconut-milk white chocolate works, though your ghosts will have a faint tropical tan. And no, almond bark is not invited to this party—it melts into a waxy puddle that tastes like a candle had an identity crisis.
The Unexpected Star
Coconut oil is the stealth weapon that thins the chocolate just enough for a sheer, even coat without the dreaded gloppy sweater look. A mere teaspoon per cup of chocolate does the trick, and it helps the shell set glassy even if your kitchen is steamy from a cauldron of chili. Refined coconut oil is neutral-flavored; unrefined gives a faint coconut that whispers "tropical vacation" under the vanilla. Either works—just don't skip it or you'll be wrestling thick chocolate that tears berries apart like a zombie movie. If you're anti-coconut, use half a teaspoon of neutral oil, but know the shine won't be quite as mirror-perfect.
The Final Flourish
For the faces, grab bittersweet chocolate chips and melt a tablespoon in the microwave for fifteen-second bursts until just fluid. You want it slightly thicker than the dipping chocolate so the expressions hold sharp edges instead of bleeding into Rorschach blots. A sandwich bag becomes your piping corral—snip the tiniest corner, about the width of a sewing needle. Any bigger and your ghosts will look like they applied eyeliner during an earthquake. Store the leftover face chocolate in the fridge; it keeps for weeks and is perfect for late-night "I need something sweet" emergencies.
Everything's prepped? Good. Let's get into the real action...
The Method — Step by Step
- Fill a big bowl halfway with ice water and plunge the strawberries in for five minutes. This mini arctic vacation tightens the cell walls so they won't leak red tears later. Swirl them like you're churning a cold jacuzzi, then lift onto paper towels and gently pat every droplet away. Even a single sneaky bead of water will seize chocolate faster than you can say "boo." While they chill, line a sheet pan with parchment—your ghosts will need a clean place to rest after their dip.
- Grate your white chocolate on the fine side of a box grater into a microwave-safe bowl. Those tiny shards melt uniformly so you skip the lava-hot spots that scorch and turn chocolate grainy. Add the coconut oil and toss to coat; think of it as giving every shaving a lightweight jacket. Microwave on 50% power for twenty-second bursts, stirring like you're mixing clouds between each zap. When most but not all chocolate is melted, stop—residual heat will finish the job and keep temper on track.
- Drop a tablespoon of unmelted grated chocolate into the bowl and stir gently for thirty seconds. This "seeds" the melted chocolate with the stable crystals it needs to set shiny and snap. Resist the urge to crank the heat; patience here is the difference between ghostly gloss and chalky streaks. The mixture should coat a spoon like heavy cream and drip in slow ribbons. If it looks like pudding, you've gone too far—add a few more unmelted shavings and stir to rescue.
- Hold a strawberry by the leafy crown and dip straight down into the chocolate, twisting gently as you lift so excess streams back into the bowl in a silky ribbon. Aim for a thin veil—too thick and your ghost will look like it's wearing a marshmallow sleeping bag. Let it hover for two seconds so the chocolate sets slightly, then place on parchment. Repeat, working quickly; chocolate waits for no one.
- Slide the tray into the fridge for five minutes to set the shell. Meanwhile, melt the bittersweet chocolate for faces. Spoon it into a sandwich bag, press out air, seal, and snip the tiniest corner—think ant eyelashes. Pipe two dots for eyes and an oval mouth; work fast so you finish before the dipped berries lose their chill. If you hesitate, the warm face chocolate will melt tiny craters into the white shell.
- Return the finished ghosts to the fridge for another ten minutes to fully crystallize. During this time, clean your bowl and spatula; hardened chocolate peels off like stickers if you use warm water first, then cold. Resist nibbling the spare face chocolate—you'll want it for touch-ups. When the timer dings, lift a ghost gently from the parchment; it should release with a satisfying snap. If it sticks, give it another minute to firm up.
- Arrange on a platter, cover loosely with plastic wrap, and refrigerate until serving. They'll keep three days chilled or a month frozen—layer between parchment in an airtight box so the faces don't smudge. Bring to room temp for five minutes before serving for the snappiest bite. That first crunch followed by cold berry juice is basically autumn fireworks in your mouth.
That's it—you did it. But hold on, I've got a few more tricks that'll take this to another level...
Insider Tricks for Flawless Results
The Temperature Rule Nobody Follows
Your berries should be cold, your kitchen cool, and your chocolate warm but not hot. If any one of those variables flips, you get bloom—that dusty gray haze that makes ghosts look like they've been haunting a damp attic. I aim for berries straight from a 35°F fridge and a room no warmer than 72°F. On muggy days, I shut off the oven, crack a window, and fan the countertop like I'm auditioning for a cooking show. The chocolate stays glossy, the faces stay sharp, and you stay smug.
Why Your Nose Knows Best
Smell the chocolate before you melt—if it smells like vanilla frosting, you're golden. If it smells like cardboard, it's past prime and will taste waxy no matter how perfectly you temper. Trust the sniff test; it's saved me from serving guests chocolate that tastes like the inside of an old purse. And while you're at it, taste a berry too. A sour berry will only taste more sour once cloaked in sweet chocolate, so balance is everything.
The 5-Minute Rest That Changes Everything
After dipping, let the tray sit uncovered in the fridge for exactly five minutes before piping faces. This flash-set locks the surface so the warm bittersweet chocolate doesn't melt craters. Too long and condensation beads; too short and you risk smearing. Set a timer—this isn't the moment to start scrolling memes. Your future Instagram post will thank you when the faces look hand-painted by a meticulous ghost artist.
Storage Ninja Move
Slip a silica gel packet (the kind from shoe boxes) into the storage container. It absorbs rogue moisture so your ghosts stay crisp, not sticky. Just nestle it under the parchment so no one accidentally munches desiccant. I've kept ghosts pristine for a full week this way—perfect for stretching Halloween spirit without nightly kitchen sessions.
Revive the Snap
If your ghosts lose their crunch after a day in a humid fridge, pop them into a 60°F oven for five minutes. The gentle warmth re-tempers the surface without melting the faces. Cool again before serving and you'll hear that satisfying crack when guests bite in. A friend tried skipping this step once—let's just say it didn't end well, and the ghosts sagged like tired balloons.
Creative Twists and Variations
This recipe is a playground. Here are some of my favorite ways to switch things up:
Mocha Phantom
Swap half the white chocolate for milk chocolate and add a teaspoon of espresso powder. The result is a cappuccino-colored ghost with a subtle coffee bite that pairs ridiculously well with the berry tartness. Pipe the faces in white chocolate so they still stand out like glowing eyes in the night. Adults-only version: spike the espresso powder with a tablespoon of coffee liqueur before mixing.
Coconut Casper
Use coconut-oil-based vegan white chocolate and roll the wet dipped berries in unsweetened shredded coconut for a fuzzy ghost vibe. The coconut toasts slightly while setting, adding a campfire smell that makes October feel legit. Kids love the texture contrast, and the fiber makes parents feel slightly better about the sugar rush.
Midnight Spirits
Dip in dark chocolate instead of white, then paint ghostly white faces with a food-safe brush and melted cocoa-butter-based white coloring. The effect is a reverse negative that's stunning on a black platter. Bonus: dark chocolate's higher melting point means these ghosts survive warmer rooms without turning into puddles of regret.
Matcha Apparition
Whisk a teaspoon of culinary matcha into the white chocolate before dipping. The green hue reads "slightly sickly spirit," perfect for a gross-out kid party. Matcha's gentle bitterness balances the sweetness so grown-ups keep sneaking them too. Pipe faces in dark chocolate for maximum contrast.
Salted Caramel Specter
Stir a tablespoon of caramel extract and a pinch of flaky salt into the melted white chocolate. The salt amplifies vanilla notes and makes the berry flavor pop like a surprise tart cherry. Drizzle extra caramel over the set ghosts for a webbed effect that's both spooky and sticky-finger inducing.
Spicy Pumpkin Poltergeist
Add a pinch of pumpkin pie spice and a whisper of cayenne to the chocolate. The heat creeps up after the cool berry, creating a haunted-house sensation in your mouth. Serve with a shot of cold apple cider for the ultimate autumn temperature play. Guests will swear the ghosts are breathing fire.
Storing and Bringing It Back to Life
Fridge Storage
Layer ghosts in an airtight container between sheets of parchment. They'll stay perky for three days, though the faces may soften slightly after day two. Keep them away from strong-smelling foods like cut onions; chocolate absorbs odors like a sponge at a perfume counter. If condensation forms on the lid, crack it open for an hour to let moisture escape, then reseal.
Freezer Friendly
Freeze in a single layer until solid, then stack into a rigid container with parchment between layers. They'll keep a month—any longer and the berries become icy marbles. Thaw five minutes at room temp before serving for the snap to return. Do not microwave; you'll get ghost soup faster than you can say "poltergeist."
Best Reheating Method
There really isn't one—serve cold or at cool room temp for maximum crunch. If they've softened from fridge humidity, pop them into a 60°F oven for five minutes as mentioned above. Add a tiny splash of water in a separate cup inside the oven; the gentle steam rehydrates the berry just enough to taste fresh-picked without turning the chocolate dull.