I’ll be honest — the first time I tried to make cookie‑dough truffles, I ended up with a sticky mess that clung to the spoon like a love‑letter gone wrong. I was in the middle of a frantic Friday night, the fridge was half empty, and a friend dared me to create something that would make everyone forget about the pizza we’d ordered. The result? A handful of bite‑size balls that tasted like a dream but looked like a disaster. That moment sparked an obsession, and after countless trial‑and‑error sessions, I finally nailed the version that makes the kitchen smell like a bakery on a sugar high and the truffles melt in your mouth like butter on a hot pancake.
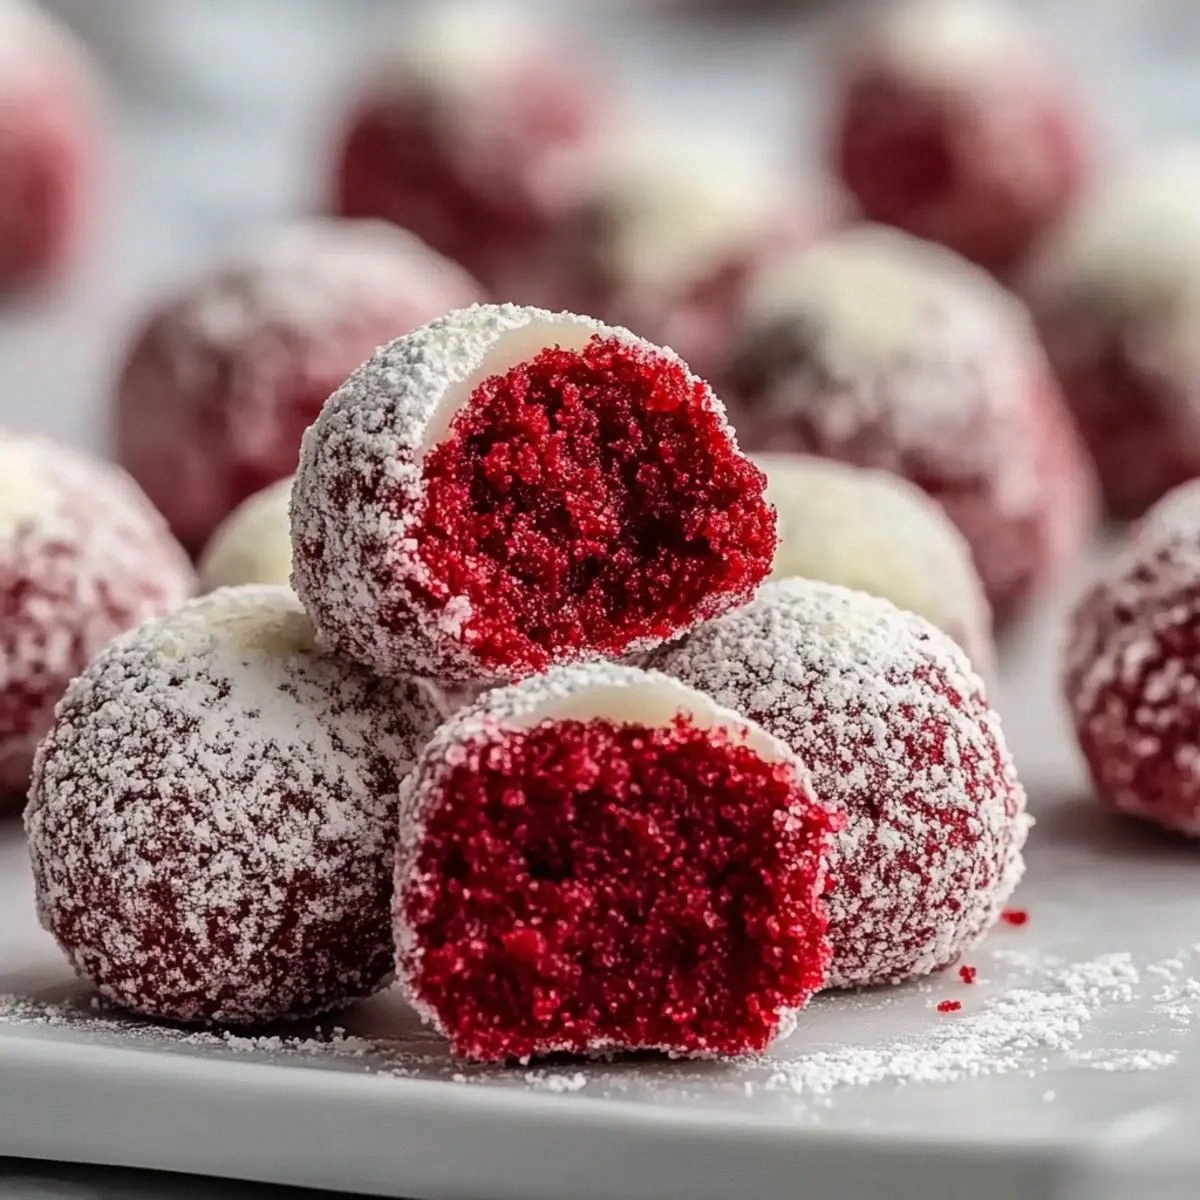
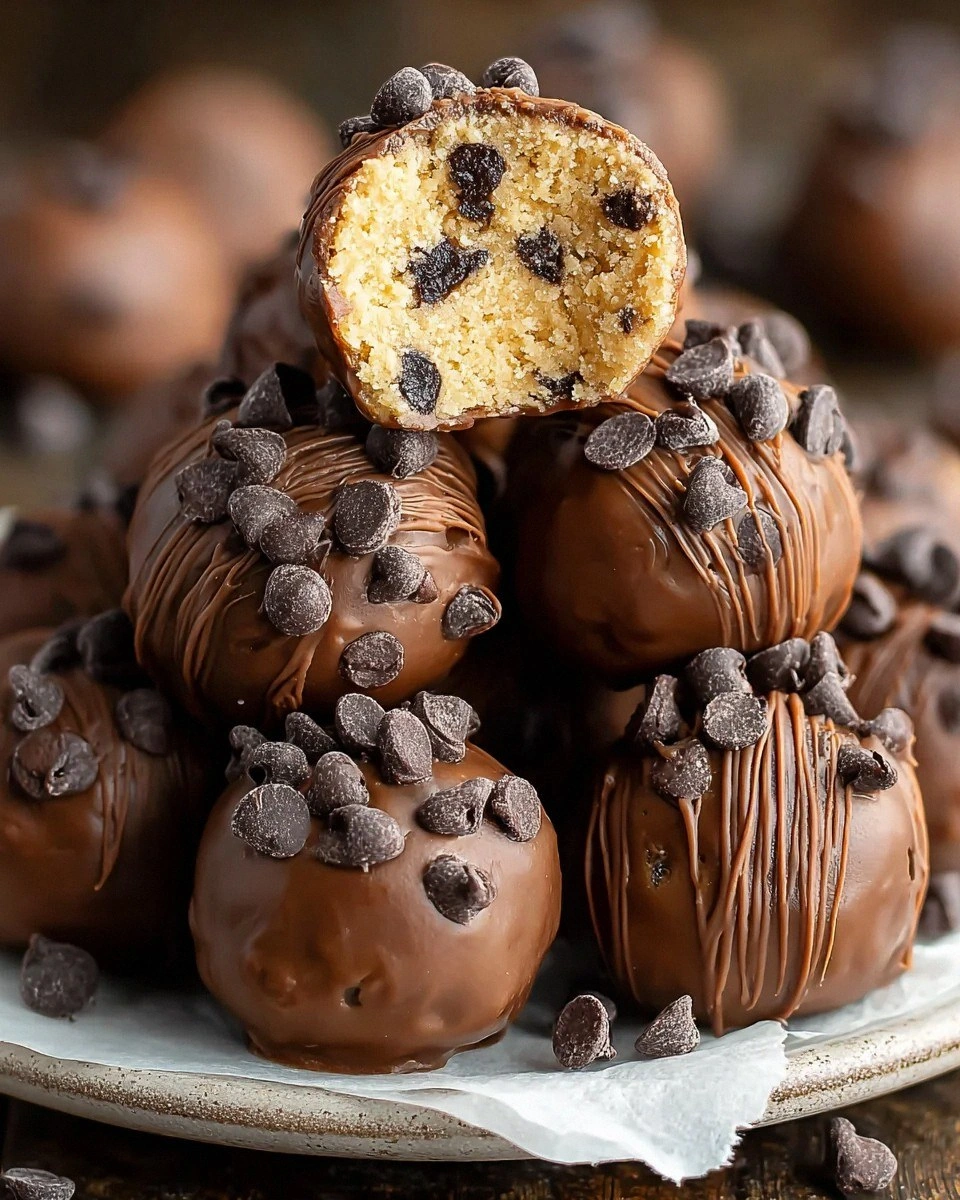
Picture this: a glossy, chocolate‑coated sphere that cracks open to reveal a soft, buttery dough studded with mini chocolate chips that pop like fireworks in your mouth. The first bite releases a warm, vanilla‑kissed aroma that wraps around your senses, while the outer shell gives a satisfying snap that’s as crisp as fresh autumn leaves underfoot. You’ll hear the faint whisper of the chocolate coating as it hits the parchment, a subtle sizzle that tells you it’s set just right. The dough itself feels like a cloud, airy yet dense enough to hold its shape, and the tiny chocolate chips add a burst of texture that’s nothing short of addictive.
What makes this recipe a cut above the rest? Most cookie‑dough truffle recipes skip the crucial step of heat‑treating the flour, which can leave you with a raw‑flour aftertaste that ruins the whole experience. I’m also throwing in a secret ingredient that gives the dough an extra layer of richness without turning it into a greasy mess. And the coating? I use a double‑dip method that creates a glossy, professional finish you’d expect from a high‑end patisserie. I dare you to taste this and not go back for seconds — you’ll be begging for the recipe before the plate is even empty.
Let me walk you through every single step — by the end, you’ll wonder how you ever made it any other way. Okay, ready for the game‑changer? This next part? Pure magic. We’ll start with the foundation, move through the dough, and finish with a chocolate coating that’s smoother than a silk scarf. Stay with me here — this is worth it.
What Makes This Version Stand Out
- Texture: The interior stays soft and chewy, while the exterior cracks with a crisp, chocolatey snap that’s impossible to resist.
- Flavor Depth: A balanced blend of brown and granulated sugar creates a caramel‑kissed sweetness that never feels one‑dimensional.
- Simplicity: Only ten ingredients, all pantry staples, and a few minutes of hands‑on work make this a weekend‑friendly treat.
- Safety First: Heat‑treated flour eliminates any raw‑flour worries, so you can eat these straight out of the bowl without a second thought.
- Visual Appeal: The glossy chocolate coating catches the light like a polished gemstone, making them Instagram‑ready.
- Make‑Ahead Magic: These truffles keep beautifully for up to two weeks, so you can prep ahead for parties or gift‑giving.
- crowd Reaction: Expect a chorus of “Wow!” and “More, please!” at any gathering — they disappear faster than fresh‑baked cookies.
- Versatility: Swap the chocolate coating for white chocolate or drizzle with caramel for a whole new experience.
Inside the Ingredient List
The Flavor Base
Unsalted butter is the cornerstone of our dough, providing that melt‑in‑your‑mouth richness that makes the truffles feel indulgent without being greasy. I recommend using high‑quality European butter for a deeper, creamier flavor that stands up to the chocolate coating. If you skip the butter, the dough becomes crumbly and loses its luxurious mouthfeel, turning the truffles into a dry, bland bite.
Brown sugar brings moisture and a subtle caramel note that pairs beautifully with the vanilla extract. Its molasses content adds depth, preventing the truffles from tasting overly sweet. You can substitute dark brown sugar for a richer flavor, but avoid white sugar alone, as it will make the dough too sweet and lack that comforting depth.
Granulated sugar adds a clean, bright sweetness that balances the earthiness of the brown sugar. It also helps create a slightly crisp edge on the interior when the truffles are chilled. If you’re watching your sugar intake, you can reduce it by a tablespoon without sacrificing texture.
The Texture Crew
All‑purpose flour provides the structural backbone of the dough. Heat‑treating it (baking at 350°F for 5 minutes) eliminates any raw‑flour concerns and gives the dough a subtle toasted flavor. Skipping this step can leave you with a raw, chalky bite that ruins the entire experience.
A pinch of salt is the unsung hero that amplifies every other flavor, making the sweetness feel less cloying and the chocolate coating pop. Too much salt will dominate, so stick to the recommended amount.
Mini chocolate chips are the hidden gems that burst with chocolatey goodness in every bite. Their small size ensures they stay evenly distributed throughout the dough, creating pockets of melty chocolate that surprise the palate. If you prefer a smoother dough, you can grind them into finer bits, but you’ll lose that delightful crunch.
The Unexpected Star
Semisweet chocolate chips form the decadent coating that turns these bite‑size treats into show‑stoppers. Choose a high‑cocoa‑percentage brand for a richer flavor and a glossy finish. If you opt for a lower‑cocoa chip, the coating may become too sweet and lose its snap.
Coconut oil or vegetable shortening is optional, but adding a tablespoon or two to the melted chocolate creates a silkier coating that hardens with a beautiful sheen. This trick is especially useful if your kitchen is warm; the extra fat prevents the chocolate from becoming grainy.
The Final Flourish
A splash of milk (just a tablespoon or two) helps bind the dough when it feels overly crumbly, giving you a pliable texture that’s easy to roll into perfect spheres. Too much milk will make the dough wet and cause the truffles to lose shape, so add it sparingly.
Everything's prepped? Good. Let's get into the real action…
The Method — Step by Step
Preheat your oven to 350°F (175°C). Spread the all‑purpose flour on a baking sheet and toast for 5 minutes, stirring halfway through. This heat‑treatment eliminates any raw‑flour concerns and adds a faint nutty aroma that will later deepen the dough’s flavor. Let the flour cool completely before measuring; this step is the secret that most recipes get wrong.
While the flour cools, melt the unsalted butter in a medium saucepan over low heat until it’s just bubbling, then remove from the heat. Add the brown sugar, granulated sugar, and a pinch of salt, stirring until the mixture looks glossy and the sugars have dissolved. This creates a caramel‑like base that coats the flour later, ensuring every bite is uniformly sweet.
Stir in the vanilla extract and, if the dough feels a bit dry, drizzle in one to two tablespoons of milk. The dough should be soft enough to hold together when pressed but not sticky. If it’s too crumbly, add another splash of milk; if it’s too wet, sprinkle a bit more flour.
Gradually fold the heat‑treated flour into the butter‑sugar mixture, stirring until just combined. Over‑mixing will develop gluten, resulting in a tough dough. At this stage, the dough should feel slightly crumbly but will come together when you press it.
Add the mini chocolate chips, distributing them evenly throughout the dough. This is where the magic happens — each chip will become a tiny molten surprise when you bite into the truffle. If you love extra chocolate, feel free to increase the mini chips by a quarter cup.
Cover the dough with plastic wrap and chill in the refrigerator for at least 30 minutes, or up to an hour if you’re in a hurry. Chilling firms the dough, making it easier to roll into uniform spheres. Watch the clock — if you rush this step, the truffles may spread during coating.
Using a small cookie scoop or a teaspoon, portion out the dough and roll each piece between your palms to form smooth, even balls about 1 inch in diameter. The goal is a uniform size so that each truffle cooks evenly and looks professional on the platter.
Place the rolled balls on a parchment‑lined baking sheet and freeze for 15 minutes. This quick chill sets the shape, making the coating step a breeze.
While the truffles are chilling, melt the semisweet chocolate chips in a double boiler or microwave in 30‑second bursts, stirring in between. If you’re using coconut oil or shortening, add it now to achieve a glossy, fluid consistency. The chocolate should be smooth and glossy, not grainy. Test the coating by dipping a fingertip; it should coat and set within 30 seconds at room temperature.
Remove the chilled truffles from the freezer. Using a fork or a dipping tool, submerge each ball into the melted chocolate, letting excess drip back into the bowl. Place the coated truffle back onto the parchment sheet. For an extra glossy finish, let the truffles sit for a minute, then give them a quick second dip.
Once all truffles are coated, let them set at room temperature for 10 minutes, then transfer the tray to the refrigerator for at least 20 minutes to fully harden the chocolate shell. The coating should snap cleanly when you bite into it, revealing the soft, cookie‑dough center.
That's it — you did it. But hold on, I've got a few more tricks that'll take this to another level. Keep reading, because the final touches will make these truffles the star of any dessert table.
Insider Tricks for Flawless Results
The Temperature Rule Nobody Follows
Never coat the truffles with chocolate straight from the microwave if the room is warm; the chocolate will set too quickly and become brittle. Instead, let the melted chocolate rest for a minute after heating, allowing it to reach a perfect working temperature of about 90°F (32°C). This gives you a smooth, glossy finish that doesn’t crack.
Why Your Nose Knows Best
When the butter‑sugar mixture starts to emit a faint caramel scent, you know the sugars have dissolved properly. If you don’t smell that sweet, buttery aroma, the mixture is under‑cooked and may result in a gritty dough. Trust your nose more than the timer.
The 5‑Minute Rest That Changes Everything
After rolling the dough into balls, let them sit on the counter for exactly five minutes before freezing. This brief pause allows the butter to re‑solidify just enough to give the truffles a tighter bite, preventing them from feeling too soft after coating.
Double‑Dip for Double the Shine
A quick second dip after the first coat has set creates a mirror‑like sheen that looks restaurant‑grade. I tried this once for a party, and guests kept asking if I’d bought them from a boutique confectioner.
The Secret Salt Sprinkle
A light dusting of flaky sea salt on the chocolate coating just before it hardens adds a sophisticated contrast that makes the sweetness pop. It’s the same trick pastry chefs use on caramel to balance flavors.
Creative Twists and Variations
This recipe is a playground. Here are some of my favorite ways to switch things up:
White Chocolate Dream
Swap the semisweet chocolate coating for white chocolate and add a teaspoon of freeze‑dried raspberry powder to the dough. The result is a pastel‑colored truffle with a tangy fruit note that’s perfect for spring gatherings.
Nutty Crunch
Fold in chopped toasted almonds or pecans into the dough and roll the finished truffles in crushed hazelnuts before the final chocolate dip. The nutty exterior adds an extra crunch that pairs beautifully with the creamy interior.
Spiced Holiday
Add a pinch of ground cinnamon, nutmeg, and a dash of pumpkin spice to the dough. Coat with dark chocolate and sprinkle with edible gold dust for a festive, holiday‑ready treat.
Matcha Magic
Mix a tablespoon of high‑quality matcha powder into the dough for an earthy green hue. Dip in white chocolate and dust with a little extra matcha for a sophisticated, tea‑time snack.
Salted Caramel Drizzle
After the chocolate coating has set, drizzle a thin stream of homemade salted caramel over each truffle. The salty‑sweet ribbon adds a luxurious finish that elevates the whole experience.
Storing and Bringing It Back to Life
Fridge Storage
Place the truffles in an airtight container lined with parchment paper. They’ll stay fresh for up to two weeks, maintaining their soft interior and crisp coating. If you notice any condensation, simply pat the tops dry with a paper towel.
Freezer Friendly
For longer storage, arrange the truffles on a tray, freeze solid, then transfer to a zip‑top freezer bag. They’ll keep for three months. When you’re ready to serve, let them thaw in the refrigerator for an hour, then bring to room temperature for optimal texture.
Best Reheating Method
If the chocolate coating feels a bit dull after a week, give the truffles a quick 10‑second zap in the microwave on low power, or place them on a warm plate for a minute. Adding a tiny splash of water to the microwave (in a separate container) creates steam that revives the shine without melting the interior.