I still remember the night I ruined dinner. Not just a little overcooked—I'm talking smoke-alarm-screaming, dog-hiding-under-the-couch, neighbors-knocking ruined. In the chaos I stomped to the pantry, grabbed a half-eaten bag of marshmallows, a sleeve of graham crackers, and the emergency chocolate stash I pretend not to know about. Ten minutes later the fire department left, my ego was in ashes, but the smell of toasted sugar and melted chocolate drifting through the open windows was absolute heaven. That kitchen disaster became my obsession: could I capture that crackling-campfire magic without the campfire, the mess, or the fire truck?
Picture this: it's 11:37 p.m., the house is finally quiet, and you're standing in front of the fridge in fuzzy socks hunting for something—anything—that will scratch that primal sweet-salty-gooey itch. Ice cream is too cold, cookies feel like homework, and you want the lightning bolt of nostalgia that only s'mores deliver. But who has the energy to build a tiny bonfire on the stovetop and chase runaway marshmallows around the burner with a pair of tongs? Not me. Not anymore. These Easy S'mores Bars are the answer to every late-night, sweet-tooth emergency, every bake-sale panic, every "bring dessert" text you forgot to answer.
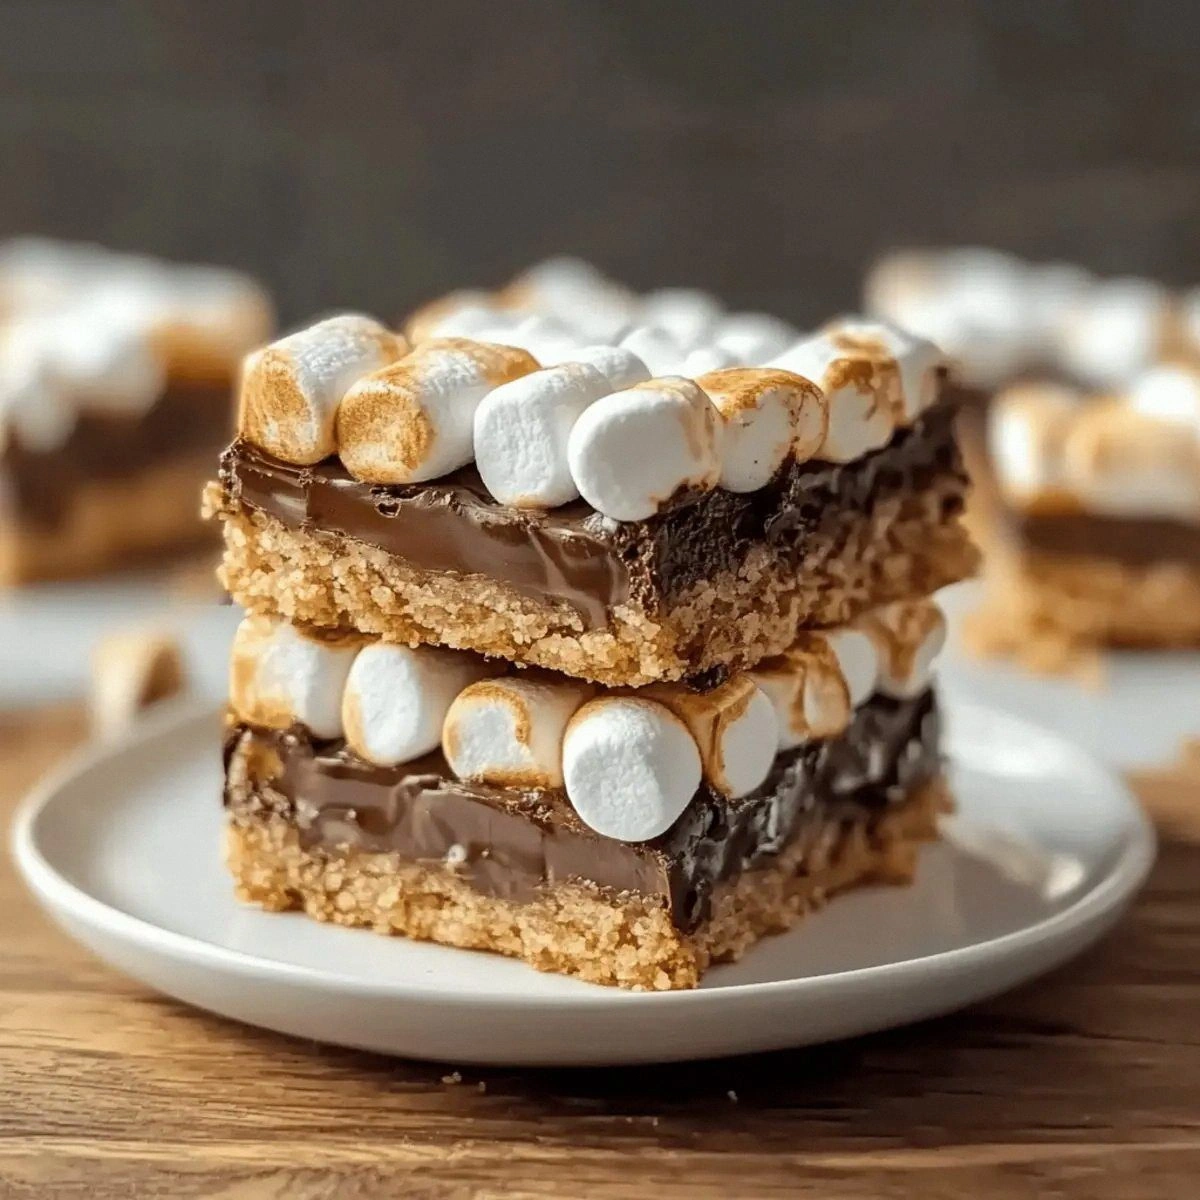
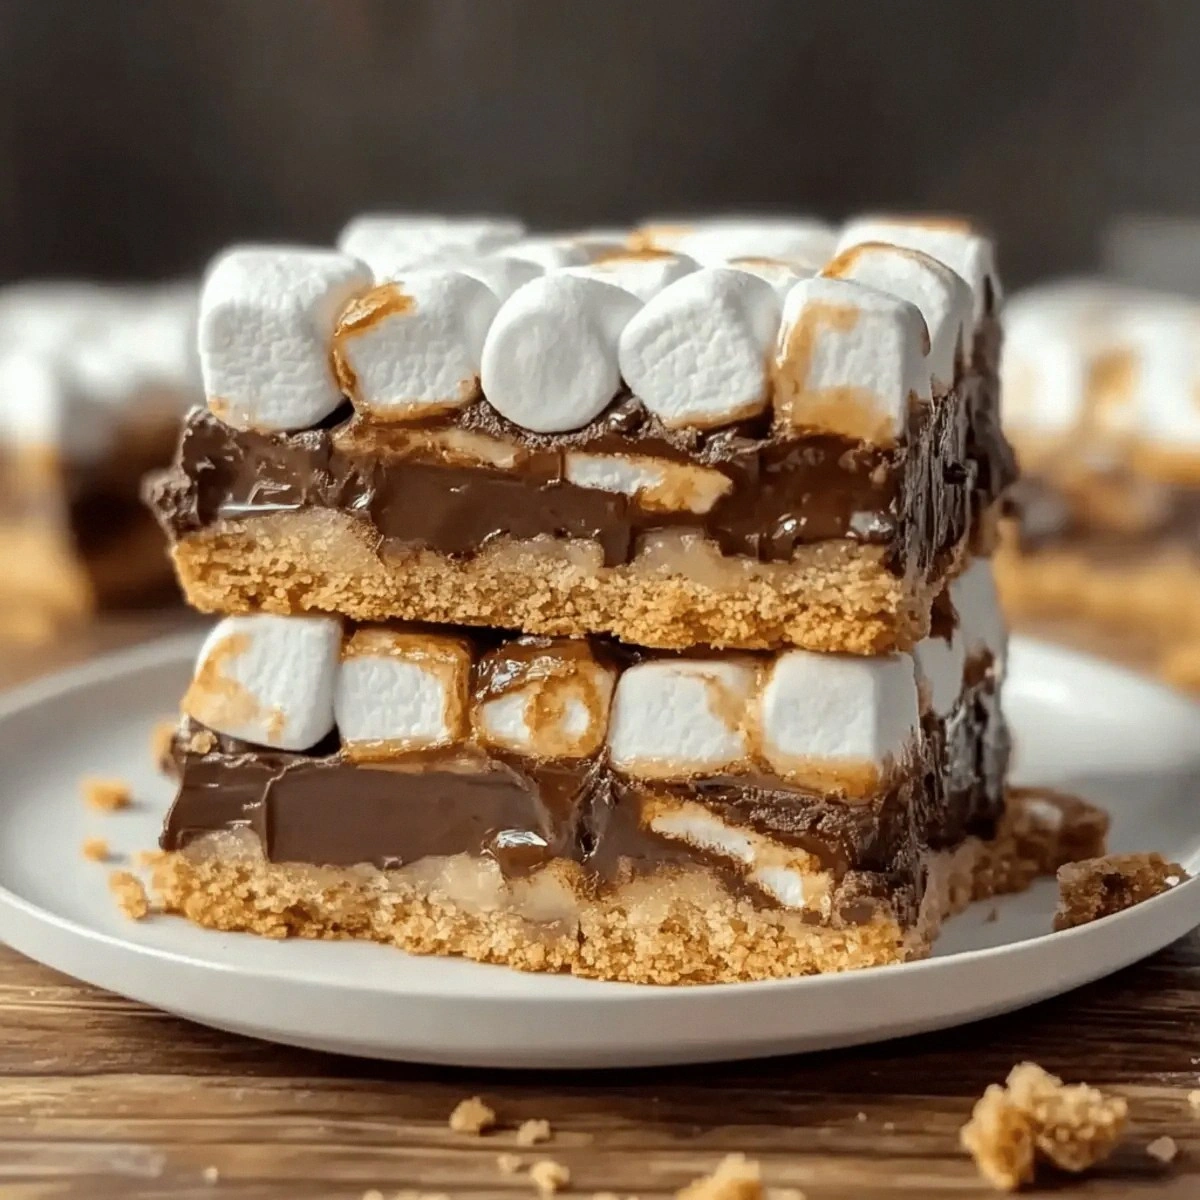
Most copycat recipes get this wrong. They dump everything into a pan, cross their fingers, and end up with a rock-hard base, scorched marshmallows, or chocolate that separates into an oily mess. After a dozen sticky experiments—some involving a blowtorch, one regrettable microwave incident, and a neighbor who still won't speak to me—I cracked the code. The result is a bar that tastes exactly like the s'more you remember: shatter-crisp graham crust, molten chocolate that stretches into Instagram-worthy strings, and a marshmallow crown that's bronzed, bubbling, and begging to be pulled apart while it's still warm.
Okay, ready for the game-changer? We're layering the ingredients in a precise order, controlling the temperature like a pastry lab, and finishing with a five-minute broiler blast that toasts the top to campfire perfection without turning the chocolate into a chalky disaster. Let me walk you through every single step—by the end, you'll wonder how you ever made it any other way.
What Makes This Version Stand Out
- Lightning-Fast: From pantry raid to first bite in under forty-five minutes, because cravings don't wait for chill times or fancy equipment.
- One-Bowl Wonder: The crust presses together with the back of a spoon—no mixer, no food processor, no mountain of dishes giving you side-eye at midnight.
- Texture Nirvana: We pre-bake the graham base until it smells like toasted granola, so you get that satisfying snap before the gooey avalanche.
- Chocolate Insurance: A sneaky sheet of parchment keeps the chocolate from welding itself to the pan, meaning every glorious square lifts out intact for maximum bragging rights.
- Marshmallow Mastery: We scatter mini marshmallows, not the jumbo ones, so they puff into tiny cloud-bubbles that brown evenly instead of turning into molten lava pockets.
- Any-Weather Friendly: Rain, snow, or mosquito-apocalypse outside—your kitchen stays clean, your eyebrows stay un-singed, and you still get that campfire flavor.
- Kid-and-Crowd Tested: I brought a tray to book club and they formed a polite line; twenty minutes later only crumbs remained and two members asked for the recipe mid-sentence.
- Make-Ahead Magic: Baked, cooled, wrapped tight, these bars stay dreamy for three days—if you can hide them that long.
Alright, let's break down exactly what goes into this masterpiece...
Inside the Ingredient List
The Flavor Base
Graham cracker crumbs are the soul of a s'more, but don't grab the pre-crushed dust at the bottom of the box. Pulverize whole crackers yourself in a zip-top bag with a rolling pin; the irregular shards toast into buttery nuggets that taste like graham cereal. If you only have honey-flavored crackers, dial back the powdered sugar a touch or the bars will swing into cloying territory. Gluten-free grahams work surprisingly well here—just check the label for added sugar so you can adjust sweetness accordingly.
The Texture Crew
Powdered sugar does double duty: it sweetens the crust and melts slightly during baking, acting like edible glue that holds everything together when you slice. Skip granulated sugar unless you enjoy grit between your teeth. Melted butter is the moisture that turns those crumbs into a press-able dough; if you're dairy-free, coconut oil is an acceptable understudy, but the flavor will lean tropical—great if you want a piña-colada-meets-campfire vibe.
The Melty Heart
Four full-size Hershey bars give you the exact chocolate-to-marshmallow ratio the original sandwich gods intended. Milk chocolate melts silkier than dark, but if you like bitter balance, swap in two bars of 60% bittersweet and keep two milk—best of both worlds. Avoid chocolate chips; they're engineered to hold their shape and you'll end up with waxy pebbles instead of a glossy river. Pro tip: chill the bars for ten minutes before unwrapping; the segments snap off cleanly and you won't leave half the logo stuck to the foil.
The Cloud Crown
Mini marshmallows toast faster and more evenly than their giant cousins, creating a delicate brûléed cap that shatters like thin ice under your fork. If you only have jumbo marshmallows, snip them into quarters with kitchen shears—yes, it's sticky, but nobody said greatness was tidy. Vegan marshmallows work, but they brown quicker, so watch the broiler like a hawk; pull the pan the second they turn golden or you'll have charcoal snowballs.
Everything's prepped? Good. Let's get into the real action...
The Method — Step by Step
- Preheat your oven to 350°F (175°C). Slide the rack to the middle—too high and the top will scorch before the base crisps; too low and you'll stare at pale marshmallows wondering where you went wrong. While the oven wakes up, line an 8-inch square metal pan with parchment, letting the paper wings drape over two opposite sides like a sling. Metal conducts heat evenly; glass pans will work but you may need an extra three minutes to achieve that golden crust.
- In a medium bowl, whisk graham cracker crumbs with powdered sugar until the mixture looks like sandy snow. Pour in the melted butter and stir with a fork until every crumb is lacquered and the mixture holds together when you squeeze a fistful. If it feels too dry, drizzle in another tablespoon of butter; humidity varies and crumbs from different brands absorb fat like thirsty little sponges.
- Dump the buttery rubble into your lined pan and press it into an even layer. Use the flat bottom of a drinking glass or a metal measuring cup—this applies uniform pressure so you won't have thin spots where the chocolate can leak and weld itself to the pan. Press firmly; think of it as building edible armor that will support the molten layers above.
- Slide the pan into the oven and bake the crust for ten minutes. Set a timer, because this is where most people wander off and forget. You're looking for a pale golden color and a toasty smell that drifts into the living room and makes people ask what you're baking. The edges should just start to pull away from the parchment—that's the signal it's set.
- Remove the pan and immediately scatter the chocolate bar pieces in a single layer. Work quickly while the crust is hot; residual heat will gently melt the chocolate so it fuses to the base instead of sliding around like slippery dominoes. Arrange them like mosaic tiles, filling gaps with broken bits so every bite gets equal chocolate real estate.
- Return the pan to the oven for three minutes—just long enough for the chocolate to surrender into a glossy puddle. Don't overbake or the chocolate will seize and turn chalky. When you jiggle the pan, the surface should ripple like a chocolate pond, not resemble dried mud cracks.
- Pull the pan out and immediately shower the mini marshmallows across the molten chocolate. Work fast; you want them to land on warm chocolate so they stick and don't roll off like tiny tumbleweeds. Aim for a single, even layer—no double-stacking or you'll create insulation that prevents browning later.
- Switch your oven to broil. Yes, this is the scary part. Place the pan on the highest rack, leave the door cracked open two inches, and watch like a hawk. In ninety seconds the marshmallows will puff, toast, and develop those gorgeous campfire spots. The moment they turn golden-brown, jerk the pan out—do not walk away to answer a text unless you enjoy the smell of charred sugar and regret.
- Cool the bars in the pan on a wire rack for at least twenty minutes. I know, the aroma is maddening, but cutting now will drag melted chocolate into swirls and you'll lose the distinct layers. Warm—not scalding—is the sweet spot for slicing; use a knife dipped in hot water and wiped dry for bakery-clean cuts.
That's it—you did it. But hold on, I've got a few more tricks that'll take this to another level...
Insider Tricks for Flawless Results
The Temperature Rule Nobody Follows
Room-temperature chocolate melts more evenly than ice-cold bars straight from the pantry. If your kitchen is chilly, let the Hershey segments sit on the counter while the crust bakes—ten minutes is plenty. Cold chocolate shocks the hot base and can create white streaks called bloom, which taste fine but look like cloudy moonscapes in your photos.
Why Your Nose Knows Best
Don't trust timers alone; trust your senses. When the crust smells like Sunday morning toast and you can hear the faintest sizzle from the butter, it's ready for chocolate. When the marshmallows smell like cotton candy and look like toasted meringue, yank them out. Ovens vary, nostrils don't.
The 5-Minute Rest That Changes Everything
After broiling, set the pan on a cold burner and walk away for exactly five minutes. During this brief truce, the chocolate re-solidifies just enough to keep the layers distinct, but the marshmallow stays pillowy. Cut too soon and you get lava; wait too long and the marshmallow firms into a chewy helmet that fights your knife.
Serving Size Sanity
An 8-inch pan yields nine generous squares or sixteen bite-size rectangles for cocktail parties. If you need show-stopping presentation, lift the entire slab onto a cutting board using the parchment sling, then use a sharp chef's knife to trim a thin ribbon from every edge—those cook's treats are your reward for being neat. Suddenly the bars look bakery-professional and you have a pile of scrappy, delicious off-cuts to nibble in secrecy.
Creative Twists and Variations
This recipe is a playground. Here are some of my favorite ways to switch things up:
Peanut Butter Campfire
Swap two Hershey bars for two cups of peanut butter cups, chopped into chunky shards. The salty-sweet peanut layer melts into a river of nougat that tastes like a s'more married a peanut butter cookie and lived happily ever after. Top with chopped honey-roasted peanuts for crunch.
Salted Caramel Eclipse
Drizzle two tablespoons of thick caramel sauce over the chocolate layer before adding marshmallows. Finish with a snow flurry of flaky sea salt. The burnt-sugar bitterness plays against the milk chocolate like a jazz duet—unexpected, sophisticated, completely addictive.
Mint Glacier
Use mint-chocolate bars instead of plain milk chocolate and add a quarter teaspoon of peppermint extract to the crust. The cool mint cuts through the sugar and leaves your palate refreshed, making these dangerously easy to inhale one after another without the cloying sweetness that usually slams on the brakes.
S'Mores Nacho Bars
Press the crust into a rimmed sheet pan for a thinner base, then scatter chocolate and marshmallows in ripples rather than layers. Once cooled, snap the sheet into random shards and serve in a paper cone like nachos at a stadium. Perfect for game night when you want finger food that disappears faster than the halftime show.
Spicy Mayan Fire
Stir a pinch of cayenne and half a teaspoon of cinnamon into the graham crumbs. Use dark chocolate with chili extract. The heat sneaks up after the third bite, warming the back of your throat like a sip of Mexican hot chocolate. Your guests will ask "what is that?" and then reach for another piece while they ponder.
Berry Bonfire
Tuck a handful of freeze-dried raspberries or strawberries between the chocolate and marshmallow layers. They rehydrate slightly from the heat, turning into tangy fruit leather that pops against all that sugar. The tartness is like hitting refresh on your taste buds, so you can devour more without hitting the wall.
Storing and Bringing It Back to Life
Fridge Storage
Place cooled bars in an airtight container with parchment between layers. They'll keep four days in the refrigerator, though the marshmallow will firm into a chewy nougat. Let them sit on the counter for fifteen minutes before serving; the chocolate regains its silkiness and the graham base loses its snap-back resistance.
Freezer Friendly
Wrap individual squares in plastic wrap, then slip into a zip-top bag. Freeze up to two months. Thaw overnight in the fridge, then bring to room temperature. The texture won't be quite as pillowy as day-one, but the flavor is still leagues better than anything store-bought. Pro move: eat them half-frozen like a candy bar on sweltering days.
Best Reheating Method
Preheat your oven to 275°F. Place bars on a parchment-lined sheet and warm for five minutes—just until the chocolate glistens and the marshmallow sighs. Skip the microwave unless you enjoy marshmallow balloon animals exploding across your turntable. A quick oven kiss revives the goo without turning the base soggy.