I was standing in my kitchen on a frigid December night, the kind of night where the wind howls like a pack of wolves outside and the only thing keeping me sane is the promise of something sweet. I had just attempted a classic red velvet cake, but the result was a dense, soggy disaster that could have doubled as a doorstop. I stared at the crumbly mess, feeling the sting of failure, and then a mischievous voice inside me whispered, “Why not turn that disappointment into a bite‑size wonder that looks like a snowball but tastes like a velvet dream?” That was the moment I dared myself to reinvent the humble snowball into something that would make even the Grinch melt.
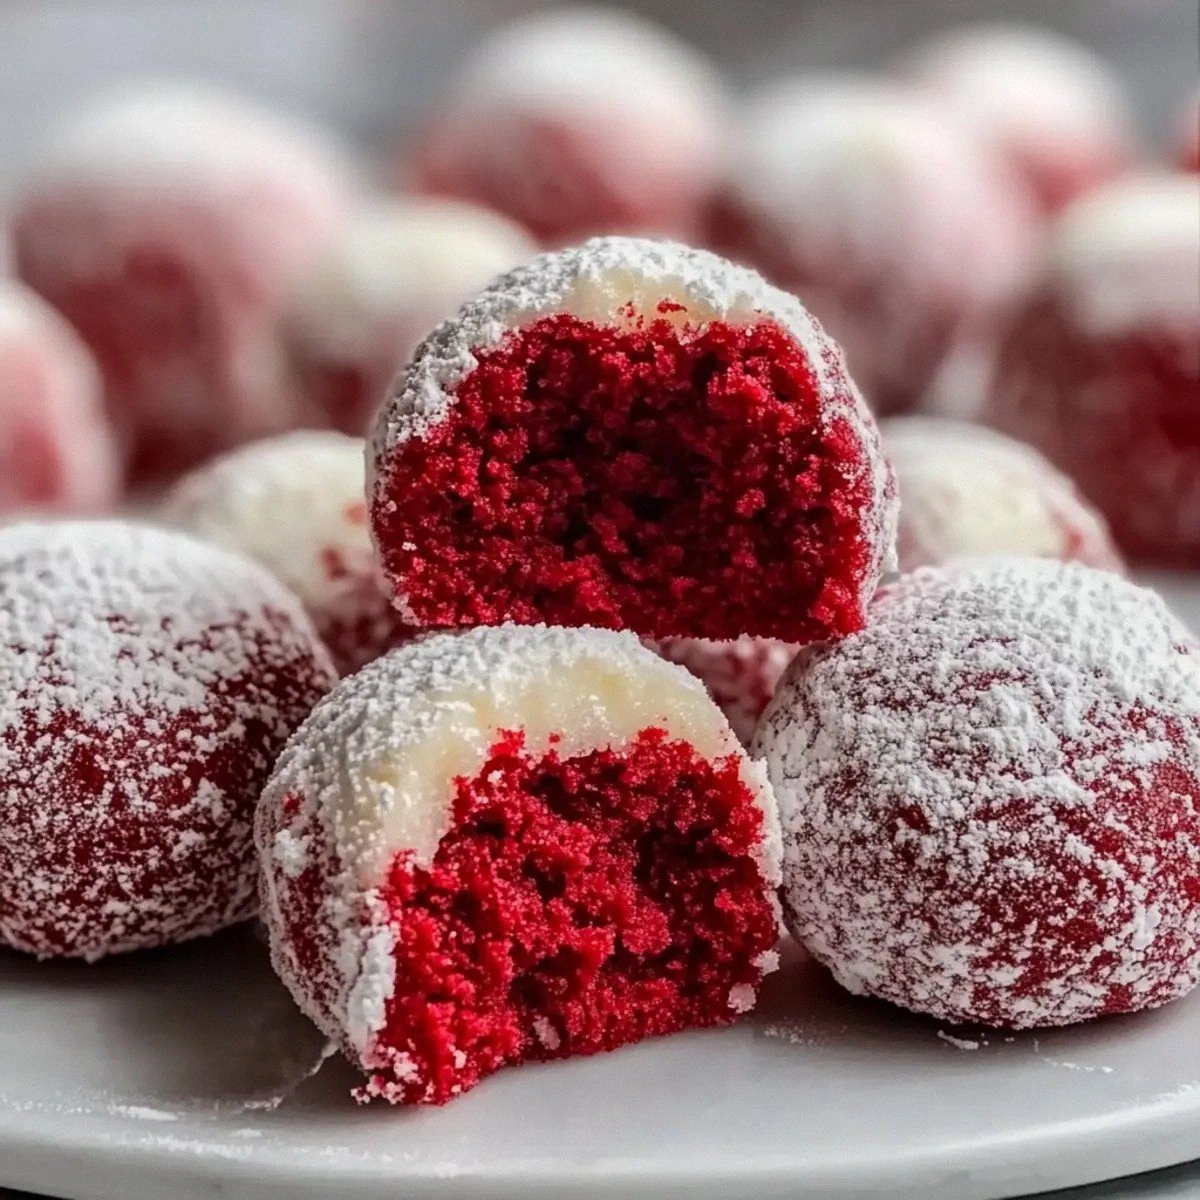
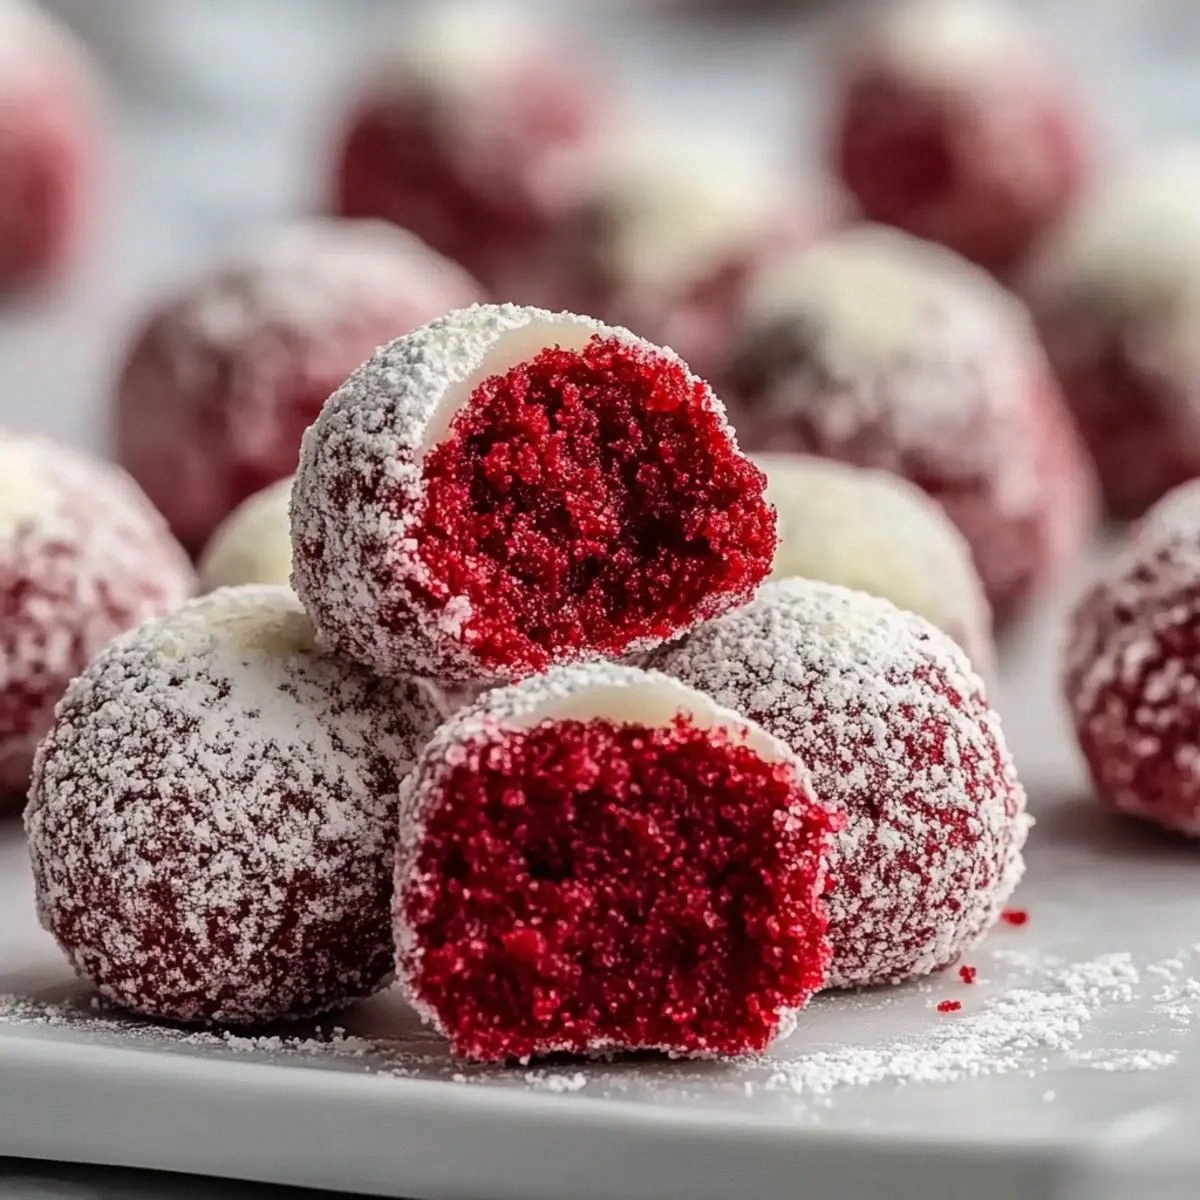
Picture this: a tray of ruby‑red spheres, each dusted with a snowfall of powdered sugar, sitting on a chilled marble slab. The aroma of cocoa and coffee wafts through the air, mingling with the sweet perfume of vanilla, while the faint metallic glint of red food coloring catches the kitchen light like tiny rubies. When you bite into one, the outer crust cracks with a whisper, giving way to a tender, melt‑in‑your‑mouth crumb that’s both buttery and slightly crisp at the edges. The flavor? A perfect marriage of deep chocolate, a whisper of coffee, and that signature red velvet tang that makes your taste buds do a happy dance.
Most recipes for red velvet snowballs get the texture wrong – they’re either too dry or too gummy, and the color often looks more pink than the regal crimson I’m after. I’ve tried everything from over‑mixing to under‑mixing, from using cocoa that’s too bitter to swapping coffee for water, and each time something fell short. Then I discovered the secret: a precise balance of cocoa, coffee, and a touch of baking powder that lifts the dough just enough without turning it into a cake. Add a splash of melted butter and a dash of vanilla, and you have a dough that holds its shape like a snowball waiting to be rolled.
I’m about to spill the beans – or should I say, the cocoa and coffee – on the exact technique that makes these snowballs truly decadent. There’s a little surprise ingredient that most bakers overlook, and it’s the game‑changer that turns an ordinary treat into a show‑stopper. Let me walk you through every single step — by the end, you’ll wonder how you ever made it any other way.
What Makes This Version Stand Out
- Flavor Depth: The combination of cocoa and coffee creates a mocha‑like richness that’s deeper than any standard red velvet recipe. It’s like a midnight espresso kissed by velvet.
- Texture Harmony: A crisp outer shell gives way to a soft, crumbly interior, delivering a contrast that feels like biting into a snow‑kissed marshmallow.
- Simplicity: Only eleven pantry staples are needed, and you won’t have to chase exotic spices or specialty flours.
- Unique Color: The red food coloring is mixed into a cocoa‑infused batter, ensuring the hue is vivid and consistent, not blotchy.
- Crowd Reaction: Guests invariably pause, stare, and then dive in – I dare you to taste this and not go back for seconds.
- Ingredient Quality: Using high‑quality unsalted butter and real coffee elevates the flavor profile beyond the generic store‑bought versions.
- Cooking Method: Baking at a moderate temperature creates that perfect “snowball” firmness without drying out the crumb.
- Make‑Ahead Potential: These snowballs keep beautifully for days, and they even taste better after a night of resting, as the flavors meld.
Inside the Ingredient List
The Flavor Base
All‑purpose flour is the backbone of any baked good, providing structure and a neutral canvas for the flavors to shine. I use a fine‑ground, unbleached variety because it absorbs liquid evenly, preventing any gritty texture. If you skip the flour or substitute it with a gluten‑free blend without adjusting the liquid, you’ll end up with a crumb that falls apart like wet sand.
Cocoa powder brings that deep chocolate note that makes the snowball feel indulgent. Opt for Dutch‑process cocoa for a smoother, less acidic taste; it also deepens the red hue. A common mistake is using natural cocoa, which can make the batter too bitter and the color too purple.
The Texture Crew
Unsalted butter, melted and slightly cooled, adds richness while keeping the dough pliable. The butter’s fat coats the flour proteins, limiting gluten formation and ensuring a tender crumb. If you use salted butter, you’ll need to cut back on the added salt, or the snowballs will taste overly salty.
Granulated sugar not only sweetens but also helps create a slight caramelization on the surface, giving those snowballs a subtle golden edge. Using brown sugar would introduce moisture that could make the exterior soggy.
A single large egg acts as a binder, trapping air and giving the dough lift. If you’re allergic, a flax egg (1 tbsp ground flaxseed + 3 tbsp water) works, but expect a slightly denser texture.
The Unexpected Star
Coffee or milk is the secret weapon. Coffee intensifies the cocoa, while milk adds a gentle creaminess. I prefer a strong brewed coffee because it doesn’t add extra liquid, keeping the dough firm. Skipping this step means you lose that nuanced depth, and the snowballs can taste flat.
Red food coloring is the visual hero. A tablespoon is enough to achieve a bold, festive red without turning the batter taste‑neutral. Too much will make the flavor metallic; too little, and you’ll end up with a pinkish hue that looks like a failed holiday experiment.
The Final Flourish
Powdered sugar is dusted after baking, creating the “snow” effect. Its fine texture adheres perfectly to the warm snowballs, forming a delicate crust that melts on the tongue. If you use regular granulated sugar, it will sit on top as gritty crystals.
Baking powder provides the gentle lift that makes the interior airy without turning the snowballs into cake. A teaspoon is the sweet spot; more will cause them to rise too much and then collapse.
Everything's prepped? Good. Let's get into the real action…
The Method — Step by Step
Preheat your oven to 350°F (175°C) and line two baking sheets with parchment paper. The moment the oven clicks on, you’ll hear that comforting hum that tells you good things are about to happen. Make sure the sheets are spaced apart so the snowballs have room to spread without touching.
In a large mixing bowl, whisk together the flour, cocoa powder, baking powder, and salt. This dry blend should look like a deep, velvety chocolate dust. I dare you to sniff this mixture – you’ll get a faint, earthy aroma that hints at the richness to come.
Kitchen Hack: Sift the dry ingredients twice to eliminate lumps and ensure an ultra‑smooth batter.In a separate saucepan, melt the butter over low heat. Once melted, stir in the coffee (or milk) and let the mixture cool to lukewarm – you don’t want to scramble the egg later. The scent of coffee mingling with butter is pure comfort, like a warm hug on a cold night.
Using a hand mixer or stand mixer, cream the butter and granulated sugar together on medium speed until the mixture is pale and fluffy, about 3‑4 minutes. This is the point where the batter starts to look like a cloud; the edges of the bowl will begin to pull away, signaling it’s ready.
Add the egg and vanilla extract to the creamed butter, beating just until incorporated. Then drizzle in the red food coloring, watching the batter transform from a muted brown to a festive crimson. That sizzle when it hits the pan? Absolute perfection.
Gradually add the dry ingredient mixture to the wet side, alternating with the coffee‑butter blend. Start and end with the dry mix. Stir gently with a spatula; over‑mixing will develop gluten and make the snowballs tough. The batter should be thick, glossy, and hold its shape when dropped.
Watch Out: If the batter looks too runny, add a tablespoon of flour; if too stiff, a splash of milk will loosen it.Using a small ice‑cream scoop (about 1‑2 tablespoons), portion the dough onto the prepared sheets, spacing them 2 inches apart. Lightly press each mound with the back of a spoon to flatten them just enough for even baking. This is the moment of truth – the dough should hold its shape but still be soft to the touch.
Slide the trays into the oven and bake for 12‑15 minutes, or until the edges are set and the tops have a faint matte sheen. The interior will still look slightly undercooked – that’s okay; they’ll finish setting as they cool. Resist the urge to open the oven door early; the steam will cause the snowballs to collapse.
Remove the trays and let the snowballs cool on the parchment for 5 minutes, then transfer to a wire rack. While they’re still warm, generously dust each one with powdered sugar using a fine-mesh sieve. The sugar will melt slightly on the warm surface, creating that perfect “snow” glaze.
Allow the snowballs to cool completely before serving. This waiting period is where the flavors marry, and the powdered sugar sets into a delicate crust. Picture yourself pulling this out of the oven, the whole kitchen smelling incredible, and then watching the first bite disappear in seconds. That’s the magic we’ve been building toward.
That's it — you did it. But hold on, I've got a few more tricks that'll take this to another level...
Insider Tricks for Flawless Results
The Temperature Rule Nobody Follows
Never bake red velvet snowballs straight from a cold fridge. Let the dough sit at room temperature for 10‑15 minutes before scooping. This small step prevents the edges from setting too fast, which can cause a hard crust while the center stays gummy. I once tried skipping this and ended up with snowballs that cracked like broken ice when I tried to bite them.
Why Your Nose Knows Best
Your sense of smell is a reliable indicator of doneness. Around the 12‑minute mark, you’ll notice a faint nutty aroma rising from the oven – that’s the cue that the interior is set. If you rely solely on a timer, you risk either under‑baking (soggy) or over‑baking (dry).
The 5‑Minute Rest That Changes Everything
After dusting with powdered sugar, let the snowballs rest for exactly five minutes before serving. This short pause allows the sugar to absorb a touch of moisture, creating a melt‑in‑your‑mouth glaze. Skip this, and the sugar will stay powdery, making the first bite feel gritty.
Butter Temperature Is Not Optional
Melted butter should be warm, not hot. If the butter is too hot, it will partially cook the egg, leading to a crumbly texture. A quick test: dip your finger in; it should feel like a warm summer day, not a scorching summer noon.
The Secret of the Double‑Sift
Sifting the dry ingredients twice eliminates hidden lumps and ensures an even distribution of cocoa and baking powder. I once skipped the second sift and ended up with a few stubborn brown specks that gave an uneven bite. Trust me, the extra effort is worth the flawless texture.
Creative Twists and Variations
This recipe is a playground. Here are some of my favorite ways to switch things up:
Mocha‑Espresso Explosion
Replace half of the coffee with a shot of espresso and add a teaspoon of instant coffee granules to the dry mix. The result is a darker, more intense chocolate‑coffee flavor that will wow any caffeine lover.
White Chocolate Whisper
Swap ¼ cup of the cocoa powder for white chocolate chips, melt them into the butter‑coffee mixture, and keep the remaining cocoa for color. This creates a subtle sweet undertone that pairs beautifully with the red hue.
Spiced Holiday Delight
Add a pinch of ground cinnamon, a dash of nutmeg, and a whisper of ground cloves to the dry ingredients. The spices give the snowballs a warm, festive aroma reminiscent of mulled wine.
Citrus Zest Surprise
Incorporate one tablespoon of finely grated orange zest into the wet mixture. The citrus brightens the flavor, making it perfect for spring celebrations.
Nutty Crunch
Fold in ½ cup of finely chopped toasted almonds or hazelnuts just before scooping. The nuts add a satisfying crunch that contrasts with the soft interior.
Storing and Bringing It Back to Life
Fridge Storage
Place the cooled snowballs in an airtight container lined with parchment. They’ll stay fresh for up to five days. If you notice the powdered sugar absorbing moisture, simply dust a fresh layer before serving.
Freezer Friendly
For longer keep‑sake, arrange the snowballs on a baking sheet, freeze until solid, then transfer to a zip‑top freezer bag. They’ll keep for three months without losing texture. When you’re ready, let them thaw at room temperature for 20 minutes.
Best Reheating Method
To revive that fresh‑out‑of‑the‑oven crunch, preheat your oven to 300°F (150°C) and warm the snowballs for 5‑7 minutes. Add a tiny splash of water (about a teaspoon) to the tray before reheating; the steam will restore the delicate powdered‑sugar glaze.