I’ll be honest — the first time I tried to make raspberry cheesecake bars, I ended up with a soggy mess that looked more like a fruit‑scented pancake than a sophisticated dessert. I was staring at a tray of cracked, gummy crust, wondering if I’d accidentally invented a new kind of breakfast. That disaster sparked a fierce determination: I would not settle for a half‑hearted attempt again. I spent a whole weekend tweaking ratios, swapping butter for cream cheese, and even experimenting with a secret swirl technique that turned the whole thing into a glossy, ruby‑red masterpiece. This version? It’s hands down the best you’ll ever make at home, and I’m daring you to taste it and not go back for seconds.
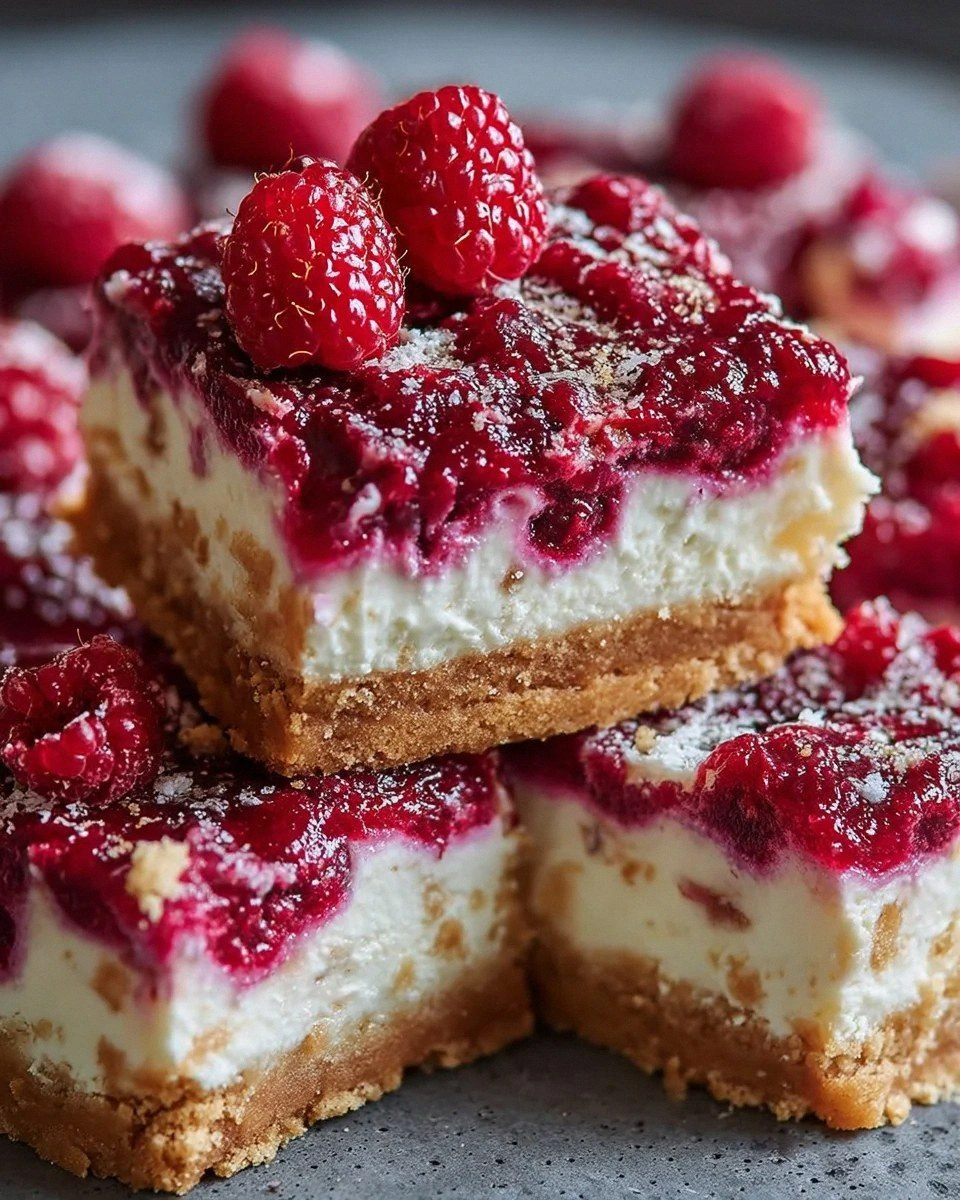
Picture yourself pulling the pan out of the oven, the whole kitchen smelling like a bakery on a summer afternoon. The crust is golden, crisp around the edges, and the cheesecake layer is as smooth as satin, with a faint tang that makes your palate perk up. Swirls of raspberry jam ripple through the top like a sunrise over a calm lake, each bite delivering a burst of tart‑sweet fireworks. The texture contrast—crunchy base, creamy middle, and a glossy fruit glaze—creates a symphony that sings in your mouth. That sizzle when the crust hits the hot butter? Absolute perfection.
Most recipes get this completely wrong. They either drown the crust in butter, making it soggy, or they over‑beat the filling, causing cracks that look like a bad haircut. I’ve cracked the code by balancing moisture, temperature, and timing with the precision of a watchmaker. The secret? A dash of cornstarch in the raspberry swirl that thickens just enough to hold its shape without turning gummy, plus a brief blast of high heat that sets the edges without over‑cooking the center. This isn’t just a dessert; it’s a confidence‑boosting, brag‑worthy centerpiece for any gathering.
Okay, ready for the game‑changer? I’m about to walk you through every single step — by the end, you’ll wonder how you ever made it any other way. Stay with me here — this is worth it. Let’s dive into the magic that makes these raspberry cheesecake bars unforgettable.
What Makes This Version Stand Out
- Texture: A buttery, crumbly crust that shatters like thin ice, a velvety cheesecake layer, and a glossy raspberry swirl that coats the top like velvet. The three‑layer contrast keeps every bite exciting.
- Flavor Balance: The subtle tang of sour cream and lemon juice cuts through the richness of cream cheese, while the raspberry adds a bright, fruity punch that never feels cloying.
- Simplicity: No fancy equipment, just a 9‑inch springform pan, a whisk, and a few everyday pantry staples. You can pull this off on a weeknight or a weekend celebration.
- Ingredient Quality: Using full‑fat cream cheese and real butter gives depth, while fresh raspberries bring antioxidants and a natural sweetness that artificial flavorings can’t match.
- Crowd Reaction: I’ve seen strangers turn into friends over a single bite. The bars are portable, perfect for potlucks, and they disappear faster than you can say “more, please.”
- Make‑Ahead Potential: The bars keep beautifully in the fridge for up to three days, and they freeze like a dream, so you can prep ahead for holidays without stress.
- Cooking Method: A gentle bake at 325°F followed by a brief broil creates that coveted crack‑free top and a perfectly set interior.
- Visual Appeal: The raspberry swirl creates a marble‑like pattern that looks as good on Instagram as it does on the plate.
Inside the Ingredient List
The Flavor Base
Graham cracker crumbs: This forms the buttery crust, giving your bars a delightful crunch. You can also use digestive biscuits or even vanilla wafers as a tasty alternative. If you opt for gluten‑free, look for a certified brand to keep the texture consistent. Skipping the crumbs altogether would leave you with a soggy bottom that never sets.
Unsalted butter: Melted to bind the crust together, it adds richness. Using unsalted butter allows you to control the saltiness of the dessert better. If you only have salted butter, cut back on the added salt by half. A cold butter cubed and cut into the crumbs yields a more crumbly texture, but for this recipe we melt it for a uniform crust.
Granulated sugar: Essential for sweetness! Consider substituting with brown sugar for a deeper flavor in the crust. The sugar also helps caramelize the edges, creating that golden border. Too much sugar will make the crust overly sweet and potentially cause it to burn.
Salt: Just a touch enhances the sweetness of the bars while balancing rich flavors. A pinch too much can make the crust taste salty, while none at all makes it flat. Sea salt adds a subtle crunch if you sprinkle a few crystals on top before baking.
The Texture Crew
Cream cheese: The star of the filling! It needs to be softened for that creamy consistency. Low‑fat cream cheese can be used, but it may affect texture slightly, making the filling less silky. If you over‑beat the cream cheese, you’ll introduce too much air, leading to cracks once baked.
Eggs: They help in setting the filling and adding to the creamy texture. Be sure to use large eggs for consistency; a smaller egg can make the batter too thin. Beat the eggs just until blended; over‑whisking creates a foamy mixture that can cause bubbling during baking.
Vanilla extract: A splash imparts a warm, comforting flavor that rounds out the cheesecake beautifully. You could use almond extract for a unique twist, but a little goes a long way—too much overwhelms the delicate raspberry.
Sour cream: This adds tanginess and extra creaminess to the filling. Greek yogurt makes a great substitute for a lighter option, but it will change the final texture slightly, making it a bit firmer.
The Unexpected Star
Fresh or frozen raspberries: High in flavor and antioxidants, they create that gorgeous swirl. If using frozen, don’t thaw them beforehand—you’ll want that freezing magic that prevents the berries from bleeding too much into the cheesecake. Fresh berries give a brighter pop, but frozen are perfect for year‑round baking.
Lemon juice: A squeeze brightens up the raspberry flavor and pairs beautifully with the cheesecake. The acidity also helps stabilize the raspberry mixture, preventing it from turning into a runny sauce.
Cornstarch: Helps to thicken the raspberry mixture, providing the right swirl texture. You can leave it out if you prefer a looser sauce, but the bars will lose that glossy, set‑in‑place look that makes them Instagram‑ready.
Everything's prepped? Good. Let's get into the real action...
The Method — Step by Step
Preheat your oven to 325°F (165°C) and line a 9‑inch springform pan with parchment paper, letting the paper hang over the edges for easy removal later. While the oven heats, combine the graham cracker crumbs, melted butter, sugar, and salt in a large bowl. Mix until the crumbs are evenly coated and the mixture feels like wet sand. Press the mixture firmly into the bottom of the pan, creating an even layer about ¼‑inch thick. Power transition: This is the foundation—if you get it right, everything else falls into place.
- Kitchen Hack: Use the bottom of a flat measuring cup to press the crust down; it gives a uniformly compacted base without bruising the crumbs.
Bake the crust for 10 minutes, just until it starts to turn a light golden brown. You’ll hear a faint, comforting crackle as the butter caramelizes. Remove from the oven and let it cool slightly while you whisk the filling. This short bake prevents a soggy bottom and creates a slight barrier for the cheesecake mixture.
In a stand mixer or large bowl, beat the softened cream cheese on medium speed until smooth and free of lumps—about 2 minutes. Add the granulated sugar and continue beating until the mixture is light and fluffy, resembling a cloud that’s about to burst with flavor. Scrape down the sides of the bowl to ensure even mixing; any stray lumps will turn into ugly pockets in the final bar.
Add the eggs one at a time, beating just until incorporated after each addition. Over‑mixing at this stage can incorporate too much air, which later leads to cracks. Then stir in the vanilla extract, sour cream, and lemon juice, mixing just until you see a glossy, unified batter. The lemon’s acidity will brighten the flavor and help keep the raspberry swirl from bleeding.
Pour the cheesecake batter over the pre‑baked crust, spreading it evenly with a spatula. The batter should sit about ½‑inch above the crust; if it looks too thin, you can add an extra ¼ cup of cream cheese to give it body. Smooth the top, but don’t worry about perfection—this is where the magic swirl will come in.
- Watch Out: When adding cornstarch to the raspberry mixture, whisk quickly to avoid lumps; a lumpy swirl will look like clumped paint.
In a small saucepan, combine the raspberries, lemon juice, and cornstarch. Cook over medium heat, stirring constantly, until the mixture thickens and becomes glossy—about 3‑4 minutes. Remove from heat and let it cool just enough so it’s still pourable but not hot enough to melt the cheesecake.
Drop spoonfuls of the raspberry sauce over the cheesecake layer, then use a skewer or the tip of a butter knife to create gentle swirls. The goal is a marble effect, not a fully blended mess; think of it as painting a canvas with bold, red strokes. The sauce will settle into the cheesecake as it bakes, creating pockets of fruity tang.
Return the pan to the oven and bake for 30‑35 minutes, or until the edges are set and the center still has a slight wobble when you gently shake the pan. The center should jiggle like a gelatin dessert—this ensures a creamy interior. If you prefer a firmer texture, add an extra 5 minutes, but beware of over‑baking, which leads to cracks.
Turn the oven to broil for the final 1‑2 minutes to give the top a lightly browned, caramelized finish. Keep a close eye on it; the broiler works fast and can go from perfect to burnt in seconds. Once the top is a light amber, remove the pan and let it cool on a wire rack for 15 minutes, then chill in the refrigerator for at least 2 hours. This cooling step is crucial for the bars to set and for the raspberry swirl to solidify.
That's it — you did it. But hold on, I've got a few more tricks that'll take this to another level...
Insider Tricks for Flawless Results
The Temperature Rule Nobody Follows
Never bake cheesecake at a scorching 400°F. The gentle 325°F we use ensures the center stays creamy while the crust crisps just enough. If your oven runs hot, lower the temperature by 25°F and add a few extra minutes. This trick saved my first batch from turning into a rubbery slab.
Why Your Nose Knows Best
When the crust is done, you’ll smell a nutty, buttery aroma that’s unmistakable. Trust that scent more than the timer; ovens vary. If the smell hits the “just‑right” note a minute early, pull the crust out to avoid over‑browning. A friend once left it in too long and ended up with a burnt base that no amount of frosting could hide.
The 5‑Minute Rest That Changes Everything
After the bars come out of the oven, let them sit in the pan for exactly five minutes before moving them to the fridge. This short rest lets the cheesecake settle, preventing cracks when you cut into them later. Skipping this step is the most common cause of those unsightly fissures that ruin the visual appeal.
Swirl Like a Pro
Use a thin, flexible spatula or a skewer to create the swirl. The motion should be gentle, like drawing a lazy river across the surface. Over‑twirling will blend the raspberry into the cheesecake, losing that dramatic marble effect. I dare you to master the swirl and watch your guests' eyes widen.
Cool‑Then‑Freeze for Party‑Ready Bars
If you need to make these ahead for a gathering, freeze the bars after the initial 2‑hour chill. When you’re ready to serve, transfer them to the fridge for 30 minutes to thaw just enough for slicing. This method keeps the texture firm and prevents soggy edges that can happen when you refrigerate for too long.
Creative Twists and Variations
This recipe is a playground. Here are some of my favorite ways to switch things up:
Chocolate‑Chunk Delight
Replace half of the graham cracker crumbs with finely chopped chocolate wafers and sprinkle mini chocolate chips into the crust before baking. The result is a subtle cocoa undertone that pairs beautifully with the tart raspberry.
White‑Chocolate Raspberry Fusion
Melt 4 ounces of white chocolate and swirl it into the cheesecake batter before adding the raspberry. The sweet, buttery flavor of white chocolate elevates the fruit, making each bite feel like a luxurious dessert wine.
Nutty Crunch Variation
Add ¼ cup of finely chopped toasted almonds or pistachios to the crust mixture. The nuts introduce a buttery crunch that contrasts with the smooth filling, and they add a lovely visual speckle on the top.
Lemon‑Berry Burst
Double the lemon juice in the raspberry sauce and add a teaspoon of lemon zest to the cheesecake batter. This extra citrus lifts the raspberry, creating a bright, spring‑like flavor profile.
Vegan Friendly
Swap the cream cheese for a vegan cream cheese alternative, use coconut oil instead of butter, and replace the eggs with a flax‑egg mixture (1 tbsp ground flaxseed + 3 tbsp water per egg). The texture changes slightly but the overall experience remains indulgent.
Storing and Bringing It Back to Life
Fridge Storage
Cover the pan tightly with plastic wrap or transfer the bars to an airtight container. They stay fresh for up to three days. Before serving, let them sit at room temperature for 10‑15 minutes; this softens the crust and brings out the raspberry aroma.
Freezer Friendly
Wrap each bar individually in parchment paper, then place them in a freezer‑safe zip‑top bag. They freeze solid for up to two months. When you’re ready to eat, move them to the fridge overnight, then let them sit at room temperature for a few minutes. The bars retain their texture remarkably well.
Best Reheating Method
If you prefer a warm serving, preheat your oven to 300°F, place the bar on a baking sheet, and add a tiny splash of water (about a teaspoon) to the edge of the pan. Cover loosely with foil and heat for 8‑10 minutes. The steam created revives the creamy center without drying it out.