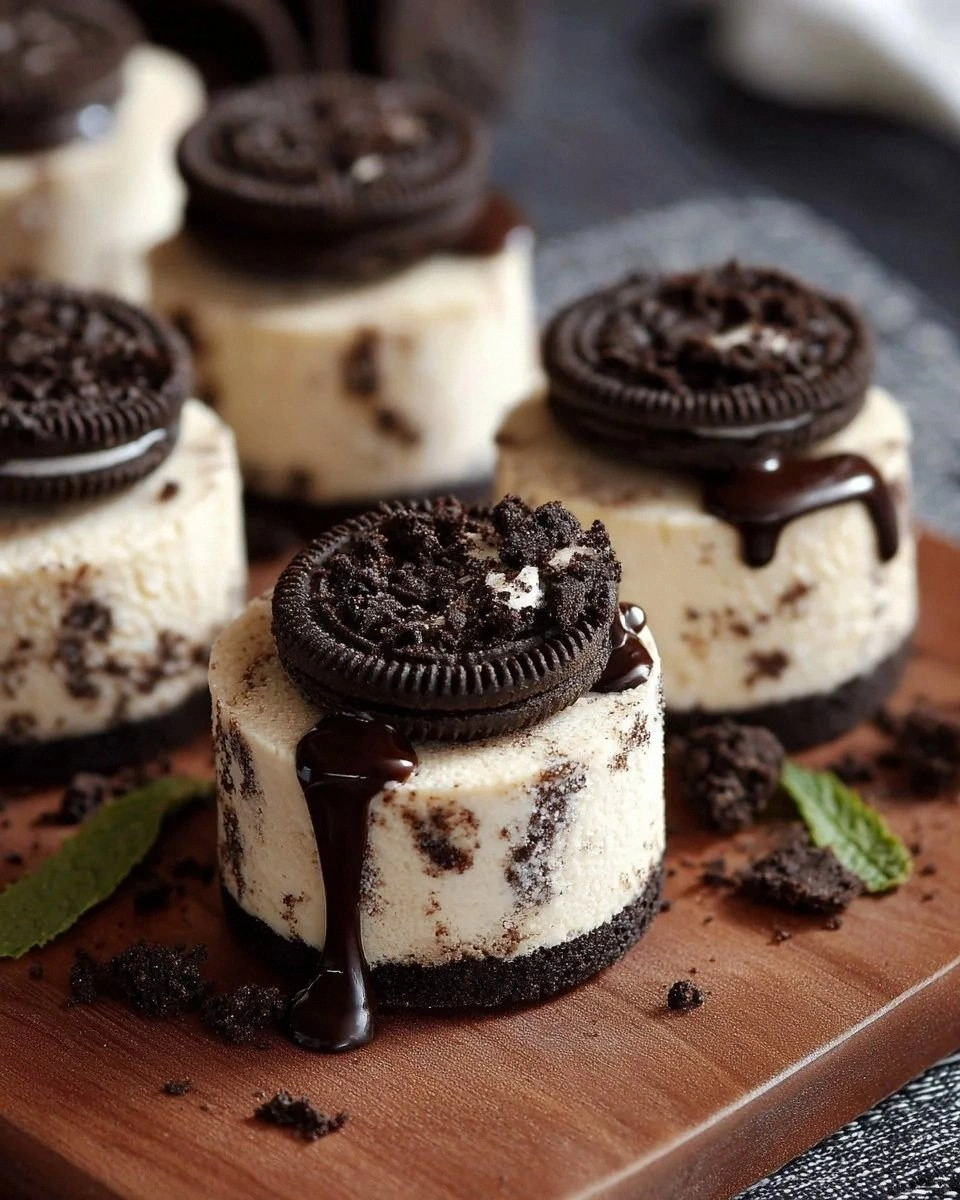
I was standing in my kitchen, half‑asleep, staring at a half‑finished batch of store‑bought mini cheesecakes that looked like they had been rescued from a sad party. The crust was soggy, the filling was bland, and I could swear I heard the faint sigh of disappointment from the empty plate. I tossed the tray into the sink, grabbed a pack of Oreos, and whispered a dare to myself: “I bet I can turn this disaster into the most addictive bite-sized dessert you’ve ever tasted.” That night, armed with a whisk, a splash of confidence, and a secret technique I’d learned from a pastry chef in Paris, I created the ultimate Mini Oreo Cheesecakes that have since become my go‑to party weapon.
Picture this: the moment you open the oven, a warm, buttery aroma mingles with the sweet perfume of vanilla and the faint, nostalgic scent of chocolate‑cream cookies. The crust crackles like fresh snow underfoot, while the creamy center shimmers like a moonlit lake. When you bite in, the Oreo crumb base crumbles with a satisfying crunch, giving way to a silky, tangy cheesecake that’s as light as a cloud yet rich enough to make your taste buds do a happy dance. The garnish of crushed Oreos and a cloud of whipped cream adds a visual pop that looks like a tiny, edible masterpiece.
What sets this version apart from every other mini cheesecake you’ve seen on Instagram? First, the crust is a perfect 1:1 ratio of buttery melt and crunchy Oreo crumbs, ensuring it never gets soggy. Second, the filling is a harmonious blend of cream cheese, whipped cream, and just enough sugar to keep it sweet without being cloying. Third, the baking method— a gentle water‑bath (or “bain‑marie”)—creates a custard‑like texture that’s smoother than silk and firmer than a mousse, so the cakes hold their shape when you pop them out of the tin. And finally, the garnish is not an afterthought; it adds an extra layer of texture that makes each bite feel like a celebration.
I’ll be honest — I ate half the batch before anyone else got a chance to try them, and that’s the kind of confession that proves just how addictive these are. I dare you to taste this and not go back for seconds; the combination of crunchy, creamy, and airy will have you reaching for the next mini marvel before the first one even disappears. Okay, ready for the game‑changer? Let me walk you through every single step — by the end, you’ll wonder how you ever made it any other way.
What Makes This Version Stand Out
- Texture: The crust is buttery and crisp, while the interior is velvety smooth, creating a contrast that feels like a perfect duet of crunch and melt‑in‑your‑mouth creaminess.
- Flavor: The deep chocolate‑cream flavor of Oreos is amplified by a hint of vanilla, and the slight tang from the cream cheese balances the sweetness beautifully.
- Simplicity: Only eight pantry‑friendly ingredients are needed, and the steps are straightforward enough for a beginner yet impressive enough for a seasoned baker.
- Uniqueness: Using whipped cream in the filling lightens the texture, giving it an airy lift that most traditional mini cheesecakes lack.
- Crowd Reaction: These mini bites disappear faster than you can say “Oreo,” making them the undisputed star of any gathering.
- Ingredient Quality: We rely on full‑fat cream cheese and real Oreo crumbs—no shortcuts, no artificial flavors, just pure indulgence.
- Cooking Method: The water‑bath technique prevents cracks and ensures an even, custard‑like consistency.
- Make‑Ahead Potential: They keep beautifully in the fridge for up to three days, so you can prep ahead and spend more time mingling.
Inside the Ingredient List
The Flavor Base
The 16‑ounce block of cream cheese is the heart of this dessert. Its high fat content provides that luxurious, tangy richness that defines a classic cheesecake. If you skimp on the cream cheese, the filling becomes watery and loses its signature bite. For a smoother blend, let the cheese sit at room temperature for at least 30 minutes before mixing; this prevents lumps and ensures a silky texture. A great tip: always use a full‑fat version—low‑fat alternatives will crack and taste bland.
The Texture Crew
Whipped cream is the secret weapon that lightens the filling without sacrificing richness. It introduces air bubbles that make the final product feel airy, almost like a mousse, yet still dense enough to hold its shape. If you’re out of whipped cream, a 1:1 swap with heavy cream folded in gently will work, though the texture will be slightly denser. The granulated sugar adds just enough sweetness to balance the tang of the cheese, while the vanilla extract provides a fragrant backdrop that ties everything together.
The Unexpected Star
Oreo cookie crumbs are more than just a flavor; they bring a subtle crunch and a chocolatey undertone that elevates the entire dessert. Using about 24 cookies gives you the perfect crumb‑to‑butter ratio, ensuring the crust sets firmly yet remains crumbly enough to crumble with each bite. If you want a gluten‑free version, substitute with gluten‑free chocolate sandwich cookies—just make sure they have a similar texture.
The Final Flourish
The garnish of crushed Oreos and a dollop of whipped cream isn’t just for looks; it adds a final textural contrast that makes each bite feel complete. The crushed cookies on top provide an extra crunch that mirrors the crust, while the fresh whipped cream adds a cool, creamy finish that balances the warm cheesecake. If you’re feeling adventurous, drizzle a thin ribbon of chocolate ganache over the top for an indulgent twist.
Everything's prepped? Good. Let's get into the real action…
The Method — Step by Step
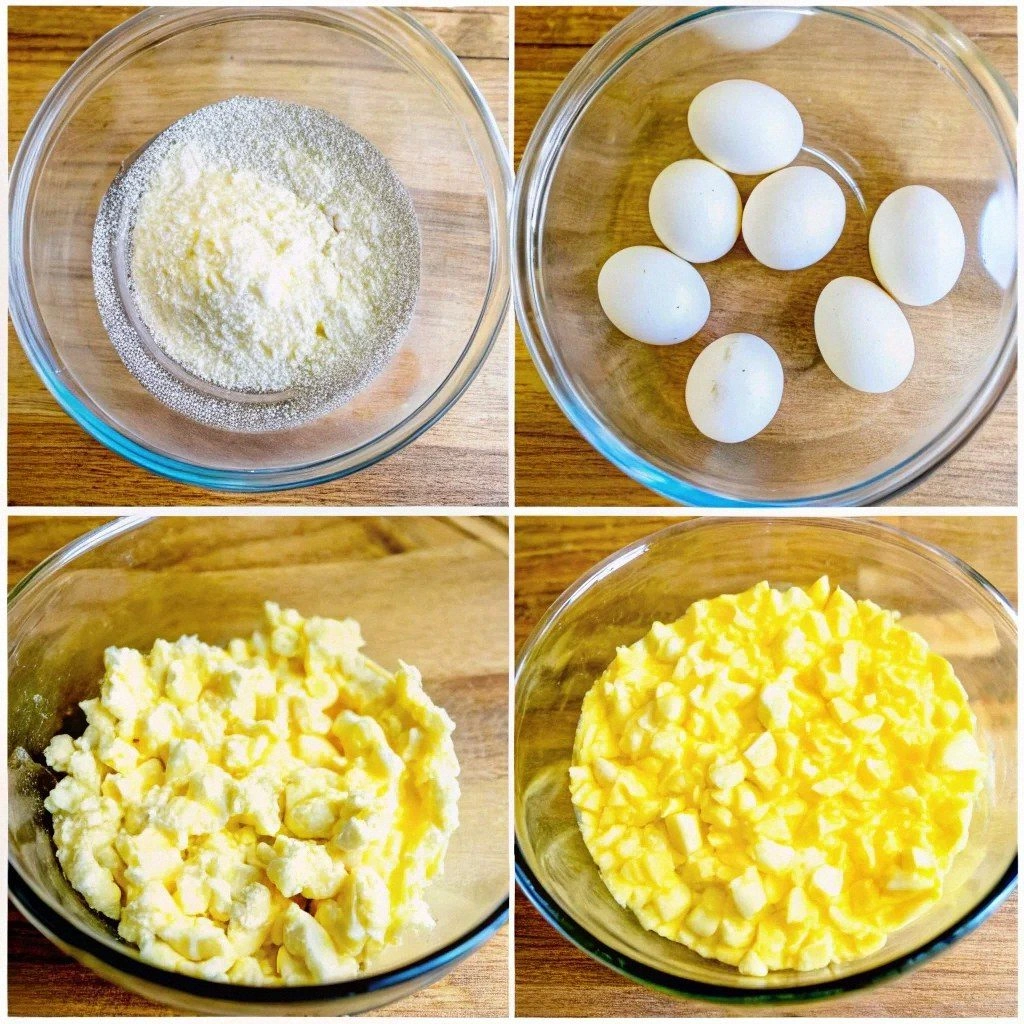
Preheat your oven to 325°F (165°C). While the oven warms up, line a 12‑cup muffin tin with paper liners or lightly grease them with butter. This ensures the mini cheesecakes will release cleanly later, preventing that dreaded “stuck to the pan” disaster.
In a food processor, blitz the Oreo cookies until they become fine crumbs. Add the melted butter and pulse just until the mixture resembles wet sand. Press about two teaspoons of this mixture into the bottom of each muffin cup, using the back of a spoon to flatten it into an even layer. Watch out: Over‑pressing can create a dense crust that won’t crumble nicely.
Watch Out: If the butter is too hot, the crumbs will become soggy; let it cool for a minute before mixing.Place the muffin tin on a larger baking sheet and set it in the oven for 8‑10 minutes. This “pre‑bake” step firms up the crust so it won’t melt into the filling later. You’ll know it’s ready when the edges turn a light golden hue and the surface looks set but not browned.
While the crust bakes, beat the softened cream cheese in a stand mixer on medium speed until it’s completely smooth—no lumps, no grainy spots. Add the sugar and vanilla extract, and continue beating until the mixture is light and fluffy. This aeration is crucial; it creates that airy, melt‑in‑your‑mouth sensation we all crave.
In a separate bowl, whisk the eggs lightly, then fold them into the cream cheese mixture one at a time. Incorporate the whipped cream gently, using a spatula to fold rather than a whisk—this preserves the air you just beat into the cream cheese. The batter should have a glossy sheen and a slightly thick but pourable consistency.
Kitchen Hack: If the batter looks too thick, add a splash of milk (about 1‑2 tbsp) to loosen it without compromising texture.Remove the crust‑filled tin from the oven and let it cool for a minute. Then, carefully pour the cheesecake batter into each cup, filling them just below the rim. Tap the pan gently on the counter to release any air bubbles; you’ll hear a faint “pop” that signals a smooth surface.
Create a water‑bath by pouring hot water onto the baking sheet until it reaches halfway up the sides of the muffin tin. This gentle steam environment prevents the tops from cracking and gives the filling a custard‑like texture. Bake for 25‑30 minutes, or until the edges are set and the centers still wobble slightly—think of a gently trembling jelly.
Turn off the oven, crack the door open a crack, and let the cheesecakes sit inside for 10 minutes. This gradual cooling prevents sudden temperature changes that could cause cracks. Then, transfer the tin to a wire rack and let the cakes cool completely to room temperature.
Once cooled, refrigerate the mini cheesecakes for at least 2 hours, preferably overnight. This chilling step firms up the filling, making the cakes easier to pop out of the liners. When you’re ready to serve, garnish each with a generous sprinkle of crushed Oreos and a dollop of whipped cream. The final presentation looks like a tiny, elegant dessert gallery.
That's it — you did it. But hold on, I've got a few more tricks that'll take this to another level…
Insider Tricks for Flawless Results
The Temperature Rule Nobody Follows
Never bake cheesecake batter straight from the fridge. Cold batter can cause the edges to set too quickly, leading to cracks. Let the mixture sit at room temperature for 20‑30 minutes before filling the crusts; this small step ensures an even bake and a smoother surface. I once tried skipping this step, and the result was a cracked, uneven top that looked like a battlefield.
Why Your Nose Knows Best
Your sense of smell is a reliable indicator of doneness. Around the 20‑minute mark, you’ll notice a faint buttery aroma wafting from the oven—this is your cue that the crust is perfectly toasted. If you rely solely on time, you might over‑bake, resulting in a dry texture. Trust that nose of yours; it’s smarter than any timer.
The 5‑Minute Rest That Changes Everything
After the water‑bath bake, let the cheesecakes sit in the turned‑off oven with the door ajar for exactly five minutes. This gentle residual heat lets the center set without shocking the structure, preventing the dreaded “crack‑fest.” I once pulled them out immediately and ended up with a cracked top that looked like a cracked egg—no one wants that.
Crush‑And‑Press Technique
When forming the crust, use the back of a measuring cup to press the Oreo‑butter mixture firmly into each cup. This creates a uniform thickness that bakes evenly. If you simply sprinkle the crumbs, you’ll get an uneven crust that can crumble apart when you try to lift the cheesecake.
Whipped Cream Whisper
Fold the whipped cream into the batter in three gentle passes, not all at once. This method preserves the air bubbles, giving the final cheesecake a light, mousse‑like texture. Over‑mixing will deflate the cream, resulting in a denser, less airy bite.
Creative Twists and Variations
This recipe is a playground. Here are some of my favorite ways to switch things up:
Mint‑Chocolate Explosion
Add ½ teaspoon of peppermint extract to the filling and fold in a handful of crushed mint chocolate chips. The refreshing mint cuts through the richness, making it perfect for holiday parties.
Salted Caramel Drizzle
Swap the whipped cream garnish for a drizzle of homemade salted caramel and a pinch of flaky sea salt. The sweet‑salty combo adds depth and makes the mini cheesecakes feel ultra‑luxurious.
Berry Burst
Stir in ¼ cup of finely chopped fresh strawberries into the batter before baking. Top each cheesecake with a fresh strawberry slice for a pop of color and a hint of tartness.
Coffee Lover’s Dream
Replace the vanilla extract with 1 teaspoon of espresso powder dissolved in a tablespoon of hot water. The coffee notes pair beautifully with the chocolatey Oreo crust, creating a dessert that feels like dessert and a coffee break in one.
Gluten‑Free Glory
Use gluten‑free chocolate sandwich cookies in place of regular Oreos, and ensure the whipped cream is made from a gluten‑free brand. The texture remains identical, and you won’t miss a beat.
Storing and Bringing It Back to Life
Fridge Storage
Cover the mini cheesecakes loosely with plastic wrap or store them in an airtight container. They stay fresh for up to three days, retaining their creamy texture. For best results, keep them on a middle shelf where temperature fluctuations are minimal.
Freezer Friendly
If you need to make them ahead, freeze the baked and cooled cheesecakes (without garnish) in a single layer on a parchment‑lined tray. Once solid, transfer to a zip‑top freezer bag. They’ll keep for up to two months. When ready to serve, let them thaw in the fridge overnight.
Best Reheating Method
To revive a frozen cheesecake, place it on a microwave‑safe plate, add a tiny splash (about 1 teaspoon) of water, and microwave on low power (30% power) for 15‑20 seconds. The steam generated will bring back that silky texture without overcooking. Then, add fresh whipped cream and crushed Oreos for the final touch.