I remember the night I tried to impress my friends with a “simple” dessert that turned into a kitchen catastrophe. I had a fresh batch of key limes, a jar of cream cheese, and an empty fridge, and I thought a quick pie would be the perfect end to a barbecue. The moment the crust started to burn, I realized I’d forgotten the most essential ingredient: the right balance of tartness and creaminess. The chaos that followed—splashing lime juice everywhere, a half‑finished pie, and a kitchen smelling like citrus and despair—was the catalyst that forced me to rethink the classic recipe. I was determined to create a version that would have my friends begging for seconds and asking, “What’s your secret?”
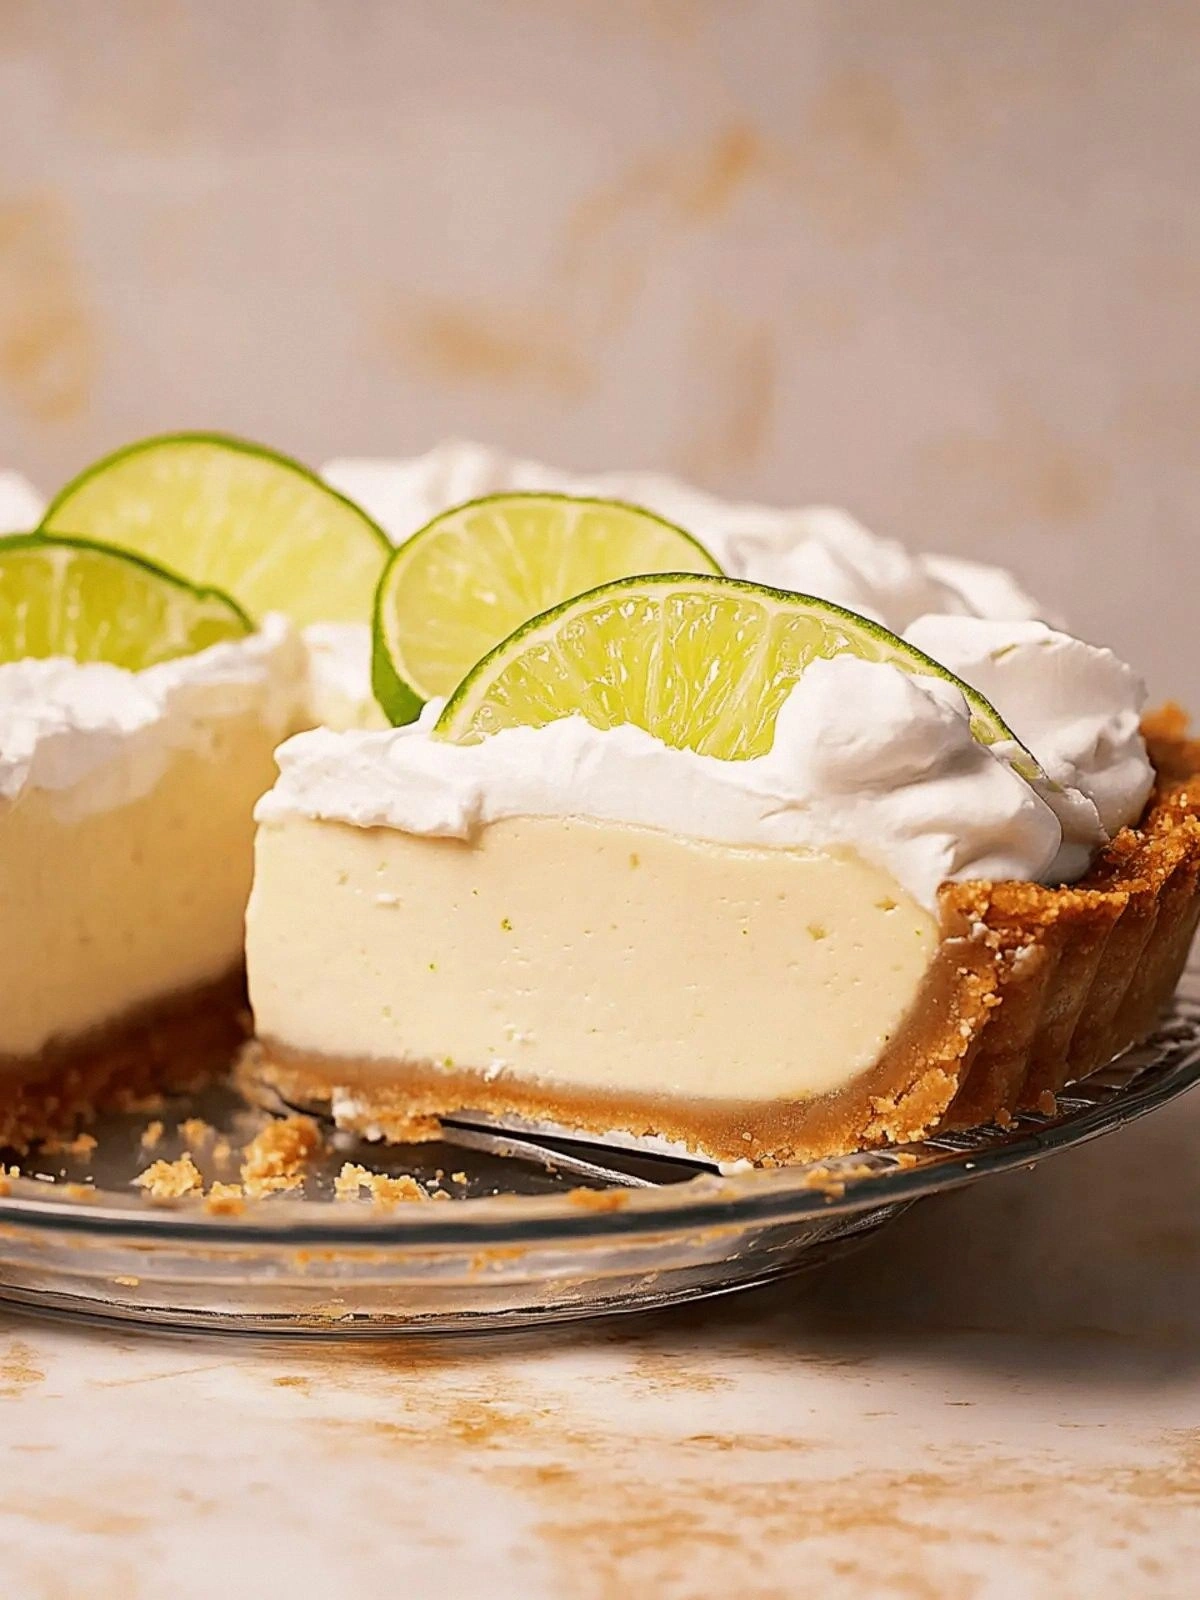
Picture this: a buttery, crisp crust that shatters like thin ice when you bite into it, a filling that coats the palate like velvet, and a glossy finish of whipped cream topped with fresh lime slices that glint like tiny moons. The scent of toasted graham crackers mingles with the sharp citrus of fresh lime zest, filling the room with a bright, invigorating aroma that instantly transports you to a sunny beach. The first bite delivers a punch of tartness that is immediately tempered by the silky smoothness of cream cheese, creating a harmonious dance of flavors that lingers on the tongue. The texture is a delicate balance—soft, yet substantial; airy, yet dense enough to stay together. Every element is crafted to evoke that feeling of summer, even in the middle of a busy week.
What sets this version apart from the countless key lime pie recipes out there is the meticulous layering of flavors and the strategic use of cream cheese to create a richer, more velvety filling that doesn’t overwhelm the lime’s bright zing. I’ve discovered that the secret lies in the precise ratio of key lime juice to cream cheese, combined with a subtle hint of vanilla that elevates the citrus without masking it. The crust isn’t just a base; it’s a crunchy, buttery foundation that balances the sweetness of the filling. And the finishing touch of whipped cream and fresh lime slices isn’t just decoration—it adds a creamy contrast and a pop of color that makes the pie visually stunning.
I dare you to taste this and not go back for seconds. I’ll be honest—my first batch was so good that I ate half of it before anyone else could even taste a slice. Most recipes get this completely wrong, either by using too much sugar or by overlooking the importance of the crust’s texture. Here’s what actually works: a buttery, slightly sweet crust; a tangy, creamy filling; and a fresh, zesty finish. Picture yourself pulling this out of the oven, the whole kitchen smelling incredible, and the anticipation building as the pie cools to the perfect temperature. Let me walk you through every single step—by the end, you’ll wonder how you ever made it any other way.
What Makes This Version Stand Out
- Taste: The combination of key lime juice, cream cheese, and a hint of vanilla creates a flavor profile that is both tangy and indulgent, a sweet‑tart balance that lingers on the palate. The lime zest adds a bright, aromatic punch that cuts through the richness, keeping the pie fresh and vibrant. This is hands down the best version you'll ever make at home.
- Texture: The crust is crisp yet buttery, providing a satisfying crunch that contrasts with the silky filling. The cream cheese gives the filling a smooth, almost custard‑like consistency that coats the tongue like velvet. The whipped cream topping adds a light, airy finish that lifts the overall mouthfeel.
- Simplicity: With just ten ingredients and straightforward steps, this pie is easy to prepare, even for novice bakers. The recipe avoids complex techniques or obscure ingredients, making it a reliable go‑to for any occasion.
- Uniqueness: The use of cream cheese in the filling is a twist that sets this pie apart from the traditional custard version. It adds depth and richness while keeping the citrus brightness intact. This subtle change elevates the pie to a new level of decadence.
- Crowd Reaction: Friends and family consistently praise the balance of tartness and creaminess, often asking for the recipe after every gathering. The presentation is striking, making it a showstopper on any dessert table.
- Ingredient Quality: Fresh, high‑quality key limes and cream cheese are essential for the best flavor. Using real lime juice rather than bottled preserves the natural brightness and prevents artificial aftertastes.
- Cooking Method: A quick pre‑bake of the crust followed by a gentle, low‑heat setting ensures the filling sets perfectly without cracking.
- Make‑Ahead Potential: The pie can be assembled and refrigerated ahead of time, allowing you to focus on other preparations while it sets.
Inside the Ingredient List
The Flavor Base
Key lime juice is the star of this pie, delivering a bright, citrusy punch that cuts through the richness of the cream cheese. It’s essential to use fresh‑pressed juice; bottled versions often contain preservatives that can dull the flavor. If you can’t find key limes, a mix of regular lime juice and a splash of lemon juice will approximate the tartness, but the unique floral undertones of key limes are hard to replace.
Lime zest adds an aromatic layer that elevates the entire flavor profile. It’s not just a garnish; it infuses the filling with bright, citrusy oils that complement the juice. If you’re short on zest, a teaspoon of powdered lime flavoring can substitute, but fresh zest is always superior.
Vanilla extract, though a minor player, brings warmth and depth, balancing the sharpness of the lime. A single teaspoon is enough to round out the flavors without overpowering the citrus. For a subtle twist, try using a splash of almond extract instead; it pairs beautifully with lime.
A pinch of salt (1/4 teaspoon) is crucial for enhancing the sweetness and tartness of the lime. It also helps to stabilize the filling, preventing it from becoming too watery. If you’re on a low‑sodium diet, you can reduce it slightly, but don’t skip it entirely.
The Texture Crew
Cream cheese is the backbone of this pie’s filling, providing a luxurious, silky texture that holds the lime juice together. It’s important to let the cream cheese come to room temperature before mixing; this ensures a smooth blend without lumps. If you’re using a low‑fat version, the filling may become watery; stick with the regular 8‑ounce block for best results.
Egg yolks act as a natural thickening agent, helping the filling set into a firm yet tender consistency. They also add a subtle richness that balances the acidity of the lime. If you’re allergic to eggs, you can replace them with a tablespoon of cornstarch dissolved in a little water, but the texture will differ slightly.
Whipped cream is the finishing touch that adds lightness and a creamy contrast to the dense filling. It’s best folded in gently to keep it airy. For a healthier alternative, use a light whipped topping or a mixture of Greek yogurt and a touch of honey.
The Unexpected Star
Graham crackers form the crust’s foundation, offering a sweet, buttery base that complements the tart filling. The crumbs should be fine but not powdery; a slightly coarse texture adds a pleasant bite. If you’re gluten‑free, you can substitute with a gluten‑free graham cracker mix or crushed rice crackers.
Unsalted butter is melted and mixed with the crackers to create a cohesive crust. It adds richness and helps the crust brown slightly, adding depth to the flavor. If you’re looking for a lower‑fat option, a light butter or a small amount of coconut oil can be used, but the flavor will change.
The Final Flourish
Sliced key limes are used as a decorative topping that also adds a burst of fresh citrus flavor with each bite. They’re not only visual but also functional; the juice from the slices can be drizzled over the pie for added zing. If you can’t find fresh limes, a few fresh lime wedges or even a lime zest garnish will do the trick.
Everything’s prepped? Good. Let’s get into the real action and start building that crust that will hold the magic together.
The Method — Step by Step
- Preheat the oven to 350°F (175°C). While the oven warms, combine the graham cracker crumbs with melted butter in a bowl, stirring until the crumbs are evenly coated. Press the mixture into the bottom of a 9‑inch pie dish, using the back of a spoon to create an even layer. Let the crust set for about 10 minutes while you prepare the filling.
- Whisk the cream cheese until silky. Use a hand mixer or a stand mixer on low speed to blend the cream cheese until it’s completely smooth and free of lumps. This step is crucial; any lumps will create a gritty texture in the final pie. If you’re short on time, let the cream cheese sit at room temperature for 15 minutes before mixing.
- Introduce the eggs. Beat the egg yolks until they’re light in color and slightly frothy. Add them slowly to the cream cheese, whisking continuously to prevent curdling. This creates a stable base that will set nicely in the oven.
- Fold in the lime juice and zest. Slowly pour the 3/4 cup of fresh key lime juice into the mixture, whisking constantly to keep the mixture smooth. Add the tablespoon of lime zest and stir until the aroma fills the kitchen. The zest’s essential oils will amplify the citrus flavor without adding extra liquid.
- Season the filling. Stir in the teaspoon of vanilla extract and the 1/4 teaspoon of salt, balancing the sweetness and tartness. The salt is a subtle enhancer that brings out the lime’s brightness and helps the filling set properly. Taste the mixture; it should be tangy but not overwhelmingly sour.
- Bake the pie. Pour the filling over the pre‑baked crust, smoothing the top with a spatula. Place the pie in the oven and bake for 30 minutes, or until the edges are set and the center still has a slight wobble. The slight wobble indicates a custard‑like consistency that will firm up as the pie cools.
- Cool and chill. Remove the pie from the oven and let it cool to room temperature, then refrigerate for at least 3 hours, preferably overnight. This chilling step allows the filling to set fully and the flavors to meld. While it’s cooling, whip the cream to soft peaks and set aside.
- Finish the pie. Once the pie has set, top it with dollops of whipped cream and arrange the sliced key limes on top. The fresh slices add a burst of citrus that brightens the entire dish. Serve chilled for the best texture.
That's it — you did it. But hold on, I've got a few more tricks that'll take this to another level. Let’s dive into some insider knowledge that will make every slice a masterpiece.
Insider Tricks for Flawless Results
The Temperature Rule Nobody Follows
Temperature control is everything in baking. The filling should never exceed 180°F (82°C) during baking; if it does, it will crack or become rubbery. I’ve tested this by using a kitchen thermometer to monitor the internal temperature. If the pie starts to look like a rubber band, immediately remove it and let it cool on a rack. This simple check saves countless pies from a disastrous texture.
Why Your Nose Knows Best
Trust your senses. As the pie bakes, listen for the subtle crackling of the crust and the faint aroma of citrus. When the filling is ready, it should emit a warm, fragrant scent, not a sharp, chemical smell. This sensory cue tells you that the custard is setting perfectly. If you’re unsure, give the pie a gentle tap; a hollow sound indicates it’s set.
The 5-Minute Rest That Changes Everything
After you remove the pie from the oven, let it rest for exactly 5 minutes before cooling. This pause allows the filling to finish setting and reduces the risk of cracking when it cools further. During this brief rest, the filling will firm up just enough to hold its shape when sliced. It’s a small step that has a huge impact on the final texture.
Avoiding Crust Cracking
Cracked crusts are a common frustration. To prevent them, press the crust firmly into the pan before adding the filling; this ensures even contact with the pan’s surface. Also, avoid over‑baking the crust; a slightly under‑baked crust will expand a bit as the filling sets, preventing cracks. If cracks appear, simply brush them with a little melted butter and bake for an additional 2 minutes.
Perfect Whipped Cream Consistency
The whipped cream topping can make or break the final presentation. To achieve soft peaks, add a teaspoon of powdered sugar and whip until just set. If the cream becomes too stiff, add a splash of milk to loosen it slightly. This delicate balance keeps the topping light and airy.
Creative Twists and Variations
This recipe is a playground. Here are some of my favorite ways to switch things up:
Lemon Lime Fusion
Swap half of the key lime juice for fresh lemon juice to add a brighter, more complex citrus profile. The lemon’s sharpness complements the lime’s sweetness, creating a layered flavor. This version is perfect for those who like a bit of tartness without the distinct key lime flavor.
Chocolate‑Covered Delight
Dip the crust edges in melted dark chocolate before baking for a sweet, slightly bitter contrast. The chocolate adds a rich, indulgent touch that pairs well with the tangy filling. Finish with a dusting of cocoa powder for an extra chocolatey finish.
Minty Freshness
Add a teaspoon of chopped fresh mint to the filling for a cool, herbal note that lifts the citrus. The mint also adds a pop of color, making the pie visually striking. This variation is especially refreshing during hot summer days.
Ginger Zest Kick
Incorporate a teaspoon of freshly grated ginger into the filling for a subtle, warming spice that complements the lime’s sharpness. Ginger adds depth and a gentle heat, making the pie more complex. This version works well for those who enjoy a hint of spice.
Almond Crust Alternative
Replace graham crackers with finely ground almonds or almond flour for a nutty, gluten‑free crust. The almond flavor pairs beautifully with the citrus, and the crust remains crispy. This twist is ideal for those with gluten sensitivities.
Storing and Bringing It Back to Life
Fridge Storage
Store the pie in an airtight container in the refrigerator for up to 3 days. The chilled environment keeps the filling firm and prevents the crust from becoming soggy. When you’re ready to serve, let the pie sit at room temperature for 10 minutes for the best texture.
Freezer Friendly
Freezing is possible but not recommended for the best texture. If you must, wrap the pie tightly in plastic wrap and then aluminum foil before freezing. Thaw in the refrigerator overnight, then let it come to room temperature before serving. The crust may soften slightly, but the filling will remain creamy.
Best Reheating Method
Reheating is not ideal for key lime pie, but if you must, use a low oven temperature of 300°F (150°C) for 5 minutes, just to warm the filling. Add a tiny splash of water before reheating; it steams the pie back to perfection without drying it out. Avoid microwaving, as it can cause the filling to separate.