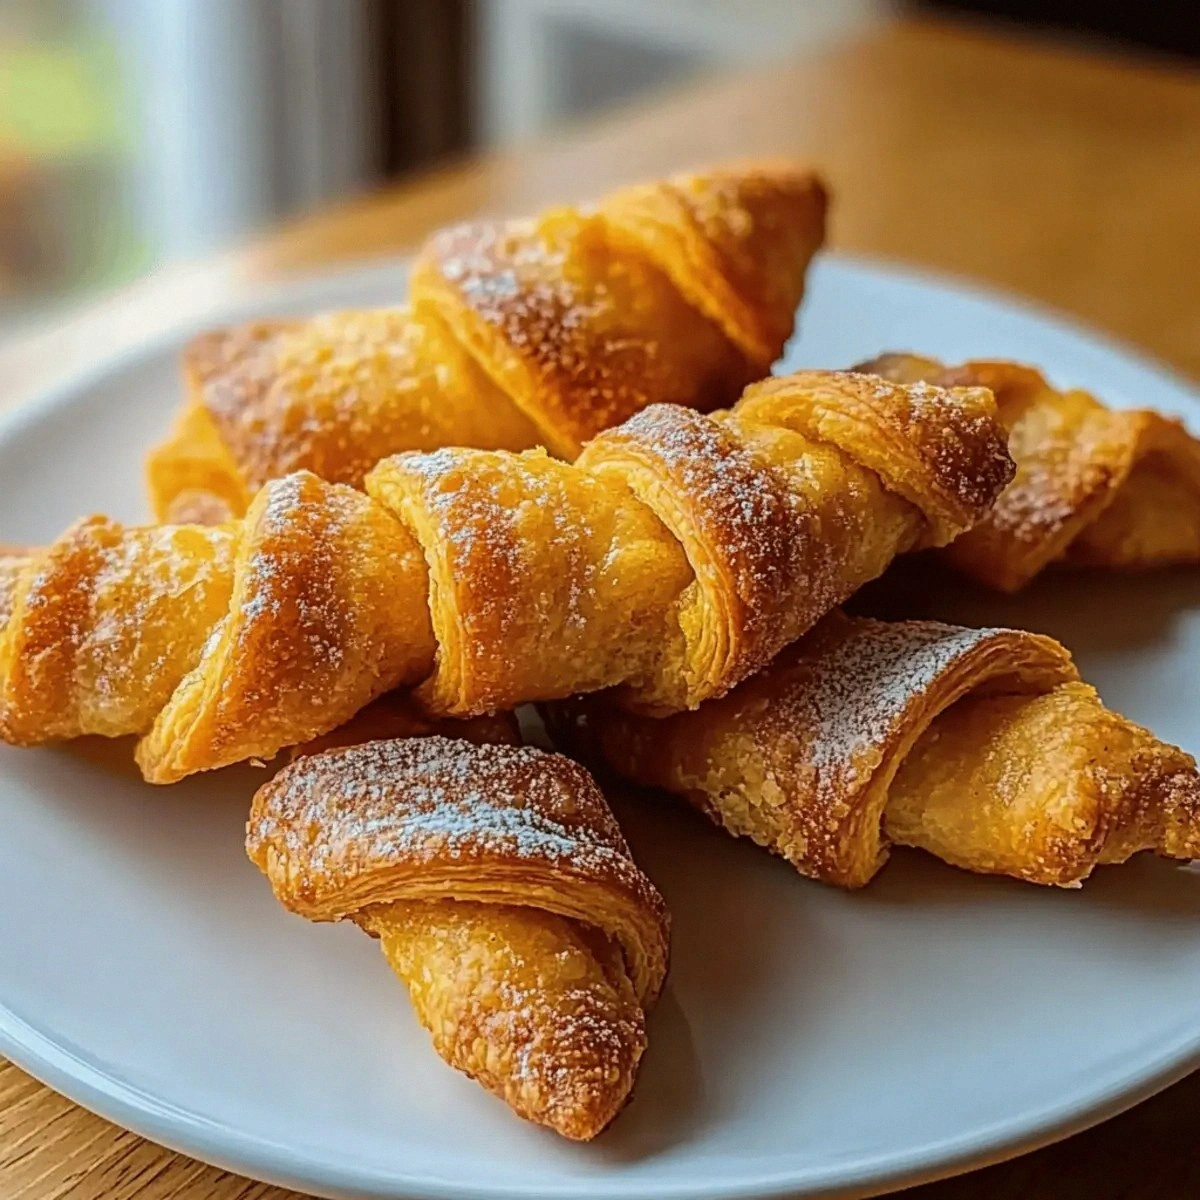
I still remember the day I nearly set my kitchen ablaze trying to make pumpkin pastries from scratch. There I was, flour in my hair, pumpkin puree splattered across the counter like a crime scene, and my smoke detector screaming at me because I got distracted by a text. My neighbor knocked on my door thinking I was hosting a very enthusiastic bonfire. Fast forward through three failed attempts, a very patient partner who suggested maybe I should just buy something from the bakery, and one triumphant Sunday afternoon when everything clicked into place. These Autumn Pumpkin Twists were born from pure stubbornness and a refusal to let some puff pastry and spices get the better of me.
Picture this: It's October, the kind of afternoon where the light turns golden and the air smells like possibility and dead leaves. You're standing in your kitchen, sleeves rolled up, and you've got Frank Sinatra crooning about autumn leaves while you're about to create something that'll make your entire house smell like a Williams Sonoma store. The first time I pulled these twists from the oven, my partner walked in, stopped dead in his tracks, and declared it smelled like "someone bottled fall and set it on fire in the best possible way." That's the moment I knew I had something special on my hands.
Here's the thing about most pumpkin recipes floating around the internet — they're either too sweet, too bland, or they taste like someone dumped a can of pumpkin pie filling onto some sad, soggy dough. Most recipes get this completely wrong. They treat the pumpkin like an afterthought instead of the star it deserves to be. But these twists? They're different. Flaky layers that shatter like thin ice when you bite into them, revealing ribbons of spiced pumpkin filling that taste like someone took your favorite pumpkin pie, condensed it into pure flavor, and wrapped it in buttery, golden perfection. That sizzle when the egg wash hits the hot pan? Absolute perfection.
What makes this version stand out is that I cracked the code on keeping the pastry crisp while the filling stays creamy, not wet and sad like so many pumpkin pastries become. Stay with me here — this is worth it. The secret lies in a technique I discovered after my third failed batch, something so simple you'll wonder why every recipe doesn't do it. Let me walk you through every single step — by the end, you'll wonder how you ever made it any other way.
What Makes This Version Stand Out
Before we dive into the nitty-gritty, let me tell you why this isn't just another pumpkin recipe cluttering up your Pinterest board. This is hands down the best version you'll ever make at home, and I'll fight anyone who says otherwise.
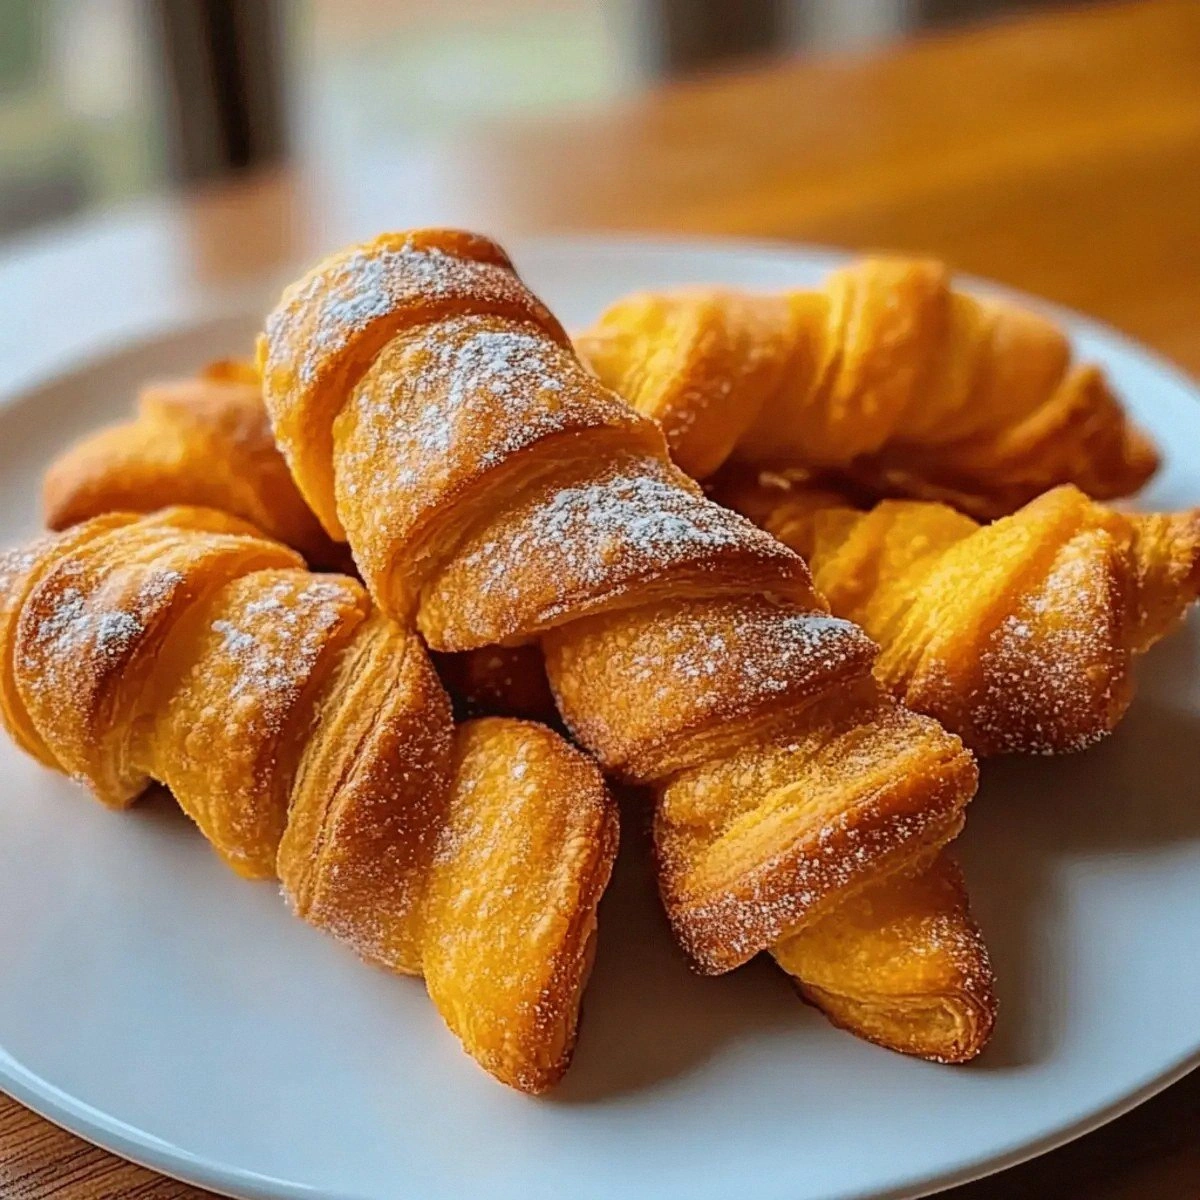
- Texture Perfection: These twists have the flakiness of a croissant with the tender chew of a Danish, creating layers that separate into delicate sheets when you pull them apart. The contrast between the crisp exterior and the almost custard-like interior is pure magic.
- Flavor That Punches Back: Most pumpkin pastries taste like someone waved a cinnamon stick over bland squash. This version layers brown sugar's molasses notes with the warmth of cinnamon and nutmeg, plus a hit of vanilla that makes everything taste like it came from a Parisian bakery.
- Beginner-Friendly Brilliance: If you've ever struggled with laminated dough or yeast-raised pastries, you're not alone — and I've got the fix. Using quality puff pastry means you get professional results without three days of folding and chilling.
- Crowd-Silencing Reaction: I brought these to a potluck last year and witnessed something magical: the room went quiet except for the sound of people chewing. One friend cornered me by the dessert table and demanded the recipe with the intensity of someone negotiating international secrets.
- Make-Ahead Magic: Picture yourself pulling this out of the oven, the whole kitchen smelling incredible, except you prepped everything last night while watching Netflix. These twists hold their texture for hours, making them perfect for brunch hosts who want to actually enjoy their guests.
- Ingredient Integrity: No artificial flavors, no weird preservatives, just real pumpkin and spices doing what they do best. The difference between using quality ingredients and the cheap stuff is like comparing a symphony to a kazoo.
Alright, let's break down exactly what goes into this masterpiece...
Inside the Ingredient List
The Flavor Base
Pumpkin puree isn't just pumpkin puree, okay? The stuff you scoop out of a can labeled "100% pumpkin" versus the organic stuff in the glass jar? Night and day difference. The good stuff tastes like someone roasted actual pumpkins and pureed them with care, because that's exactly what happened. It has this deep, almost nutty sweetness that makes the cheap canned stuff taste like cardboard that's been left in the rain. If you skip this and grab the bargain basement puree, your twists will taste like disappointment and broken dreams.
Brown sugar is your flavor foundation here, and I'm talking dark brown, not that anemic light stuff. Dark brown sugar has more molasses, which brings notes of toffee and caramel that make the pumpkin taste more like pumpkin and less like baby food. The molasses also helps create that gorgeous mahogany color on the twists as they bake. Try making this with white sugar and you'll get pale, sad twists that taste like someone forgot to add the flavor.
The Texture Crew
Puff pastry is where most home bakers panic and reach for the phone to order takeout instead. But here's the truth: even professional bakers buy puff pastry more often than they make it. The key is knowing which one to buy. Skip the generic store brand that costs two dollars — it tastes like flaky cardboard. Splurge on the all-butter version, usually found in the freezer section near the frozen fruit. Yes, it costs more. Yes, it's worth every penny. That butter creates layers so delicate they practically dissolve on your tongue.
The egg wash isn't just for pretty color, though it does create that golden-brown finish that makes people think you went to culinary school. It also acts like glue, keeping your twists from unraveling in the oven. I add a splash of milk to my egg wash because it creates a more even, glossy finish. Skip the egg wash and your twists will look pale and anemic, like they need a vacation somewhere sunny.
The Spice Symphony
Ground cinnamon is the lead singer here, but not all cinnamon is created equal. That jar that's been sitting in your spice rack since the Obama administration? It's lost its voice. Fresh cinnamon has this bright, almost citrusy note that makes the pumpkin sing. If your cinnamon doesn't smell like Christmas and childhood memories when you open the jar, it's time for a new one. The difference between fresh and stale spices is like comparing a live orchestra to a MIDI file.
Nutmeg is your secret weapon, the spice that makes people say "I can't quite place what makes this so good" while going back for thirds. Freshly grated nutmeg is a game-changer — it has this warm, nutty complexity that pre-ground nutmeg can't touch. I keep whole nutmegs in a tiny jar and grate them with a microplane. One whole nutmeg will last you through dozens of recipes, and your twists will taste like they have a secret.
The Unexpected Star
Vanilla extract is your flavor amplifier, the ingredient that makes everything else taste more like itself. But here's what most recipes get wrong: they add it to the pumpkin filling where it gets overwhelmed. Instead, I brush a tiny amount on the pastry before adding the filling. This creates a vanilla-scented layer that perfumes the whole twist as it bakes. It's subtle, but it's the difference between good pastries and pastries that make people close their eyes when they take a bite.
Everything's prepped? Good. Let's get into the real action...
The Method — Step by Step
- Start with the filling foundation: In a medium bowl, whisk together your pumpkin puree, brown sugar, granulated sugar, cinnamon, nutmeg, and vanilla until it looks like the inside of the world's most delicious pumpkin pie. The mixture should be thick but spreadable — if it's watery, your twists will weep in the oven and turn soggy. I like to let this sit for five minutes while the sugar dissolves fully. This step is crucial because it lets the spices bloom and meld with the pumpkin, creating depth that you can't get if you rush it. The filling should taste slightly too sweet at this stage — it mellows during baking.
- Prep your pastry station: Unfold one sheet of puff pastry on a lightly floured surface. If it's cracked or broken, don't panic — just press the seams together with your fingers. Roll it gently to smooth out the creases, but don't go crazy with the rolling pin. You want to keep those layers intact. The pastry should be cold but pliable — if it starts getting sticky, pop it back in the fridge for ten minutes. Working with warm puff pastry is like trying to fold a wet napkin — technically possible, but why make life harder?
- Create your pumpkin canvas: Spread half the filling evenly over the pastry, leaving a 1/2-inch border clean around the edges. This border is your sealing zone, so resist the urge to spread filling all the way to the edges. Use an offset spatula if you have one, or the back of a spoon works fine. The layer should be thin enough that you can still see the pastry through it in places — too much filling and your twists will explode like pumpkin grenades. Aim for about 1/8-inch thickness, just enough to flavor every bite without overwhelming the delicate pastry.
- The twist technique that changes everything: Here's where most recipes go wrong and create a mess. Fold the pastry in half lengthwise, like closing a book, and press the edges to seal. Now, and this is key, refrigerate this for 15 minutes. This step is pure magic — it firms up the filling so when you cut and twist, everything stays put. After chilling, use a sharp knife or pizza cutter to slice into 1-inch strips. Grab each strip at both ends and twist in opposite directions. The cold filling keeps its shape while the pastry spirals around it like a flaky candy cane.
- Master the egg wash: Beat your egg with a tablespoon of milk until it's completely smooth and no streaks remain. The milk helps break down the egg proteins so it brushes on evenly. Use a pastry brush and apply a thin, even coat — too much and you'll get a rubbery exterior. Make sure to get into all the nooks and crannies where the layers meet. This is the moment of truth where amateur-looking twists transform into golden, professional pastries that would make a French baker nod approvingly.
- The temperature sweet spot: Bake at 400°F for 20-25 minutes, rotating the pan halfway through. This temperature is hot enough to create steam between the pastry layers (hello, puff!) but not so hot that the filling scorches. You'll know they're done when they're puffed like proud little pastry balloons and the bottoms are deep golden brown. The edges should look caramelized and slightly crisp, while the centers remain tender. If they start getting too brown on top before the bottoms are done, tent loosely with foil.
- The cooling conundrum: I dare you to taste this and not go back for seconds, but resist the urge to grab one straight from the oven. Let them cool for at least 10 minutes — the filling needs time to set, and the pastry reaches its peak flakiness as it cools slightly. Plus, molten pumpkin filling is basically napalm. A friend tried skipping this step once — let's just say it didn't end well for his tongue or his pride. Patience here pays off in perfect texture and no emergency room visits.
- Repeat and perfect: While your first batch cools, repeat the process with your second sheet of pastry and remaining filling. By now you've got the rhythm down, and this batch will go faster. Don't feel pressured to bake both sheets at once — these are best fresh, and the second batch waits beautifully in the fridge while the first bakes. Plus, there's something deeply satisfying about pulling a second tray of golden twists from the oven just as your guests are polishing off the first batch.
That's it — you did it. But hold on, I've got a few more tricks that'll take this to another level...
Insider Tricks for Flawless Results
The Temperature Rule Nobody Follows
Here's the thing that separates good bakers from great ones: temperature awareness. Your ingredients need to be at the right temp, but more importantly, your kitchen needs to cooperate too. If you're baking in a steamy, hot kitchen, your pastry will melt before it puffs. I learned this the hard way during a heatwave when my twists emerged looking like they'd been steamrolled. Now I crank the AC or wait until evening when the kitchen cools down. Cold ingredients, cool kitchen, hot oven — that's the trinity of perfect puff pastry.
Your filling temperature matters just as much as your pastry temp. Room temperature filling spreads more evenly and doesn't shock the cold pastry. Take your pumpkin puree out of the fridge 30 minutes before you start. If you're in a rush (and who isn't?), microwave it for 10-second bursts, stirring between each, until it's spreadable but not warm. Warm filling plus cold pastry equals a mess that would make a kindergarten art project look sophisticated.
Why Your Nose Knows Best
Professional bakers don't just rely on timers — they use all their senses, especially smell. When these twists are perfectly done, your kitchen will fill with the scent of buttery pastry and warm spices. It's not just pleasant; it's your built-in doneness indicator. If you smell the sugars starting to caramelize (like toasted marshmallows), they're probably done or very close. If you smell something slightly burnt, you've got maybe 60 seconds before they're overdone. Trust your nose — it's been refined over thousands of years to detect exactly these kinds of delicious, toasty aromas.
Touch is your other secret weapon. Gently lift a twist with a spatula and check the bottom — it should be golden brown and feel crisp, not doughy or soft. The sides should feel firm but yield slightly to gentle pressure. If they feel squishy or look pale, give them another 3-5 minutes. This hands-on approach beats any timer, because every oven is different and every batch of pastry behaves slightly differently.
The 5-Minute Rest That Changes Everything
Okay, ready for the game-changer? After baking, turn off the oven and crack the door open, but leave the twists inside for 5 minutes. This gradual cooling prevents the rapid temperature change that can make puff pastry collapse. It's like the difference between jumping into an ice bath versus slowly acclimating to cooler water. Your twists will maintain their height and structure instead of deflating like sad little balloons. I discovered this trick after watching my beautiful pastries turn into flat, crispy disappointments one too many times.
During this rest, something magical happens to the filling too. The pumpkin mixture, which was bubbling and loose during baking, sets into this creamy, almost custard-like texture. It firms up just enough that when you bite into a cooled twist, you get that perfect contrast between shatteringly crisp pastry and smooth, spiced filling. Skip this step and you'll have tasty but texturally confused pastries that can't decide if they want to be crisp or soggy.
Creative Twists and Variations
This recipe is a playground. Here are some of my favorite ways to switch things up:
The Maple Bourbon Version
Replace the granulated sugar with maple sugar if you can find it, or add two tablespoons of real maple syrup to the filling. Swap the vanilla for bourbon — the alcohol burns off, leaving behind this incredible depth that makes the pumpkin taste like it was roasted in a bourbon barrel. Finish with a maple glaze made from powdered sugar, maple syrup, and a splash of cream. These disappear faster than free samples at Costco, especially during football season.
The Savory-Sweet Hybrid
Add a pinch of black pepper and reduce the sugar by half, then crumble in some goat cheese with the pumpkin filling. The tang of the cheese against the sweet pumpkin creates this sophisticated flavor profile that converts even people who claim they "don't like pumpkin." I've served these at dinner parties where guests assumed they came from an upscale bakery. The black pepper adds warmth without heat, making people taste and pause, trying to figure out what makes these so addictive.
The Breakfast of Champions
Add a teaspoon of espresso powder to the filling — it doesn't make them taste like coffee, just intensifies the pumpkin flavor and adds complexity. Serve these warm with a side of vanilla Greek yogurt for dipping. The slight bitterness of the coffee balances the sweetness perfectly, making these acceptable breakfast food in my book. My coffee-addicted friends go wild for this version, claiming it's like having their morning latte in pastry form.
The Chocolate Lover's Dream
Sprinkle mini chocolate chips over the filling before you fold and twist. Use dark chocolate (60-70%) for the best balance — milk chocolate makes them too sweet. The chocolate melts into little pockets of richness that burst when you bite into them. Kids love this version, but I've seen grown adults fight over the last one. The bitterness of the dark chocolate against the sweet pumpkin creates this sophisticated flavor that feels indulgent without being cloying.
The Spicy Autumn Version
Add a pinch of cayenne and extra cinnamon to create Mexican hot chocolate vibes. The heat is subtle — just enough to make your tongue tingle and enhance the other flavors. These are incredible with a cup of strong coffee or Mexican hot chocolate. The spice sneaks up on you, building with each bite until you're reaching for your drink and then immediately reaching for another twist. It's the culinary equivalent of a cozy mystery novel with a surprising twist ending.
The Nutty Professor
Spread a thin layer of almond paste under the pumpkin filling, or sprinkle chopped toasted pecans over the filling before twisting. The nuts add texture and richness that transforms these from simple pastries into something you'd pay six dollars for at a fancy coffee shop. Toast the nuts first — it brings out their oils and intensifies their flavor. This version is particularly good for holiday mornings when you want something special but don't want to spend all day in the kitchen.
Storing and Bringing It Back to Life
Fridge Storage
I'll be honest — I ate half the batch before anyone else got to try it, but when I do manage to save some, here's what works: Store completely cooled twists in an airtight container at room temperature for up to 2 days. Line the container with paper towels to absorb any moisture, and add another layer between twists if you're stacking them. The enemy of crisp pastry is humidity, so avoid storing them while still warm unless you enjoy soggy disappointment. They'll gradually lose their crispness but remain delicious — just warm them briefly before serving.
Freezer Friendly
These freeze beautifully, making them perfect for meal prep or unexpected guests. Flash freeze individual twists on a baking sheet for 2 hours, then transfer to freezer bags. They'll keep for up to 2 months, though honestly, they've never lasted more than a week in my freezer. To reheat, place frozen twists on a baking sheet in a 350°F oven for 10-12 minutes. They emerge almost as good as fresh, with crisp edges and warm, spiced centers. It's like having a secret weapon against bad days stashed in your freezer.
Best Reheating Method
The toaster oven is your friend here — it revives the crispness better than a microwave, which just makes them rubbery and sad. Three to four minutes at 350°F usually does the trick. Add a tiny splash of water to the pan before reheating — it creates steam that helps re-crisp the pastry without drying it out. This trick works for any puff pastry leftovers, from croissants to Danish. The steam penetrates the layers, essentially re-steaming them from the inside out, restoring that fresh-from-the-oven texture.