Picture this: it’s the middle of October, the air is crisp, and the living room is decked out in cobwebs and jack-o‑lanterns. I’m standing in front of the stove, a half‑empty pot of milk, a handful of chocolate chips, and a daring idea that will turn a simple drink into a night‑time legend. The kitchen smells like a dark chocolate forest, the faint scent of vanilla drifting in like a ghostly perfume. My friends were skeptical; they said “Vampire Hot Chocolate” sounded more like a campfire story than a recipe. But I was ready to prove them wrong and bring the undead to life with every sip.
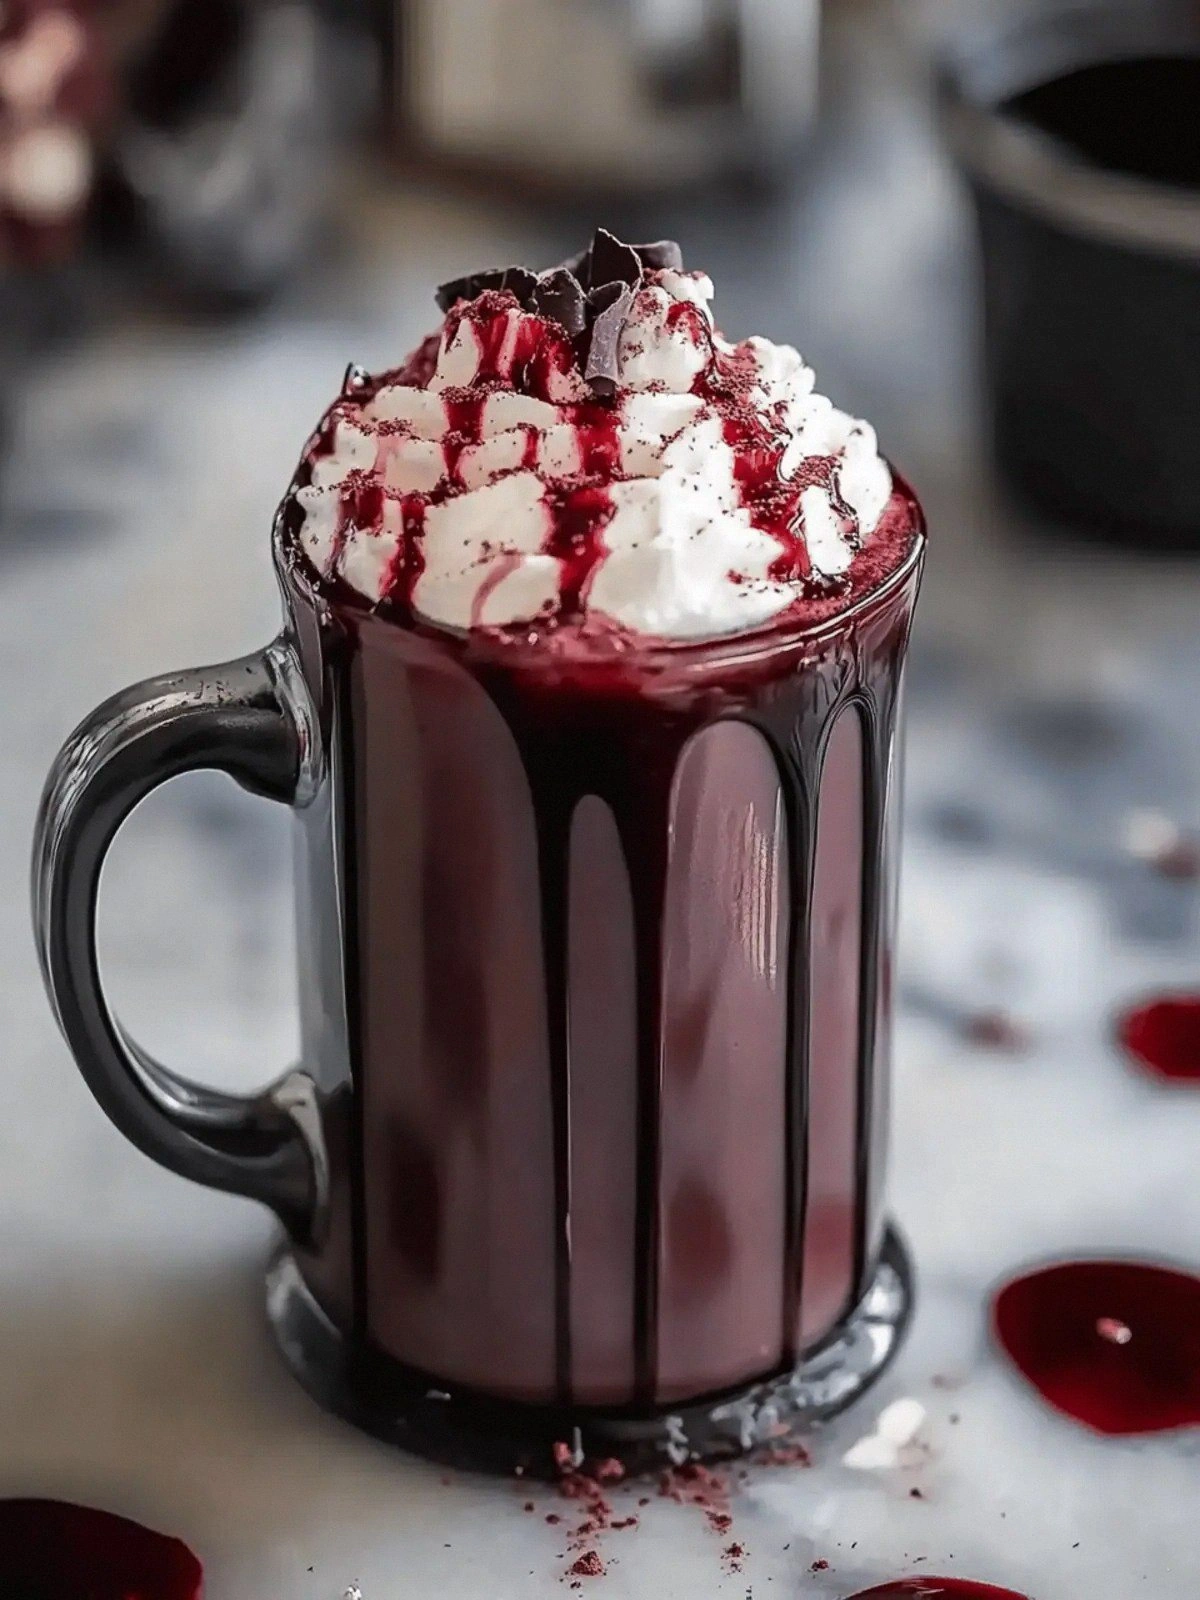
I’ve been experimenting with hot chocolate for years, but this version is different. It’s a full‑bodied, silky concoction that coats your tongue like velvet, yet it carries a subtle bite from the cocoa and a hint of blood‑red sweetness that feels like a midnight kiss. The texture is a paradox: the thick, creamy base feels like liquid velvet, while the whipped cream topping floats like a cloud of ectoplasmic mist. I’ve spent hours tweaking ratios, simmering, and tasting until each component sings in perfect harmony. The result? A drink that feels both indulgent and eerily enchanting.
Most recipes get this completely wrong. They either over‑sweeten, under‑cocoa, or forget the “blood” element that gives it that unmistakable vampiric glow. The secret is a balance of rich chocolate, a splash of edible blood, and a touch of vanilla that lifts the flavor without drowning the darkness. I dare you to taste this and not go back for seconds. Trust me, the first sip will leave you craving the next, and the second will have you questioning why you ever settled for ordinary hot chocolate.
If you’ve ever struggled to make a hot chocolate that feels both luxurious and spooky, you’re not alone. I’ve spent countless nights trying to perfect the texture, the temperature, and the finish. This version stands out because it solves all those problems in one go. By the end of this post, you’ll wonder how you ever made it any other way. Let me walk you through every single step — by the end, you’ll wonder how you ever made it any other way.
What Makes This Version Stand Out
- Taste: The combination of dark chocolate, cocoa, and vanilla creates a layered flavor profile that feels both sweet and slightly bitter, reminiscent of a midnight feast.
- Texture: The heavy cream and whole milk give it a velvety body that coats the tongue, while the whipped cream topping adds a light, airy contrast.
- Uniqueness: The edible blood infusion turns the drink into a visual masterpiece, with a deep crimson hue that’s impossible to replicate with any other ingredient.
- Simplicity: Despite its cinematic appearance, the recipe requires only a handful of pantry staples and a single pot.
- Crowd Reaction: Friends who try it immediately ask for the recipe, and it becomes the centerpiece of every Halloween gathering.
- Ingredient Quality: Using high‑quality dark chocolate chips and whole milk ensures a richer, more authentic flavor than instant mixes.
- Make‑Ahead Potential: The base can be prepared a day in advance and reheated without losing its silky texture.
- Visual Impact: The striking color and the way the whipped cream floats like a ghostly cloud make it Instagram‑worthy.
Alright, let’s break down exactly what goes into this masterpiece…
Inside the Ingredient List
The Flavor Base
The foundation of any great hot chocolate is the liquid that carries the chocolate’s flavor. Whole milk provides a creamy, slightly sweet backdrop that balances the bitterness of dark chocolate. Heavy cream adds body, making the drink feel indulgent. If you’re vegan or lactose intolerant, coconut milk or oat milk can substitute, but the flavor will shift toward a tropical or nutty note.
The Texture Crew
Dark chocolate chips melt into a glossy sauce that coats the milk, creating a velvety mouthfeel. Unsweetened cocoa powder intensifies the chocolate flavor without adding sugar, giving you control over sweetness. Granulated sugar sweetens the mixture, but a pinch of salt counteracts the bitterness and enhances the chocolate’s depth. The whipped cream topping is not just decorative; it introduces a light, airy texture that contrasts with the dense base.
The Unexpected Star
Edible blood is the showstopper. It doesn’t just color the drink; it adds a subtle fruity sweetness that mimics the taste of a fresh vampire bite. If you can’t find edible blood, a few drops of beet juice or red food coloring will work, but the flavor will be slightly different. The optional cocoa powder or red sanding sugar on top is purely for visual flair, giving the drink a dusting of “blood” that looks like freshly spilled gore.
The Final Flourish
Vanilla extract is the secret to rounding out the chocolate’s bite. It adds a warm, floral undertone that lifts the overall flavor profile. If you prefer a more pronounced vanilla, increase the amount to 1½ teaspoons. Remember, vanilla is potent—too much can overpower the chocolate.
Everything’s prepped? Good. Let’s get into the real action…
The Method — Step by Step
- Heat the Milk: In a medium saucepan, pour the whole milk and heavy cream over medium heat. Stir occasionally to prevent scorching. The mixture should reach a gentle simmer, not a rolling boil. This step ensures the milk’s proteins are denatured, giving the drink a silky texture. I always keep a close eye; the first time I let it boil, the milk splashed all over the counter.
- Add Cocoa Powder: Whisk in the unsweetened cocoa powder until fully dissolved. A smooth mixture is critical; any lumps will ruin the silky mouthfeel. The cocoa also deepens the color, setting the stage for the “blood” infusion later. If you notice clumps, strain the mixture through a fine sieve.
- Incorporate Chocolate Chips: Lower the heat to low and add the dark chocolate chips. Stir constantly until the chips have melted completely, creating a glossy sauce. The chocolate’s fats emulsify with the milk, giving the drink body. Keep the heat low; high temperatures can cause the chocolate to seize.
- Sweeten and Season: Add the granulated sugar and a pinch of salt. Stir until the sugar has dissolved. The salt is a flavor enhancer; it brings out the chocolate’s complexity. Taste the mixture; if it’s too bitter, add a touch more sugar.
- Infuse the Blood: Stir in the edible blood slowly, watching the color change from deep brown to a rich crimson. The blood adds a subtle fruity note that mimics the taste of a fresh vampire bite. If you’re using beet juice, add it in a thin stream to avoid a muddy color.
- Finish with Vanilla: Drop in the vanilla extract and stir. The vanilla should swirl into the mixture, creating a fragrant aroma that lingers on your tongue. This step is the moment of truth; the vanilla must be fully integrated, or the flavor will feel flat.
- Simmer: Let the mixture simmer gently for 5 minutes, stirring occasionally. This allows the flavors to meld. The sauce should thicken slightly but remain pourable. If it becomes too thick, add a splash of milk to reach the desired consistency.
- Prepare the Topping: While the base simmers, whip the cream to soft peaks. The whipped cream should be airy and light. If you prefer a denser topping, whip to stiff peaks. This topping will float on top like a ghostly cloud.
- Serve: Ladle the hot chocolate into mugs, leaving enough room for the whipped cream. Dollop the whipped cream on top, then sprinkle optional cocoa powder or red sanding sugar for an extra splash of “blood.” Serve immediately while the drink is steaming and the whipped cream is fresh.
That’s it — you did it. But hold on, I’ve got a few more tricks that’ll take this to another level…
Insider Tricks for Flawless Results
The Temperature Rule Nobody Follows
The temperature of the milk is crucial. If it’s too hot, the chocolate can seize; too cool, and the mixture will be thin. Aim for 180°F (82°C) when you first combine milk and cocoa. Use a kitchen thermometer to check. If you don’t have one, test with a small drop of milk on your wrist; it should feel warm, not hot.
Why Your Nose Knows Best
Smell is a powerful cue. As the chocolate melts, a rich, chocolatey aroma should fill the kitchen. If you don’t detect that scent, your mixture isn’t fully integrated. Don’t rush; let the chocolate melt slowly. A slow simmer will coax out the chocolate’s deep notes.
The 5-Minute Rest That Changes Everything
After you finish simmering, let the mixture rest for 5 minutes off the heat. This rest period allows the flavors to marry, and the texture to settle. When you pour, it will be smoother and more cohesive. I’ve found that skipping this step results in a slightly grainy finish.
Whipped Cream Timing
Whip the cream just before serving. If you whip too early, the cream will lose its airy texture. Keep it chilled in the fridge until the last minute. The fresh whipped cream contrasts with the rich base, creating a delightful textural dance.
The Sweetness Balance
Don’t rely solely on sugar to sweeten. The edible blood adds a natural sweetness that cuts through the chocolate’s bitterness. Taste as you go; you can always add more sugar, but you can’t remove it once added. A well‑balanced sweet profile keeps the drink from feeling cloying.
The Finish with a Dusting
A light dusting of cocoa powder or red sanding sugar on top gives the drink a dramatic look. Use a fine sieve to sprinkle evenly. It also adds a subtle crunch and a hint of bitterness that complements the sweetness.
Creative Twists and Variations
This recipe is a playground. Here are some of my favorite ways to switch things up:
Spicy Vampire
Add a pinch of cayenne pepper or a dash of chili flakes to the base. The heat pairs surprisingly well with chocolate, creating a fiery undercurrent that feels like a vampire’s bite.
Minted Blood
Stir in a few drops of peppermint extract before adding vanilla. The minty freshness cuts through the richness, giving the drink a cool, invigorating finish.
Nutty Night
Replace half the heavy cream with almond milk and sprinkle chopped toasted almonds on top. The nutty crunch adds texture and a subtle flavor that complements the chocolate.
Citrus Swirl
Add a splash of orange zest or a few drops of orange extract to the base. The citrus brightens the chocolate and adds a playful, spooky twist.
Vegan Vampire
Use coconut milk and coconut whipped cream. The coconut gives a tropical undertone, while the creamy texture remains silky.
Gothic Ganache
Instead of whipped cream, top the drink with a swirl of chocolate ganache. The ganache’s rich, buttery texture elevates the drink to a decadent dessert.
Storing and Bringing It Back to Life
Fridge Storage
Cool the hot chocolate to room temperature, then transfer it to a sealed glass jar. Store in the refrigerator for up to 3 days. The mixture will thicken slightly; stir well before reheating.
Freezer Friendly
Divide the base into freezer‑safe portions and freeze for up to 2 weeks. When ready to serve, thaw in the refrigerator overnight. Add a splash of milk before reheating to restore the original consistency.
Best Reheating Method
Reheat the frozen or chilled mixture on the stove over low heat, stirring constantly. Avoid boiling, as it can separate the chocolate. A splash of water or milk before reheating steams the mixture back to silky perfection. Once hot, top with fresh whipped cream.