I was standing over a skillet that had just erupted with a cloud of grease and a faint hiss that could have been mistaken for a small fire alarm. The ground beef I’d tossed with taco seasoning had started to sizzle so loudly that my neighbor’s cat bolted from the hallway, and I swear I saw the kitchen tiles tremble. I stared at the pan, realizing I’d forgotten to add any crunch or fresh element to balance that savory, meaty richness. That moment of culinary chaos was the spark that set me on a mission to create a taco salad that could survive the heat of the skillet and the cool of a jar. I dare you to taste this and not go back for seconds.
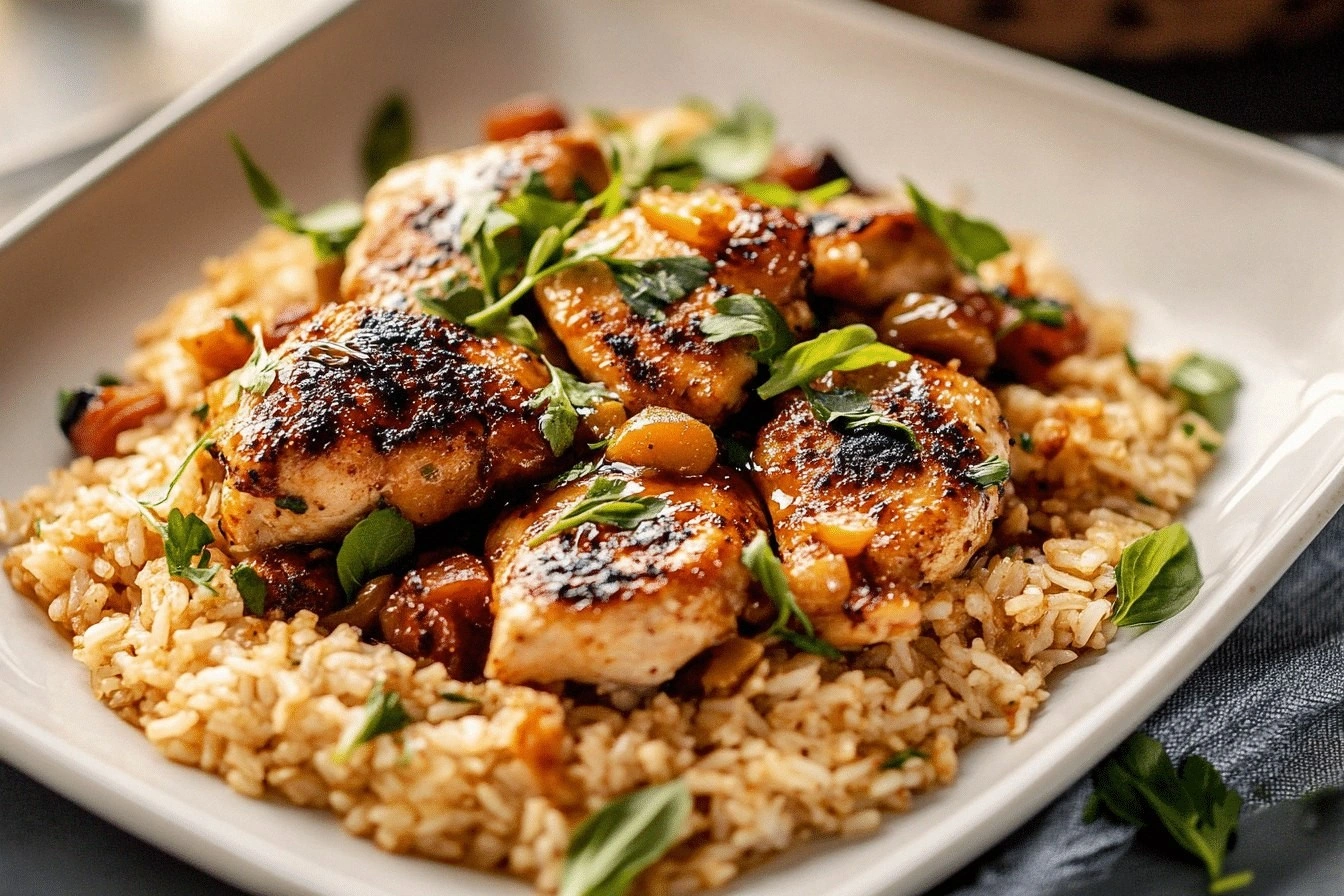
Picture the aroma of cumin and chili powder drifting through the air, mingling with the sharp, bright scent of freshly sliced tomatoes. The sound of the skillet’s metal clanging against the heat, the sizzle that announces the meat’s transformation into a caramelized, slightly crispy layer. When I finally lifted the pan, the beef was a glossy, golden brown, almost like a caramelized candy with a savory heart. The texture was a delightful contrast: tender meat, crisp lettuce, and the faint crunch of tortilla chips that shatter like thin ice when you bite into them. The visual tapestry of colors—deep green, ruby red, golden corn, and a splash of creamy avocado—was enough to make my taste buds tingle in anticipation.
What makes this jar‑packed taco salad a revelation is that it takes the classic taco experience and locks it into a portable, layered masterpiece that you can assemble in minutes and devour anywhere. I’ve spent hours experimenting with ratios, textures, and the timing of each component to preserve the integrity of every layer. The result is a dish that feels like a taco on a plate, but with the convenience of a grab‑and‑go meal that doesn’t lose its crunch or flavor. The secret? A meticulous layering technique that ensures the sauce never sogs the lettuce and the chips stay crisp until the last bite. This is hands down the best version you'll ever make at home.
And here’s the kicker: I discovered that a simple splash of lime juice added after the salad is assembled, just before sealing the jar, creates a subtle, tangy brightness that lifts the entire dish. That tiny burst of citrus is the finishing touch that turns a good salad into an unforgettable experience. I’ll be honest—when I first tasted the finished product, I ate half the batch before anyone else even got a chance to try it. It’s a flavor explosion that makes you want to keep reaching for the jar, even when you’re halfway through. Picture yourself pulling this out of the fridge, the whole kitchen smelling incredible…
What Makes This Version Stand Out
- Taste: Every bite is a harmonious blend of smoky, spicy, and fresh flavors that dance on the palate. The taco seasoning gives depth, while the lime and cilantro add a bright counterpoint.
- Texture: Layered crunch from tortilla chips and crisp lettuce contrasts beautifully with the tender, seasoned meat and creamy avocado.
- Convenience: The jar format keeps everything separate until you’re ready to eat, preventing sogginess and making it perfect for lunches or picnics.
- Visual Appeal: The vibrant colors of lettuce, tomato, corn, and cheese create an eye‑catching presentation that feels almost like a work of art.
- Make‑Ahead Potential: The salad can be assembled days in advance, and the flavors only deepen, making it ideal for meal prep.
- Versatility: Swap ground beef for turkey, or add a protein of your choice, and the recipe adapts effortlessly.
Inside the Ingredient List
The Flavor Base
Ground beef is the heart of this dish, providing a hearty, savory foundation that absorbs the taco seasoning’s complex spices. Using a lean cut ensures the salad isn’t weighed down by excess fat, but a bit of extra fat can be added for richer flavor. If you prefer a vegetarian option, swap the beef for crumbled tofu or lentils, seasoned the same way. The key is to cook the meat until it’s browned and crumbly, releasing its natural juices and allowing the spices to coat every crumb.
The taco seasoning packet is a shortcut that delivers a balanced blend of cumin, chili powder, paprika, garlic powder, and oregano. If you’re watching sodium, you can make your own blend with these spices, adjusting the amounts to your taste. The seasoning not only flavors the meat but also coats the lettuce and other vegetables, creating a cohesive taste profile across all layers. Skipping this step would leave the salad feeling disconnected and bland.
Black beans add protein and a subtle earthiness that pairs wonderfully with the bright corn and tomatoes. Rinse and drain canned beans or cook fresh ones to keep the texture firm. Beans also help bind the salad together, preventing the layers from separating during storage. If you’re on a low-carb diet, you can reduce the bean quantity or replace them with edamame for a similar protein boost.
Corn kernels bring a sweet pop that contrasts with the smoky meat and tangy dressing. Fresh or frozen corn both work; just thaw and drain if frozen. The corn’s bright yellow color adds visual vibrancy and a burst of sweetness that balances the dish’s savory elements. If you’re allergic to corn, substitute with roasted bell pepper strips for a crunchy, sweet alternative.
The Texture Crew
Shredded cheddar cheese offers a creamy, melty component that melts slightly when the jar is sealed, creating a subtle sauce that coats the other ingredients. Choose a sharp cheddar for a more pronounced flavor, or a Monterey Jack for a milder, creamier profile. Cheese also adds a layer of richness that compensates for the crispness of the lettuce and chips. If you’re dairy‑free, a sprinkle of nutritional yeast or a vegan cheese alternative can provide similar texture.
Fresh lettuce is the crunch that anchors the salad, delivering a clean, cool contrast to the warm, seasoned meat. Romaine or iceberg lettuce works best because they hold their crispness even when layered. Tear the lettuce into bite‑sized pieces to prevent tearing when you open the jar. If you prefer a softer texture, replace lettuce with mixed greens or spinach for a more delicate bite.
Diced tomatoes bring juiciness and acidity that cut through the richness of the cheese and meat. Use ripe, firm tomatoes to avoid excess water that could make the salad soggy. Tomatoes also add a pop of color that makes the dish visually appealing. For a smoky twist, use roasted tomatoes instead of raw.
Sour cream or Greek yogurt adds a cool, tangy creaminess that balances the heat from the spices. It also helps bind the layers together, preventing the salad from becoming a soggy mess. If you’re lactose intolerant, a dollop of coconut cream or a dairy‑free yogurt works well. Adjust the amount to your preferred level of creaminess.
The Unexpected Star
Avocado provides a buttery texture and a subtle, nutty flavor that elevates the entire salad. It also delivers healthy fats that keep you feeling satisfied for longer. Slice the avocado just before assembling the jar to prevent browning. If you’re not a fan of avocado, try adding sliced mango for a sweet, tropical twist.
Tortilla chips add a satisfying crunch that contrasts with the soft, creamy components. Crumble them into small pieces so they don’t overwhelm the salad but still provide that iconic chip texture. If you’re watching calories, use baked tortilla chips or even roasted chickpeas for a lighter crunch. The chips also help absorb excess moisture, keeping the lettuce crisp.
Cilantro and lime juice are the finishing touches that bring brightness and depth. The fresh herbs add herbal notes that complement the cumin, while the lime’s acidity cuts through the richness. Add the lime juice right before sealing the jar to keep the citrus flavor fresh and vibrant. If you’re not a fan of cilantro, mint or parsley can be used as a substitute.
The Final Flourish
A drizzle of salsa adds a zesty kick and a splash of color that ties the layers together. Choose a mild salsa if you want a gentle heat or a hot salsa for extra spice. The salsa also helps keep the salad moist without making it soggy. If you prefer a different flavor profile, try a chipotle or green salsa.
A pinch of salt and pepper to taste balances the flavors, ensuring each bite is well‑seasoned. Salt enhances the savory elements, while pepper adds a subtle heat that lingers on the tongue. Adjust the seasoning as you assemble each layer, tasting as you go. Over‑salting can make the salad taste flat, so it’s best to season gradually.
Everything’s prepped? Good. Let’s get into the real action. The next step is to layer the ingredients in the jar, ensuring each component stays distinct and fresh until you’re ready to eat.

The Method — Step by Step
- Heat a large skillet over medium‑high heat and add the ground beef. Break it up with a wooden spoon and cook until it starts to brown, about 5 minutes. The meat should emit a savory aroma that makes your kitchen smell like a taco truck. Keep the heat steady to avoid burning; a slight char adds depth but too much turns it bitter. When the meat is nearly cooked, sprinkle the taco seasoning and a splash of water, stirring until the mixture is evenly coated.
- Let the seasoned meat simmer for another 3 minutes, allowing the spices to meld and the water to evaporate. The meat should be a deep, caramelized brown, almost like a savory caramel. Stir occasionally to prevent sticking. If the pan feels dry, add a teaspoon of oil to keep the meat from drying out. This step is the moment of truth; if you rush it, the flavor will be flat.
- While the meat cooks, rinse and drain the black beans and corn. Toss them with a pinch of salt to bring out their natural sweetness. This pre‑seasoning ensures the beans and corn don’t stay bland after they’re layered in the jar. If you’re using frozen corn, thaw it quickly in cold water to keep the texture crisp. Keep them in a bowl until you’re ready to layer.
- Dice the tomatoes, slice the avocado, and chop the lettuce into bite‑sized pieces. The lettuce should be crisp and fresh; if it feels wilted, give it a quick rinse and pat dry. The avocado slices should be thin to avoid mushiness. Arrange the lettuce at the bottom of the jar; this base will keep the other ingredients from sinking to the bottom. Layering in this order also prevents the lettuce from becoming soggy.
- Add a generous layer of shredded cheddar cheese over the lettuce. The cheese will act as a barrier, keeping the lettuce crisp and preventing the meat from seeping into it. If you prefer a milder cheese, use Monterey Jack or a blend of cheddar and mozzarella. The cheese also adds a creamy texture that balances the crunch of the chips.
- Spoon the cooked, seasoned meat over the cheese. Spread it evenly so every bite has a good amount of protein. The meat should be hot and aromatic, creating a steam effect that helps bind the layers. If you’re using turkey, adjust the cooking time slightly to avoid over‑cooking. This layer is the flavor anchor of the salad.
- Add the black beans, corn, diced tomatoes, and sliced avocado in a single layer. Sprinkle a pinch of salt and pepper over the veggies. The vegetables add moisture and a fresh burst of flavor that contrasts with the meat. Keep the layering gentle to avoid crushing the avocado. This step ensures the salad remains colorful and vibrant.
- Crumble the tortilla chips over the vegetables. The chips should be scattered, not packed, to keep their crunch. If you’re using baked chips, they’ll stay crisp longer. This crunchy layer is what makes the salad feel like a taco with every bite. A few chips on top also help absorb any excess moisture.
- Drizzle salsa and dollop a spoonful of sour cream or Greek yogurt. The salsa adds a zesty kick, while the sour cream provides a cool, creamy contrast. If you’re dairy‑free, a spoonful of coconut cream works beautifully. This layer should be the final touch before sealing the jar, ensuring every bite has a burst of flavor.
- Squeeze fresh lime juice over the entire salad and sprinkle chopped cilantro. The lime’s acidity brightens every component, preventing the dish from feeling too heavy. The cilantro adds herbal freshness that complements the cumin and chili. Seal the jar tightly and give it a gentle shake to mix the flavors. Store in the refrigerator for up to 3 days.
That’s it — you did it. But hold on, I've got a few more tricks that will elevate this salad from good to legendary. These insider tips will help you avoid common pitfalls and ensure every jar is a masterpiece.
Insider Tricks for Flawless Results
The Temperature Rule Nobody Follows
Never let the skillet get too hot when cooking the meat. A scorching pan will char the outside while leaving the interior under‑seasoned. Aim for medium‑high heat, and test the temperature by sprinkling a few drops of water; they should sizzle and evaporate quickly. If the water evaporates too fast, lower the heat slightly. This simple control ensures a juicy, evenly flavored meat base.
Why Your Nose Knows Best
Before sealing the jar, give it a quick sniff. A faint, buttery aroma indicates the cheese has melted just enough to bind the layers, while a sharp, tangy scent from the lime signals freshness. If the smell leans too sour or metallic, adjust the seasoning or add a splash of water. Your nose is the ultimate quality control; trust it to guide you.
The 5‑Minute Rest That Changes Everything
After assembling the jar, let it rest for exactly five minutes before sealing. This short pause allows the flavors to marry and the heat from the meat to diffuse evenly. It also gives the cheese a chance to soften slightly, creating a silky coating over the lettuce. Skipping this rest can leave the salad feeling raw and disjointed.
Layering Like a Pro
Start with the lettuce at the bottom, then cheese, meat, veggies, chips, and finally the sauce. This order prevents the lettuce from getting soggy and keeps the chips crunchy. If you prefer a different texture, experiment by swapping the chip layer with a crunchy quinoa or roasted chickpeas. The key is to keep each component distinct until you’re ready to eat.
The “Add a Splash” Trick
Right before sealing, add a splash of water or broth to the jar. This small amount of liquid helps the sauce spread evenly without making the salad watery. It also keeps the lettuce crisp by preventing direct contact with the sauce. This trick is especially useful if you’re using a lot of salsa or a thick yogurt.
Creative Twists and Variations
This recipe is a playground. Here are some of my favorite ways to switch things up:
Mexican Street Tacos
Swap the jar for a tortilla and top with the same layers, then fold into a taco shape. Add a drizzle of guacamole and a squeeze of lime for extra zest. Serve with a side of pickled jalapeños for a fiery kick. The result is a handheld version that’s just as delicious.
Greek‑Inspired Fusion
Replace the cheddar with feta and add chopped kalamata olives. Use a Greek yogurt base instead of sour cream and sprinkle oregano on top. The salty, tangy flavor profile transforms the salad into a Mediterranean‑Mexican hybrid that’s sure to impress.
Vegan Powerhouse
Use crumbled tempeh or textured vegetable protein seasoned with taco spices. Replace cheese with nutritional yeast or vegan cheddar. Top with avocado, salsa, and a drizzle of vegan mayo. This version packs plant‑based protein and is perfect for a cruelty‑free meal.
Breakfast Taco Salad
Add scrambled eggs or a fried egg to the top layer for a hearty breakfast. Sprinkle chives or green onions for a fresh bite. The eggs add richness and make the salad a filling morning meal. Serve with a side of warm tortillas for a complete breakfast experience.
Spicy Sriracha Kick
Stir a teaspoon of sriracha into the salsa for an extra punch of heat. Add a pinch of cayenne pepper to the meat for a subtle spice that lingers. The combination of chili and sriracha creates a fiery flavor profile that satisfies heat lovers.
Southwest BBQ Twist
Swap taco seasoning for a smoky BBQ rub on the meat. Add a handful of chopped pickled red onions for crunch and acidity. Drizzle with a smoky chipotle BBQ sauce instead of salsa. This variation gives the salad a deep, smoky flavor reminiscent of a summer cookout.
Storing and Bringing It Back to Life
Fridge Storage
Keep the jar in the refrigerator for up to 3 days. Store it on a shelf where it won’t be knocked over, as the layers can shift. The lettuce will stay crisp, and the cheese will form a subtle sauce that keeps the salad moist. If you notice the salad becoming soggy, add a small amount of fresh lime juice before serving.
Freezer Friendly
The salad can be frozen for up to 2 weeks. Assemble the layers, seal the jar, and place it on a flat surface to freeze. When ready to eat, thaw in the refrigerator overnight. The flavors will meld beautifully, and the texture remains pleasant after thawing.
Best Reheating Method
If you prefer a warm salad, microwave the jar (without the lid) for 30-45 seconds. Add a splash of water or broth to prevent drying. Stir gently to distribute heat evenly. The cheese will melt slightly, creating a silky coating that enhances the overall experience.