I still remember the night I tried to impress my friends with a dessert that would make them swoon, only to end up with a sticky, soggy mess that tasted like a bad experiment in a science lab. The kitchen was a chaotic symphony of clattering bowls, the faint scent of melted butter, and the sweet, almost sinful aroma of Oreo cookies baking in the oven. I stared at the ruined batch, my heart sinking faster than the batter in the pan, and swore that this culinary catastrophe would never happen again. Fast forward a few weeks, and I stumbled upon a recipe that promised to turn that nightmare into a triumph—No-Bake Oreo Cheesecake Sushi. The moment I saw the title, I felt a spark of hope, a whisper that maybe, just maybe, dessert could be both indulgent and surprisingly simple.
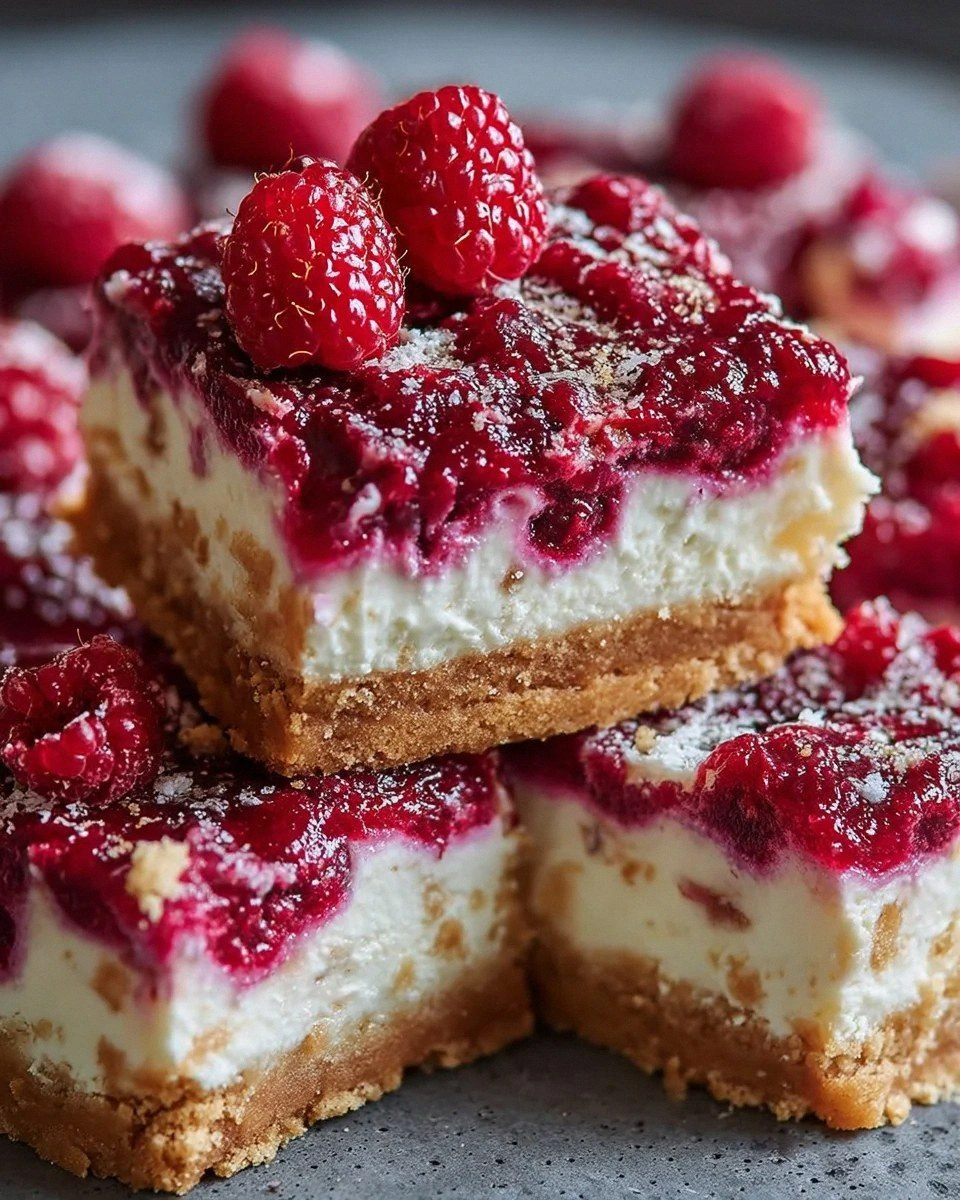
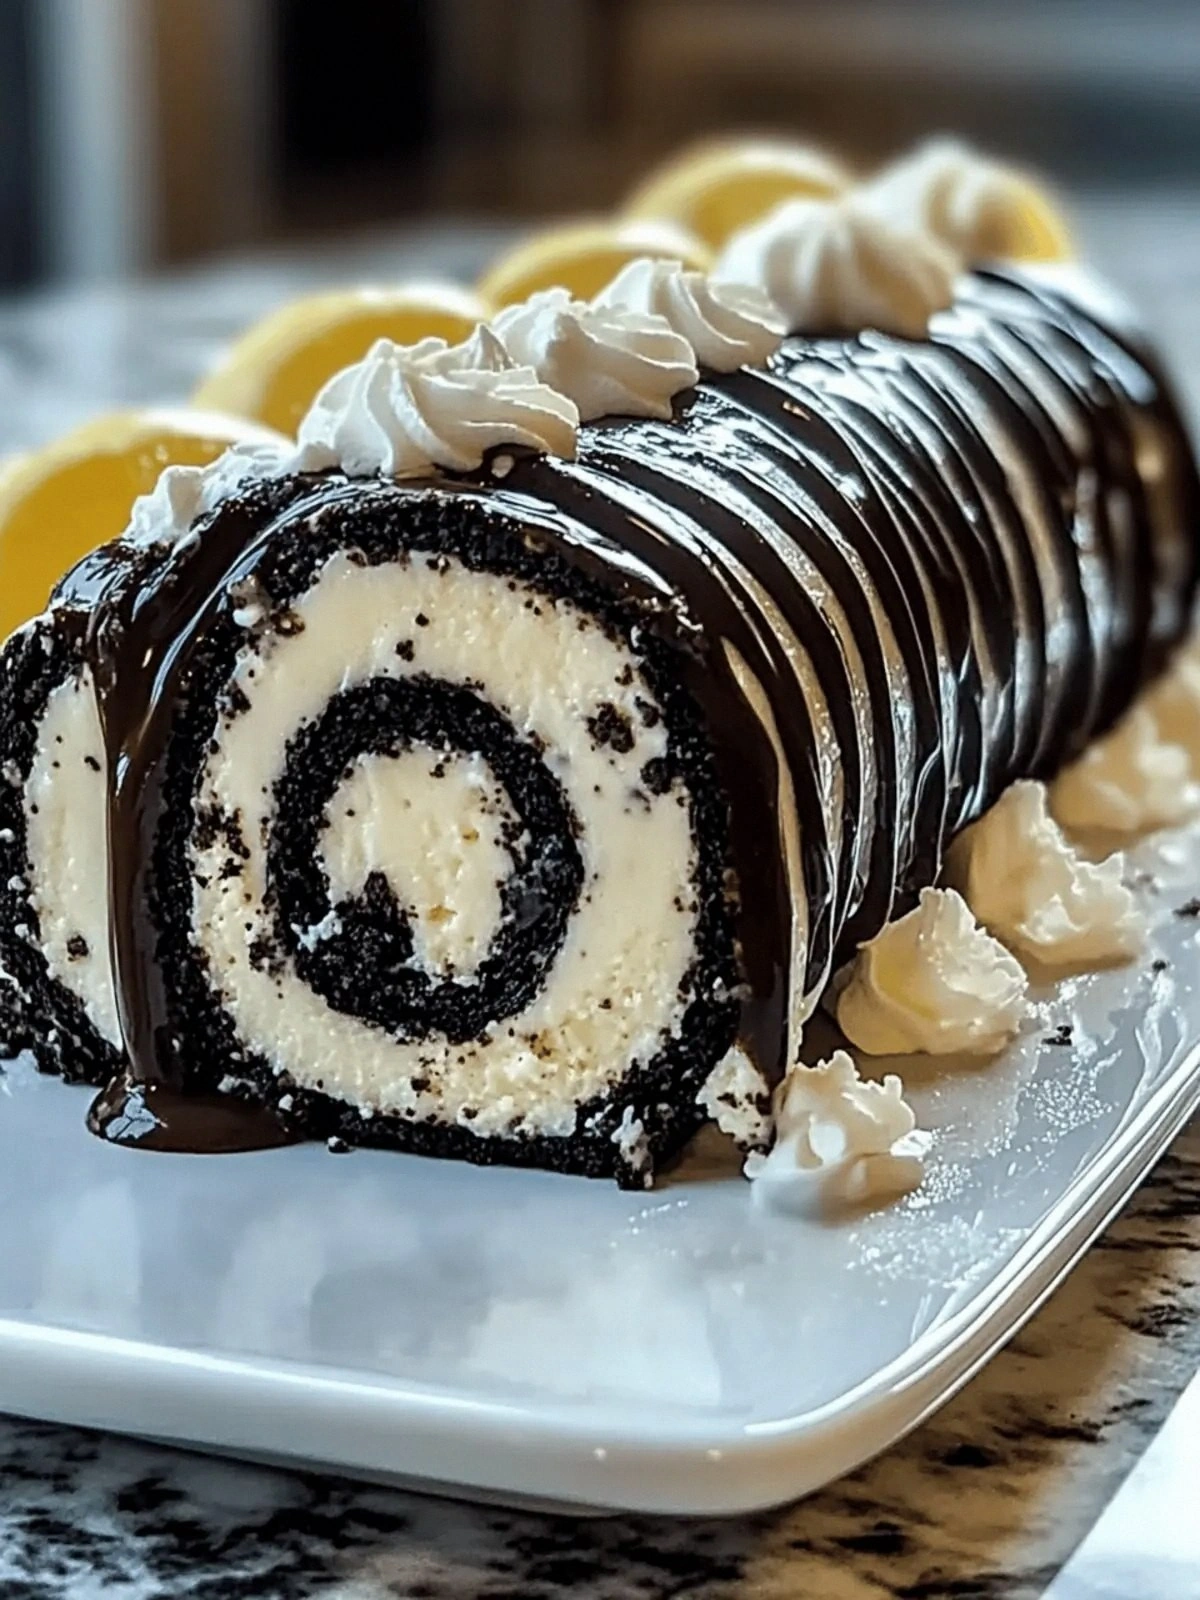
Picture this: a sheet of silky cream cheese frosting, studded with crushed Oreos, rolled into a delicate sushi shape, glazed with a glossy chocolate drizzle, and topped with a crown of fresh strawberries or banana slices. The texture is a marriage of creamy, crunchy, and a hint of sweet chewiness from the chocolate. The flavor is a bold, chocolatey bite that dances with the subtle, buttery crunch of Oreo crumbs. The presentation? A visual feast that looks like a piece of art you could almost eat with your eyes before your mouth even knows what’s coming. If you’ve ever been skeptical about making dessert sushi, I dare you to taste this and not go back for seconds.
What sets this version apart from the countless other “no-bake” or “cheesecake sushi” recipes floating around the internet is the meticulous balance of ingredients and the step-by-step clarity that eliminates guesswork. The crust isn’t a simple cookie crumble; it’s a thoughtfully crafted base that holds the roll together while delivering a crisp bite. The filling is not just a bland mixture of cream cheese and sugar; it’s a velvety, luscious spread that melts in your mouth like a cloud of sugar. The chocolate drizzle isn’t a thick, heavy sauce; it’s a thin, glossy coating that adds a touch of sophistication and a burst of flavor. The result is a dessert that feels indulgent, yet light enough to enjoy in a single bite—or a handful—without feeling guilty.
Most recipes get this completely wrong by overmixing the batter, using too much butter, or forgetting to chill the mixture before rolling. The result is often a soggy, unstructured roll that falls apart in your hand. This recipe, however, employs a simple technique that locks in the moisture and keeps the roll intact, even when you’re serving a crowd. The technique involves a precise ratio of melted butter to crushed Oreos, a quick chill period, and a firm, even rolling motion that mimics the art of sushi making. The outcome is a roll that holds together, looks pristine, and delivers a flavor experience that is, hands down, the best version you’ll ever make at home.
I’ve been told that this dessert is so good, you’ll forget it’s not actually sushi. That’s because the texture and flavor profile are so well executed that the brain can’t help but think it’s a savory delicacy. The sweet, chocolatey, and crunchy elements combine to create a complex taste that lingers on the palate, leaving you craving that next bite. I’ve seen people take one bite, pause, and then immediately ask for more, as if they’re caught in a delicious loop. The best part is that it’s a dessert that’s both visually stunning and practically effortless, so you can spend less time in the kitchen and more time enjoying the moment.
If you’ve ever struggled with making desserts that look as good as they taste, you’re not alone—and I’ve got the fix. The secret lies in the preparation and the method, which I’ve broken down into simple, manageable steps that anyone can follow. The next section will dive into what makes this version stand out from the rest, highlighting the key elements that make it a must-try. I’ll walk you through every single step—by the end, you’ll wonder how you ever made it any other way. Get ready to roll, drizzle, and indulge in a dessert that’s as fun to make as it is to eat.
Picture yourself pulling these out of the fridge, the whole kitchen smelling incredible, the glossy chocolate coating glinting under the kitchen lights, and the fresh fruit adding a burst of color and flavor. The anticipation builds as you watch the first roll slide onto the plate, its smooth surface reflecting the room’s light like a tiny, edible mirror. The moment you take a bite, the creamy filling gives way to the crunch of Oreo crumbs, followed by a sweet, chocolatey finish that leaves you smiling. That sensation—sweet, crunchy, and creamy all at once—makes you question whether you’re eating a dessert or a piece of art. And if you’ve ever had a dessert that felt like a guilty pleasure, this one will elevate that feeling to a whole new level of delight.
If you’ve ever had a dessert that felt like a guilty pleasure, this one will elevate that feeling to a whole new level of delight. I’ve been experimenting with variations, adding a hint of espresso, or swapping in dark chocolate for the drizzle, and each tweak feels like a small win. The recipe is flexible enough to accommodate your taste preferences while still maintaining its core structure. I’ll share those variations later, but first, let’s break down exactly what goes into this masterpiece. The next section will give you a clear, concise list of ingredients, grouped in a way that makes sense and saves you time. Ready to dive in? Let’s get started.
What Makes This Version Stand Out
- Texture: The combination of a crisp cookie base, silky cream cheese filling, and a glossy chocolate glaze creates a multi-layered mouthfeel that feels like a dessert and a snack rolled into one.
- Flavor: The subtle chocolate undertone of the Oreos is amplified by the chocolate drizzle, while the sweet, airy cream cheese filling balances the richness, resulting in a harmonious flavor profile.
- Visual Appeal: The sushi-like presentation, complete with a bright fruit topping, makes the dish Instagram-worthy and perfect for entertaining.
- Ease of Assembly: The method uses common kitchen tools and requires no advanced techniques, making it accessible for beginners and seasoned bakers alike.
- Make-Ahead Potential: Once rolled and chilled, the sushi can be stored for up to 48 hours, making it an ideal option for parties or last-minute dessert needs.
- Ingredient Quality: Using high-quality Oreo cookies and fresh cream cheese ensures the best flavor and texture, elevating this recipe above the mediocre ones.
Alright, let's break down exactly what goes into this masterpiece. The next section will walk you through each ingredient group, explaining why each component matters and how you can tweak them to suit your taste. I’ll also throw in a few quick hacks to make your life easier in the kitchen. Stick with me, because the next few minutes will change the way you think about dessert sushi forever.
Inside the Ingredient List
The Flavor Base
The flavor base is the heart of this dessert—it's the creamy, sweet filling that keeps the roll moist and luscious. Cream cheese provides the rich, tangy foundation, while powdered sugar sweetens it to the perfect level of indulgence. If you skip the powdered sugar, the filling will taste too tart and won't have that smooth finish. For an extra touch of decadence, consider adding a splash of vanilla extract to the mixture; it will deepen the flavor without overpowering the Oreo notes.
When selecting cream cheese, aim for a brand that’s smooth and unflavored, as any added flavors can clash with the Oreo and chocolate components. A chilled, firm texture is ideal because it’s easier to mix and won’t become too runny. If you’re looking to experiment, you can try a half-and-half approach: use half cream cheese and half mascarpone for a lighter, airier filling. Just remember to chill the mixture for at least 30 minutes before rolling to ensure it holds its shape.
The Texture Crew
The texture crew consists of the crushed Oreos and the melted butter, which together form the crust that holds the sushi together. The Oreo crumbs add a crunchy bite that contrasts beautifully with the silky filling. Butter is the binding agent that keeps the crumbs from falling apart during assembly. If you find the crust too dry, add a tablespoon of milk or heavy cream to the crumb mixture; it will moisten it without diluting the flavor.
Choosing the right amount of butter is crucial—too little and the crust will crumble, too much and it will become greasy. A good rule of thumb is to use 2 tablespoons of melted butter for every 20 Oreo cookies; this ratio gives a firm yet tender base. If you’re aiming for a vegan version, replace the butter with melted coconut oil or vegan butter, and use vegan cream cheese. The texture will remain similar, though the flavor may shift slightly toward a tropical note.
The Unexpected Star
The unexpected star of this recipe is the chocolate drizzle, which adds a glossy, slightly bitter counterpoint to the sweet filling. A thin, even coating of chocolate not only looks elegant but also provides a subtle flavor contrast that keeps the palate engaged. To achieve the perfect glaze, melt your chocolate carefully over a double boiler or in a microwave, stirring every 30 seconds to avoid scorching.
If you’re not a fan of chocolate, you can substitute it with caramel sauce or a fruit reduction for a different flavor profile. However, the chocolate’s bitterness balances the sweetness of the Oreo and cream cheese, making it a vital component of the dish’s overall harmony. For a richer finish, drizzle a small amount of dark chocolate over the top; the slight bitterness will add depth without overwhelming the delicate flavors.
The Final Flourish
The final flourish consists of whipped cream, crushed Oreos, and fresh fruit. Whipped cream adds a light, airy texture that contrasts with the dense filling, while the crushed Oreos on top provide a crunchy, chocolatey crunch. Fresh fruit—strawberries or bananas—offers a bright, juicy burst that cuts through the richness and adds a refreshing note.
When selecting fruit, choose ripe, sweet varieties to avoid any tartness that could throw off the flavor balance. If you’re using strawberries, slice them thinly so they’re easy to bite into; for bananas, slice them into rounds that fit the roll’s width. The fruit also serves as a natural garnish, making the sushi look more vibrant and appetizing. For an extra pop of color, sprinkle a few mint leaves on top before serving.
Everything's prepped? Good. Let's get into the real action. The next section will walk you through each step, from mixing to rolling, with clear instructions that keep the process smooth and enjoyable. I’ll point out the moments where precision matters most, so you can avoid common pitfalls and achieve a flawless result. The method is straightforward, but the details are what make the difference between a mediocre roll and a showstopper.
The Method — Step by Step
- Start by crushing the Oreo cookies into fine crumbs using a food processor or a clean zip-top bag and a rolling pin. The finer the crumbs, the smoother the crust will be, and the less likely it will crumble during rolling. While crushing, sprinkle a pinch of powdered sugar to sweeten the crumbs slightly—this step is often overlooked but essential for flavor balance.
- In a medium bowl, combine the cream cheese and powdered sugar. Use a hand mixer on medium speed until the mixture is smooth, airy, and glossy. The goal is a silky filling that can be spread without cracking the surface. If the mixture is too thick, add a splash of heavy cream to loosen it; if too thin, let it chill for a few minutes to thicken.
- Now, gently fold the melted butter into the Oreo crumbs, stirring until the mixture resembles damp sand. The butter acts as a binder, preventing the crumbs from falling apart when pressed into a pan. Once the crumb mixture is uniform, press it firmly into the bottom of a 9x13-inch baking dish lined with parchment paper, creating an even base. Pressing too lightly will result in a loose crust that will crumble during rolling.
- Spread the cream cheese filling over the crust, smoothing it with a spatula. The filling should be spread evenly, leaving a small border around the edges to prevent leakage. This is the moment of truth; a well-spread filling ensures the roll holds together. Let the assembled base chill in the refrigerator for at least 30 minutes to set the filling and firm up the crust.
- While the base chills, prepare the chocolate drizzle. Melt the chocolate in a double boiler or microwave, stirring every 30 seconds until smooth. Once melted, let it cool slightly so it thickens to a pourable consistency. Drizzle the chocolate over the chilled filling in a thin, even line, allowing it to pool slightly at the center for a glossy finish. The chocolate should coat the surface without soaking into the filling.
- At this point, the roll is ready to be assembled. Remove the dish from the fridge and use a serrated knife to cut the base into 8 equal squares. Carefully lift each square with a spatula and place it onto a clean cutting board. Roll each square tightly, starting from the short end, and wrap it in plastic wrap. The plastic wrap helps maintain shape and prevents the roll from unrolling as you handle it.
- Once all rolls are formed, place them seam-side down on a serving platter. Brush each roll lightly with a little melted butter or water to help the final garnish adhere. Top each roll with a generous swirl of whipped cream, a sprinkle of crushed Oreos, and a few slices of fresh fruit. The whipped cream adds a lightness that contrasts with the dense filling, while the fruit provides a burst of freshness.
- Serve immediately or refrigerate the sushi rolls for up to 48 hours. When you’re ready to serve, let them sit at room temperature for 10 minutes to soften the filling slightly. The rolls should be firm enough to hold their shape but soft enough to bite into. Enjoy the combination of textures and flavors, and remember that each bite is a mini adventure in dessert sushi.
That's it—you did it! But hold on, I've got a few more tricks that'll take this to another level. The next section is all about insider tips that will help you perfect the texture, presentation, and flavor of your rolls. These are the little details that make the difference between a good dessert and an unforgettable one. Stick with me, and let's dive into the secrets that will elevate your culinary game.
Insider Tricks for Flawless Results
The Temperature Rule Nobody Follows
Temperature control is the secret sauce for a perfect roll. The filling should be cold but not frozen; if it’s too warm, it will spread and lose its shape. Use a thermometer to check that the filling is around 5-7°C (41-45°F) before rolling. If you don’t have a thermometer, simply press your thumb into the filling—if it leaves a slight indent, it’s ready.
Why Your Nose Knows Best
The aroma of your ingredients can tell you if everything’s on track. A faint chocolate smell indicates the drizzle is ready; if the Oreo scent is overpowering, you’ve crushed too many crumbs. Smell the filling before adding the chocolate—if it’s too sweet, let it chill a bit longer to set the sugar. Trust your nose; it’s a reliable indicator of flavor balance.
The 5-Minute Rest That Changes Everything
After rolling, let the sushi rest for 5 minutes before slicing. This brief pause allows the filling to settle and the chocolate to firm up, preventing the rolls from collapsing. During this time, the whipped cream also sets slightly, making the final garnish stick better. Skipping this step often leads to messy, unstructured rolls.
How to Keep the Rolls from Sliding
A common problem is the rolls sliding off the cutting board during assembly. To counter this, lightly dust the board with powdered sugar or cornstarch. This creates a slight friction that keeps the rolls in place. Alternatively, use a silicone mat for a non-stick surface.
Balancing Sweetness with Acidity
If you find the rolls too sweet, add a splash of lemon zest to the filling. The citrus will cut through the richness and add a bright, refreshing note. A pinch of sea salt on top can also enhance the chocolate flavor, creating a subtle contrast that elevates the overall taste.
How to Avoid Crumbly Edges
If the edges of your roll crumble, it’s likely the crumb mixture was too dry. Add a tablespoon of milk or heavy cream to the crumb mix to moisten it. Press the crumbs into the pan more firmly, ensuring a tight, even crust. This small adjustment can make a big difference in the final texture.
Quick Fix for Overly Dense Filling
Sometimes the filling can become too dense, making the roll heavy. To lighten it, fold in a tablespoon of sour cream or Greek yogurt. This not only lightens the texture but also adds a subtle tang that balances the sweetness. Make sure to chill the mixture again after adding the dairy.
Using a Silicone Mat for Perfect Rolls
A silicone mat is a game-changer when rolling the sushi. It provides a non-stick surface that prevents the roll from sticking, making it easier to shape and cut. If you don’t have a silicone mat, a lightly oiled parchment paper works as a decent substitute. The key is to keep the surface smooth and free of crumbs.
Adding a Touch of Espresso
Espresso powder or a shot of espresso can add depth to the chocolate flavor. Stir a teaspoon of espresso powder into the chocolate drizzle for a subtle, bitter edge that complements the sweetness. This trick is perfect for coffee lovers who want a dessert with a bold, complex profile.
And that’s the secret sauce to making these rolls look and taste like a professional dessert. Each tip is a small tweak that can transform your creation from good to unforgettable. With these tricks in your culinary arsenal, you’ll never have to settle for a mediocre dessert again.
Creative Twists and Variations
This recipe is a playground. Here are some of my favorite ways to switch things up: add a splash of espresso for a mocha twist, swap the chocolate drizzle for caramel or peanut butter for a nutty flavor, or use dark chocolate for a richer finish. The variations are endless, and each one brings a new dimension to the classic Oreo cheesecake sushi.
Mocha Madness
Add a teaspoon of espresso powder to the chocolate drizzle for a deep, coffee-infused flavor. The espresso’s bitterness cuts through the sweetness, creating a balanced, sophisticated taste. Serve with a side of espresso crema for an extra indulgence. This variation is perfect for coffee lovers who crave a dessert with a caffeine kick.
Caramel Crunch
Replace the chocolate drizzle with a generous spoonful of caramel sauce. The buttery sweetness of caramel pairs beautifully with the Oreo crumbs, creating a harmonious blend of flavors. Top with a drizzle of sea salt to elevate the caramel’s richness. This version is ideal for those who love a sweet, salty combination.
Nutty Delight
Swap the chocolate drizzle for a peanut butter glaze made with melted peanut butter and a touch of honey. The nutty flavor adds depth and a slight crunch to each bite. Sprinkle chopped peanuts on top for an extra texture contrast. This twist is a crowd-pleaser for those who love peanut butter and chocolate.
Berry Burst
Use fresh blueberries or raspberries instead of strawberries or bananas. The tartness of berries adds a bright, juicy contrast to the rich filling. Place the berries on top of the whipped cream for a colorful, refreshing finish. This variation is perfect for summertime gatherings.
Chocolate Covered Oreo
Dip the rolled sushi into melted chocolate and then roll it in crushed Oreos for an extra crunch. The double chocolate coating provides a decadent, chocolatey bite. Finish with a dusting of powdered sugar for a sweet finish. This version is a chocolate lover’s dream.
Storing and Bringing It Back to Life
Fridge Storage
Store the rolls in an airtight container in the refrigerator for up to 48 hours. The cool environment keeps the filling firm and the chocolate glaze intact. Before serving, let the rolls sit at room temperature for 10 minutes to soften the filling slightly. This step ensures the rolls are easy to slice and enjoy. If you’re in a hurry, you can also microwave the rolls for 10-15 seconds to warm them up.
Freezer Friendly
For longer storage, freeze the rolls in a freezer-safe bag for up to 2 weeks. Wrap each roll individually with plastic wrap before placing them in the bag to prevent freezer burn. To thaw, leave the rolls at room temperature for 1-2 hours or place them in the refrigerator overnight. This method keeps the texture intact and preserves the flavor. Just be sure to reapply the chocolate drizzle before serving if it has hardened.
Best Reheating Method
If you need to reheat the rolls, place them on a microwave-safe plate and cover with a damp paper towel. Heat in short bursts of 10-15 seconds until the filling is warm and the chocolate is glossy. Avoid overheating, as this can melt the chocolate too much and cause the roll to become soggy. A quick steam, achieved by adding a splash of water to the container before reheating, can help the rolls regain their original texture. Serve immediately for the best experience.