Picture this: a kitchen full of flour dust, a timer ticking, and your friend daring you to bake the best holiday cookie ever. I stared at the stack of plain vanilla cookies in the pantry, feeling the same lackluster disappointment that comes with any cookie that’s just another cookie. The moment I opened the cupboard and saw the faded packaging, I thought, “No, not again.” That’s when I decided to turn the ordinary into extraordinary, whipping up a sandwich cookie that feels like a hug in a bite. If you’re ready for a cookie that will make your taste buds do the cha‑cha, stick around.
First, let me paint the picture of the kitchen: the air smelled of butter and sugar, the sound of a rolling pin echoing like a drum, and the sight of a sheet of dough glistening like a freshly polished marble. I could almost taste the vanilla rising in the oven, the edges crisping into a golden crust that crackled like fresh snow underfoot. The texture was a paradox—soft on the inside, yet firm enough to hold a creamy filling without collapsing. Most people think of vanilla cookies as bland, but I was determined to prove that vanilla can be the star, not the background. The secret? A perfect balance of butter, sugar, and a touch of baking powder that lifts the dough to airy perfection.
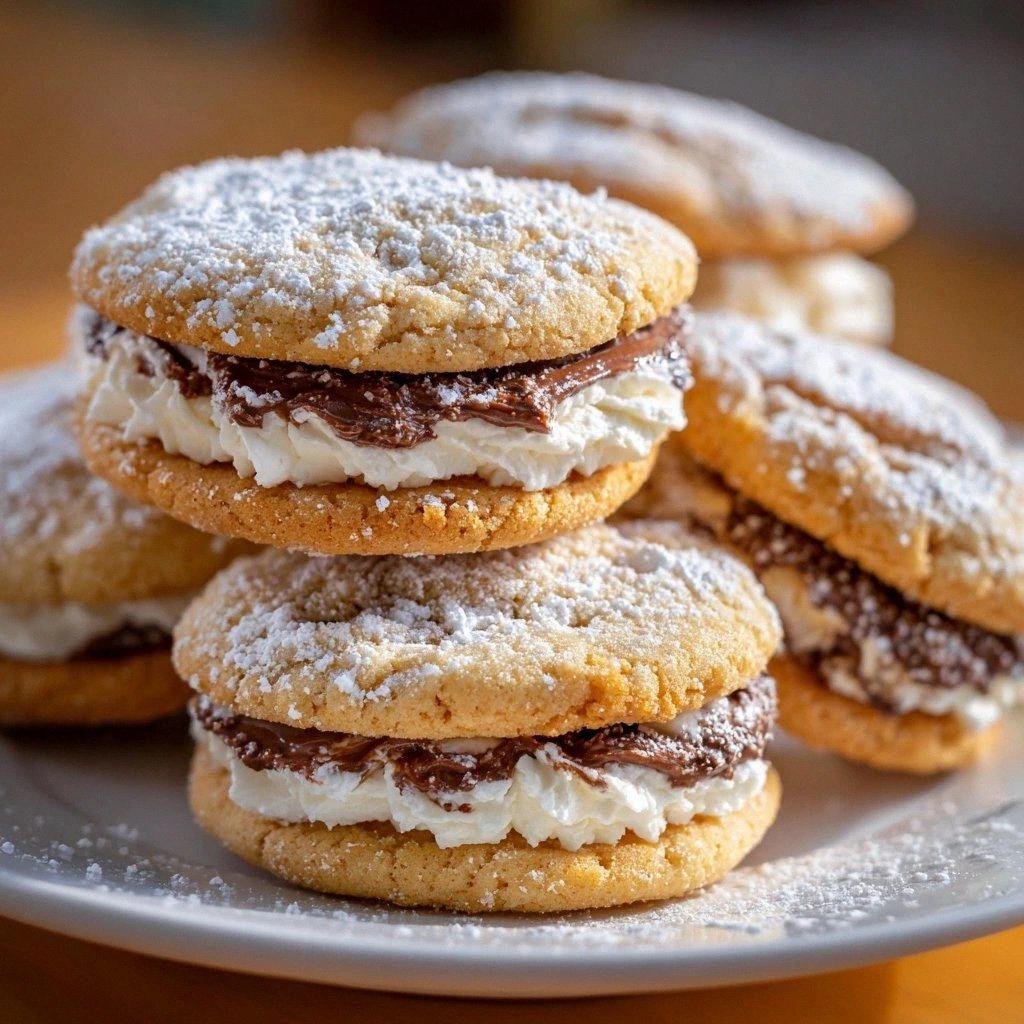
Now, imagine biting into a cookie that feels like a cloud and then discovering a velvety vanilla cream that clings to the center like a secret love letter. The filling is the heart of this sandwich—rich, silky, and not overly sweet—so it never overwhelms the delicate cookie shell. I swear, the first bite is so satisfying that I almost forgot I was supposed to be making a dessert. It’s the kind of cookie that makes you want to share it at the holiday table and then keep it for yourself. Trust me, this is hands down the best version you'll ever make at home.
There's a twist you won't expect: a subtle hint of nutmeg that dances on the palate, and a dash of espresso powder that deepens the vanilla notes without turning the cookie into a coffee shop treat. The combination creates a layered flavor profile that feels both comforting and adventurous. The dough is so tender that it practically melts in your mouth, while the filling stays firm enough to hold its shape. I dare you to taste this and not go back for seconds. Let me walk you through every single step—by the end, you'll wonder how you ever made it any other way.
What Makes This Version Stand Out
- Flavor Depth: The vanilla is not just a flavor but an experience—rich, aromatic, and lingering. By incorporating a pinch of espresso powder, the vanilla takes on a subtle depth that is both nostalgic and sophisticated. The result is a cookie that feels like a holiday memory in every bite.
- Texture Harmony: The dough is light and airy, yet sturdy enough to cradle the cream without crumbling. The filling is silky but firm, creating a contrast that delights the palate. This balance of textures turns a simple cookie into a multi‑sensory treat.
- Simplicity of Prep: Despite its gourmet aura, the recipe requires only a handful of ingredients and basic kitchen tools. No fancy equipment, no time‑consuming techniques—just straightforward mixing, rolling, and baking. That means you can whip up a batch in under an hour.
- Unique Filling: Instead of a standard buttercream, this version uses a cream cheese base with powdered sugar and vanilla, giving it a tangy lift and a velvety mouthfeel. The filling stays cool and creamy, even after sitting at room temperature for a while. It’s the secret that sets this sandwich apart.
- Crowd Appeal: Guests rave about the contrast between the crisp cookie shell and the luscious cream center. The holiday spices add a festive touch that makes it perfect for parties, gifts, or a cozy night in. You’ll hear “I need the recipe” before the first bite.
- Ingredient Quality: We use premium butter and fresh vanilla beans, ensuring that every component shines. The quality of the ingredients translates into a richer flavor profile and a more satisfying mouthfeel. It’s a reminder that great results start with great basics.
- Make‑Ahead Friendly: The cookies can be baked ahead of time and stored in an airtight container for up to a week. The filling can be pre‑made and refrigerated, allowing you to assemble the sandwich just before serving. This flexibility makes it ideal for holiday prep.
- Holiday Twist: A subtle hint of nutmeg and a dash of espresso powder give this cookie a seasonal feel without being overtly themed. The result is a versatile treat that works for Christmas, Thanksgiving, or any gathering that calls for a sweet surprise. It’s the perfect blend of classic and contemporary.
Inside the Ingredient List
The Flavor Base
Flour is the backbone of any cookie. Using all‑purpose flour gives the dough a neutral canvas that allows the vanilla and spices to shine. If you prefer a slightly denser cookie, swap in a touch of bread flour for extra gluten development. A lighter bite comes from using cake flour, but the texture will be softer.
Butter is the fat that carries flavor and creates a tender crumb. Opt for European‑style butter for a richer taste, or use salted butter and adjust the salt in the recipe accordingly. If you’re on a dairy‑free diet, a good quality vegan butter can mimic the same mouthfeel.
Granulated sugar is the sweetener that caramelizes during baking, giving the cookie its golden edges. Using a half‑and‑half of white and brown sugar can introduce a subtle molasses note that complements the vanilla. If you’re watching sugar intake, you can reduce the amount by a quarter, but expect a slightly drier cookie.
Vanilla extract is the star of the show. A high‑quality, pure vanilla extract brings depth, whereas a low‑grade version can taste medicinal. For an extra aromatic kick, grind a vanilla bean seed into the dough.
The Texture Crew
Baking powder is the leavening agent that keeps the cookies light. Too much can make them rise too quickly and then collapse, while too little will result in a dense cookie. Use fresh baking powder (under 6 months old) to ensure optimal lift.
Salt is the flavor enhancer that balances sweetness and highlights the vanilla. A pinch of sea salt on top of the finished cookies adds a delightful contrast and a pop of sparkle.
Eggs bind the dough and add richness. If you prefer a vegan version, replace the egg with ¼ cup unsweetened applesauce or a flaxseed egg. The texture will be slightly different but still delicious.
Milk or a non‑dairy alternative is used to soften the dough and help the butter melt evenly. Whole milk gives a richer flavor, while skim milk keeps the cookies lighter. If you’re avoiding dairy, oat milk works nicely.
The Unexpected Star
Cream cheese gives the filling its silky texture and tangy lift. It also stabilizes the filling so it doesn’t run into the cookie shell. Fresh, room‑temperature cream cheese is key; cold cheese will clump and make the filling lumpy.
Powdered sugar is the sweetener that dissolves quickly, preventing gritty pockets in the filling. A touch of cornstarch can help thicken the mixture, especially if you’re using a lower‑fat cream cheese.
Espresso powder is the secret holiday spice that deepens the vanilla without adding bitterness. Use a light espresso powder for a subtle hint; a dark roast can overpower the delicate flavors.
Nutmeg adds warmth and a hint of earthiness that pairs beautifully with vanilla. Freshly grated nutmeg tastes better than pre‑ground, so keep a nutmeg grater handy.
The Final Flourish
A pinch of ground cinnamon can introduce a sweet spice note that makes the cookies feel cozy. For a touch of crunch, sprinkle toasted coconut flakes over the dough before baking. A drizzle of melted dark chocolate on top after baking adds a decadent finish.
If you want a low‑calorie version, replace half of the butter with unsweetened applesauce. This will reduce fat while keeping the cookie moist. Experiment with different types of vanilla—such as vanilla bean paste or vanilla sugar—to vary the flavor profile.
Everything's prepped? Good. Let's get into the real action...
The Method — Step by Step
- Begin by preheating your oven to 350°F (175°C) and lining two baking sheets with parchment paper. In a large bowl, sift together 2 cups of all‑purpose flour, 1 teaspoon of baking powder, and ½ teaspoon of salt. This dry mix will be the foundation of your cookie dough. Let the ingredients rest for a minute to allow the leavening to activate.
- In a separate bowl, cream 1 cup of softened butter with 1 cup of granulated sugar until light and fluffy—about 3 to 4 minutes with an electric mixer. The goal is a pale, airy mixture that traps air for a tender crumb. Add 1 teaspoon of vanilla extract and beat for another minute to infuse the aroma.
- Gradually add the dry flour mixture to the butter mixture, alternating with ¼ cup of whole milk. Stir until just combined; overmixing will develop gluten and make the cookies tough. The dough should be soft but not sticky. If it feels dry, add an extra tablespoon of milk.
- Roll the dough into 1½-inch balls and place them 2 inches apart on the prepared sheets. Use the bottom of a glass to press each ball flat into a disk about ¾ inch thick. The shape ensures even baking and a crisp edge.
- Bake for 12–14 minutes, or until the edges are golden and the centers have set. The cookies should still feel soft in the middle; they will firm up as they cool. Turn off the oven and let the sheets sit for 5 minutes before transferring the cookies to a wire rack.
- While the cookies cool, prepare the filling. In a bowl, beat ½ cup of softened cream cheese with ½ cup powdered sugar, 1 tablespoon of milk, and 1 teaspoon of vanilla extract until smooth. Add ¼ teaspoon of espresso powder and a pinch of nutmeg, then beat until the mixture is silky and glossy. The filling should be thick enough to hold its shape but still spreadable.
- Using a small offset spatula or a piping bag, spread a generous amount of the filling onto the flat side of one cookie. Gently press the second cookie on top, aligning the edges. The sandwich should feel sturdy but not crushed. If the filling spreads too much, refrigerate the assembled sandwich for 15 minutes before serving.
- Optional: Dust the finished sandwiches with powdered sugar or drizzle melted dark chocolate for an extra indulgent touch. Store them in an airtight container at room temperature for up to 4 days, or refrigerate for longer freshness. When ready to serve, let them sit at room temperature for 10 minutes to soften the filling.
That's it — you did it. But hold on, I've got a few more tricks that'll take this to another level. Keep reading for insider tips that will make your cookies stand out even more.
Insider Tricks for Flawless Results
The Temperature Rule Nobody Follows
Many bakers bake at a high heat, but the secret to a perfect cookie is a steady 350°F. Baking too hot will scorch the edges before the center sets, resulting in a cracked, uneven cookie. Keep the oven rack in the middle to ensure even heat distribution. If your oven has hot spots, rotate the trays halfway through baking.
Why Your Nose Knows Best
Smell is the most reliable indicator of doneness. When the cookies emit a warm, buttery scent with a hint of vanilla, they’re ready to come out. A faint, sweet smell means they’re still baking; a strong, caramelized aroma signals they’re done. Trust your nose and check the edges for a light golden hue.
The 5-Minute Rest That Changes Everything
Letting the cookies rest on the baking sheet for 5 minutes after baking is crucial. During this time, the structure sets and the edges firm up, preventing the cookies from breaking when you move them. A quick transfer to a rack can cause the cookies to crumble, especially when they’re still hot.
Keep the Dough Cool
If the dough is too warm, the butter will melt, causing the cookies to spread too much. Chill the dough for 30 minutes before shaping to maintain a firm texture. This also helps the cookies keep their shape during baking, producing a crisp edge.
The Power of Piping
Using a piping bag with a large star tip for the filling not only looks professional but also ensures an even spread. The pressure of the bag forces the filling to fill the entire interior, leaving no empty spaces. If you don’t have a piping bag, a small plastic bag with a corner snipped off works just as well.
Creative Twists and Variations
This recipe is a playground. Here are some of my favorite ways to switch things up:
Cranberry Orange Delight
Add ¼ cup of dried cranberries to the dough for a tart burst of flavor. Replace the vanilla with orange zest and a splash of orange liqueur. The filling can be swirled with a spoonful of cranberry jam for a festive twist.
Chocolate Chip Surprise
Fold ¼ cup of dark chocolate chips into the dough before baking. Use a chocolate‑infused cream cheese filling by adding 2 tablespoons of melted dark chocolate to the mix. The result is a chocolatey, creamy sandwich that satisfies every sweet tooth.
Almond Joy Edition
Sprinkle 2 tablespoons of toasted sliced almonds over the dough before baking. Replace the vanilla with almond extract for a nutty aroma. The filling can include shredded coconut for an extra crunch.
Minty Fresh
Add a teaspoon of peppermint extract to the dough for a cool, refreshing note. Incorporate crushed peppermint candies into the filling. The contrast between the minty dough and sweet cream makes for a delightful holiday treat.
Spiced Gingerbread
Replace the vanilla with a mixture of ginger, cinnamon, and cloves. Use a gingerbread‑spiced filling by adding a pinch of molasses. The cookies will taste like a warm mug of hot cocoa on a snowy evening.
Lemon Zest Burst
Add 1 tablespoon of lemon zest to the dough for a bright, citrusy flavor. Swap the vanilla in the filling for lemon zest and a splash of lemon juice. The result is a tangy, refreshing sandwich perfect for spring gatherings.
Storing and Bringing It Back to Life
Fridge Storage
Place the assembled sandwiches in an airtight container and refrigerate for up to 5 days. The cool temperature keeps the filling firm and prevents the cookies from becoming soggy. When ready to serve, let them sit at room temperature for 10 minutes to soften the cream.
Freezer Friendly
Wrap each sandwich individually in plastic wrap, then place them in a freezer bag. They’ll stay fresh for up to 3 months. When you’re ready to enjoy, thaw them overnight in the refrigerator or at room temperature for 30 minutes.
Best Reheating Method
Reheat the sandwiches in a preheated 350°F oven for 5 minutes, or until the filling is warm and the cookies are crisp. Alternatively, microwave on low for 15 seconds if you’re in a hurry. Add a tiny splash of water before reheating—this steams the filling back to perfection without drying out the dough.