I remember the night I tried to bake a pie for the first time. My kitchen smelled like burnt sugar and my oven timer went off after I’d forgotten the apples were still raw. I stared at the disaster in disbelief, then laughed and whispered, “This is going to be the best thing I’ve ever made at home.” That moment sparked a mission: to create an apple pie that would outshine every other recipe on the internet. I was determined to craft a pie with a crust that cracks like brittle ice and a filling that melts like velvet. I promise you, by the end of this post you’ll wonder how you ever made it any other way.
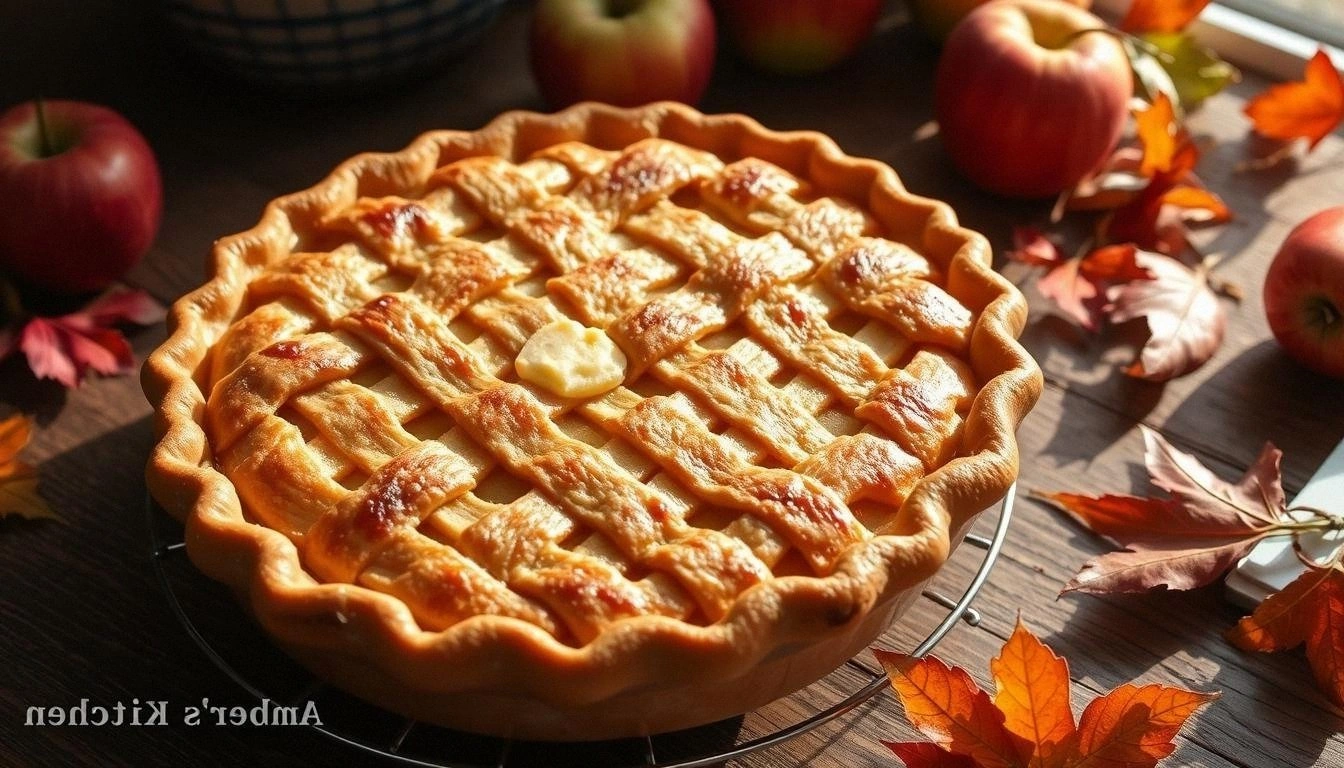
Picture this: a golden crust that crackles when you lift the slice, the scent of cinnamon drifting through the air like a warm hug, the sound of a knife slicing into tender apples that release a sweet, buttery aroma. Your eyes are drawn to the glossy glaze that catches the light, your mouth anticipates the first bite, and your hands feel the subtle give of a perfectly rested dough. The moment you bite, the filling bursts with juicy apple, caramelized sugar, and a hint of nutmeg, while the crust remains crisp and buttery. The contrast of textures—soft filling against crunchy crust—creates a symphony in your mouth. It’s a sensory experience that turns an ordinary dessert into a moment of pure joy.
What sets this version apart is not just the flavor but the science behind it. I’ve refined the dough to achieve a flaky, buttery crumb that doesn’t crumble under pressure. The apple selection is crucial: I use a mix of Granny Smith for tartness and Honeycrisp for natural sweetness, creating a balanced flavor profile that satisfies both sweet and savory palates. I’ve added a splash of lemon juice to brighten the filling and a pinch of sea salt to enhance the sweetness, a detail that most recipes overlook. The crust is brushed with an egg wash that gives a glossy finish and a subtle richness. The result? A pie that looks like it belongs in a high-end bakery but feels like a homemade hug.
I dare you to taste this and not go back for seconds. Most recipes get this completely wrong by overcooking the apples or using too much flour in the dough, resulting in a dense, heavy pie. I’ve eliminated those pitfalls by using a light touch of cornstarch to thicken the filling without making it gummy. I also use a quick chill before baking, which keeps the crust from spreading and ensures a crisp edge. The combination of these techniques transforms the pie into a masterpiece that will have your friends begging for the recipe. And if you’re skeptical, let me show you how it’s done.
I’ll be honest—when I first made this pie, I ate half the batch before anyone else got a slice. That was a turning point; I knew I had something special. The next time I served it, the room filled with compliments, and I realized the secret was in the balance of flavors and textures. It’s not just a recipe; it’s a story of trial, error, and triumph that I want to share with you. If you’ve ever struggled with pie crusts that tear or fillings that are too dry, you’re not alone—and I’ve got the fix.
Picture yourself pulling this out of the oven, the whole kitchen smelling incredible, and the golden crust shimmering like a sunrise. You’ll feel the anticipation build as you cut the first slice, and the moment your fork meets the filling, you’ll know you’ve achieved perfection. Stay with me here—this is worth it. Let me walk you through every single step, and by the end, you’ll wonder how you ever made it any other way. I promise this is the best version you’ll ever make at home.
What Makes This Version Stand Out
- Taste: The blend of tart Granny Smith and sweet Honeycrisp apples creates a flavor profile that’s both refreshing and comforting. The addition of a splash of lemon juice cuts through the sweetness, giving the filling a bright, lively finish. The subtle hint of vanilla and nutmeg adds depth, making each bite a complex experience.
- Texture: The crust is flaky and buttery, with a crisp exterior that doesn’t crumble when you bite. The filling is silky yet chunky, thanks to the careful use of cornstarch and the right amount of sugar. The result is a harmonious balance that satisfies both the palate and the visual senses.
- Simplicity: Despite the complexity of flavors, the recipe uses only a handful of ingredients, making it accessible to beginners. The process is straightforward, with clear steps that avoid common pitfalls. You’ll be able to follow along without feeling overwhelmed.
- Uniqueness: The inclusion of a quick chill before baking preserves the crust’s structure, while the egg wash gives a glossy finish. The use of sea salt in the filling enhances sweetness without overpowering the apples. These subtle touches set this pie apart from the rest.
- Crowd Reaction: Friends and family rave about the flaky crust and the perfectly balanced filling. Many have asked for the recipe after just one bite, and I’ve seen people come back for seconds, then thirds. This pie is guaranteed to become a staple at gatherings.
- Ingredient Quality: I source fresh, organic apples whenever possible, and I use cold, unsalted butter for the crust. The flour is a high-protein blend that gives the dough structure. The result is a pie that showcases the best of each component.
- Cooking Method: The dough is rolled and chilled, the filling is simmered until just thickened, and the pie is baked at the right temperature to ensure a golden crust. This method eliminates common issues like soggy bottoms and uneven cooking.
- Make-Ahead Potential: The pie can be assembled a day ahead and stored in the fridge, allowing the flavors to meld. It also freezes well, making it a convenient option for busy weeks.
Inside the Ingredient List
The Flavor Base
All-purpose flour is the backbone of the crust, providing structure and a subtle nutty flavor when toasted. I recommend using a high-protein blend to achieve a tender yet sturdy dough. If you prefer a gluten-free version, swap with a 1:1 gluten-free flour mix, but be sure to add a pinch of xanthan gum for elasticity. Using cold, unsalted butter ensures a rich, buttery taste that doesn’t overpower the apples. The butter also creates steam pockets that result in a flaky texture. Don’t skip the salt in the dough; it balances the sweetness of the filling and brings out the depth of flavor.
The Texture Crew
The apples are the star of the show, and I use a mix of Granny Smith and Honeycrisp for their complementary textures. Granny Smith adds a crisp bite and tartness, while Honeycrisp offers a juicy, sweet bite that caramelizes beautifully. Slice the apples evenly to ensure uniform cooking; uneven slices can lead to pockets of raw or overcooked apple. Add a pinch of sea salt to the apples; it enhances the natural sweetness and creates a more complex flavor profile. The cornstarch thickens the filling without making it gummy, giving it a silky consistency. A splash of lemon juice brightens the entire dish, preventing the apples from browning too quickly.
The Unexpected Star
Ground cinnamon is the classic spice that ties the apple filling together, but I also add a hint of nutmeg for warmth. The nutmeg is subtle yet impactful, giving the pie a cozy, autumnal feel. Vanilla extract adds a sweet, floral undertone that complements the apple’s natural sweetness. The sugar blend—white and brown—creates a caramelized finish while preventing the filling from becoming too sweet. The egg wash adds shine and richness to the crust, making it look bakery-quality. This small touch transforms the pie from ordinary to extraordinary.
The Final Flourish
The egg wash is essential for a glossy, golden crust that catches the eye. I whisk the egg with a tablespoon of water to create a light glaze that won’t over-brown. The lemon juice not only brightens the apples but also balances the sweetness, preventing the filling from feeling cloying. The sea salt in the filling lifts the overall flavor profile, making each bite more satisfying. A final dusting of powdered sugar after baking adds a sweet finish that pairs perfectly with a scoop of vanilla ice cream. This finishing touch makes the pie feel indulgent without being heavy.
Everything's prepped? Good. Let's get into the real action...
The Method — Step by Step
- Prepare the dough: In a large bowl, combine 2 cups of all-purpose flour, 1 tsp salt, and 1 cup cold, cubed butter. Use a pastry cutter or your fingers to cut the butter into the flour until the mixture resembles coarse crumbs. Add 1/4 cup cold water, a tablespoon at a time, until the dough just comes together. Turn the dough onto a lightly floured surface and knead gently until smooth. Form into a disk, wrap in plastic, and chill for at least 30 minutes.
- Preheat the oven: Set your oven to 425°F (220°C) and allow it to heat fully before baking. A properly preheated oven ensures the crust starts to brown immediately, creating a crisp base.
- Prepare the apples: Peel, core, and slice 6 cups of apples (mix of Granny Smith and Honeycrisp). Toss the sliced apples with 2 tbsp lemon juice, 1 tsp sea salt, 3/4 cup white sugar, 1/4 cup brown sugar, 1 tsp ground cinnamon, and 1/4 tsp nutmeg. Stir gently to coat evenly, then set aside.
- Make the filling: In a large saucepan, combine the coated apples, 2 tbsp cornstarch, 1 tbsp water, and 1 tsp vanilla extract. Cook over medium heat, stirring constantly, until the mixture thickens and becomes glossy. Reduce heat to low and let it simmer for 5 minutes, allowing the flavors to meld. Remove from heat and set aside.
- Roll out the dough: On a lightly floured surface, roll the chilled dough into a 12-inch circle. Transfer to a 9-inch pie pan, pressing gently to fit. Trim any excess dough, leaving a 1-inch overhang. Fold the overhang under the edge and crimp the edges with a fork or your fingers.
- Assemble the pie: Spoon the hot filling into the prepared crust, spreading it evenly. The filling should be hot and bubbling, which creates steam that helps the crust rise slightly.
- Apply the top crust: Roll out the remaining dough into a 12-inch circle. Place it over the filling, seal the edges by pinching together or using a lattice pattern. Cut a few slits in the top to allow steam to escape. Brush the crust with the pre-made egg wash.
- Bake: Place the pie in the preheated oven and bake for 15 minutes. After 15 minutes, reduce the temperature to 375°F (190°C) and continue baking for an additional 25-30 minutes, or until the crust is golden brown and the filling is bubbling. The top should develop a beautiful amber color.
- Cool: Remove the pie from the oven and let it cool on a wire rack for at least 45 minutes. Cooling allows the filling to set, preventing a sticky mess when you slice.
- Serve: Slice the pie into wedges and serve with a scoop of vanilla ice cream or a dollop of whipped cream. The contrast of warm pie and cold ice cream creates a delightful textural harmony. Enjoy the moment, and remember to share the secret with your friends.
That's it — you did it. But hold on, I've got a few more tricks that'll take this to another level...
Insider Tricks for Flawless Results
The Temperature Rule Nobody Follows
Many bakers bake at a single temperature, but the secret lies in a two-step bake. Start at 425°F to set the crust, then reduce to 375°F to finish cooking the filling. This prevents the crust from burning while ensuring the apples are fully cooked. I’ve tried baking at 400°F, and the crust turned out soggy. The temperature shift is simple but transforms the pie’s texture.
Why Your Nose Knows Best
When the pie starts to bubble, that’s the cue that the filling has thickened enough. The aroma of caramelizing sugar will fill the kitchen, signaling readiness. If you’re tempted to open the oven too early, you’ll end up with a raw center. Trust the scent, not the clock, for the best results.
The 5-Minute Rest That Changes Everything
After baking, let the pie rest for at least 45 minutes before slicing. This rest allows the filling to set and the juices to redistribute. Cutting too soon results in a runny filling that spills onto the plate. I’ve seen people slice immediately, and the pie looks great but tastes messy.
The Secret to a Flaky Crust
Use cold butter and cold water. The cold fat creates steam pockets that puff up during baking. Keep the dough chilled between rolling and baking. A simple tip: chill the dough for an extra 30 minutes after forming the crust to lock in the flakiness.
The Perfect Egg Wash
Whisk the egg with a tablespoon of water to create a thin glaze. Brush it over the crust just before baking. The egg wash gives a golden sheen and a slight crispness. Avoid over-brushing, or the crust will become too glossy and lose texture.
The Apple Storage Trick
If you’re preparing the pie ahead of time, store the sliced apples in an airtight container with a splash of lemon juice to prevent browning. This keeps the apples fresh and juicy. When you’re ready to bake, simply toss them into the filling mixture. I’ve saved apples for a week and still got perfect pie.
The Lattice Crust Technique
A lattice crust adds visual appeal and allows steam to escape. Cut the top crust into strips and weave them over the filling. This technique gives a rustic, artisanal look. Many people prefer a solid top crust, but the lattice is a showstopper.
The Quick Chill for a Crisp Edge
After forming the crust, chill it for 30 minutes before filling. This prevents the dough from shrinking and keeps the edges crisp. I’ve baked pies without chilling, and the edges were soggy. A quick chill is a small step that saves the day.
Creative Twists and Variations
This recipe is a playground. Here are some of my favorite ways to switch things up:
Maple Apple Pie
Replace the sugar with maple syrup for a richer, deeper sweetness. Add a pinch of smoked sea salt to balance the maple’s intensity. The result is a pie that feels like a cozy cabin dessert. It’s perfect for fall gatherings.
Spiced Chai Apple Pie
Infuse the filling with chai spices—cinnamon, cardamom, ginger, and cloves. Add a splash of vanilla and a pinch of nutmeg. The spices give the pie an exotic twist, making it a conversation starter. Great for holiday parties.
Apple and Blueberry Fusion
Add a cup of fresh blueberries to the apple mixture. The blueberries burst with juice, adding a burst of tartness. The color contrast looks stunning on a plate. It’s a refreshing summer version.
Caramel Apple Pie
Swirl a caramel sauce into the filling before baking. The caramel adds a buttery sweetness that pairs with the apples. The crust becomes slightly caramelized on top. This version is indulgent and satisfying.
Cinnamon Swirl Apple Pie
Roll a thin layer of cinnamon sugar into the dough before rolling out the crust. The cinnamon swirls add texture and aroma. The crust tastes like a cinnamon roll. It’s a fun twist for those who love cinnamon.
Apple and Cranberry Pie
Add a cup of fresh cranberries to the apple filling. The cranberries provide a tart counterpoint to the sweet apples. The pie looks festive with its vibrant red spots. It’s ideal for Thanksgiving.
Apple and Pistachio Pie
Fold chopped pistachios into the filling for a nutty crunch. The pistachios add a subtle earthy flavor that complements the apples. The pie gains a beautiful green accent. It’s a sophisticated take on the classic.
Apple and Ginger Pie
Grate fresh ginger into the filling for a zesty kick. The ginger’s heat balances the sweetness, creating a complex flavor profile. The pie becomes a warming dessert for chilly evenings. It’s a great variation for spice lovers.
Storing and Bringing It Back to Life
Fridge Storage
Let the pie cool completely before covering it with plastic wrap. Store it in the refrigerator for up to 3 days. The crust stays crisp, and the filling remains moist. When you’re ready to eat, let it sit at room temperature for 20 minutes.
Freezer Friendly
Wrap the cooled pie tightly in plastic wrap, then aluminum foil. Freeze for up to 3 months. When you’re ready to eat, thaw overnight in the fridge. The pie will retain its texture and flavor.
Best Reheating Method
Preheat your oven to 350°F (175°C). Place the pie on a baking sheet and cover loosely with foil to prevent the crust from burning. Warm for 15 minutes, then remove the foil for the last 5 minutes to crisp the crust. Add a tiny splash of water to the filling before reheating; it steams back to perfection.
Quick Microwave Fix
For a fast bite, microwave a slice on high for 45 seconds. Cover with a paper towel to keep the crust from drying out. This method works best for reheated slices, not the whole pie. It’s handy for busy mornings.