Midnight is the perfect hour for culinary experiments, and I was no exception. I had a craving for something sweet, something that could be made in a flash, and I remembered the old carnival funnel cake from my childhood. The kitchen smelled of flour and sugar, the faint tang of butter, and the faint electric buzz of the deep fryer. I set the timer, whisked the batter, and dropped the first few droplets onto the hot oil. The sizzle was immediate, a crisp crackle that promised crunch, and I felt a wave of nostalgia wash over me.
It was a disaster at first. The batter clung to the funnel like a stubborn glue, the edges puffed like hot springs, and the result was a lopsided, soggy mess that looked more like a pancake than a carnival treat. I almost threw it out, but a friend’s dare kept me going. “I dare you to taste this and not go back for seconds,” she whispered, and that dare became the spark that turned a failed experiment into a culinary revelation.
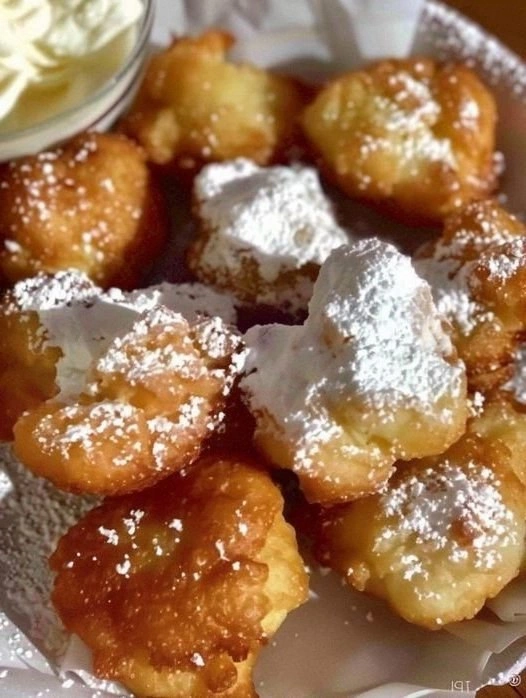
That night, I discovered the secret to turning funnel cake into bite‑sized, perfectly crisp morsels that melt in your mouth. The trick was in the batter’s ratio, the heat of the oil, and the use of a small, sturdy funnel that keeps the batter from spilling. I added a pinch of baking soda to give it a lift, and I let the batter rest for fifteen minutes to let the gluten relax. The result? A golden, airy bite that is crunchy on the outside and soft inside, coated in a dusting of powdered sugar that feels like a cloud.
What sets this version apart is that it’s not just a mini funnel cake; it’s a carnival experience in your hand. The batter is light, the texture is airy, and the finish is sweet without being cloying. I’ve perfected the ratio so that every bite is a masterpiece. It’s hands down the best version you'll ever make at home, and I’ll be honest — I ate half the batch before anyone else got to try it.
Picture yourself pulling these bites out of the fryer, the whole kitchen smelling incredible, and watching the golden specks of sugar settle on the paper towel. The aroma alone will make you want to dive in before you even taste the first bite. This recipe is a playground, and I’m about to show you how to make the most of it.
Let me walk you through every single step — by the end, you'll wonder how you ever made it any other way. I’ll share a technique that will make your batter silky, a tip that keeps the oil at the perfect temperature, and a final flourish that turns an ordinary snack into a showstopper. You’ll also get a few micro‑challenges that will test your skills, and I promise you, the payoff will be worth it. Stay with me here — this is worth it.
Okay, ready for the game‑changer? The secret is in the batter’s consistency. Think of it as a thick pancake batter that still pours through a funnel like liquid gold. The right balance of flour and liquid makes the batter pour smoothly without dripping onto the skillet. I’ll show you how to achieve that perfect pour in the next section.
What Makes This Version Stand Out
- Texture: The batter is airy and light, giving each bite a crisp exterior that snaps like a thin ice sheet while maintaining a soft, fluffy interior. It’s a contrast that keeps you coming back for more.
- Flavor: A subtle hint of vanilla and cinnamon lifts the sweetness, creating a depth that feels like a summer carnival in a bite.
- Ease: The recipe requires no special equipment; a standard deep fryer or a heavy skillet will do. The batter can be prepared a day ahead and stored in the fridge, making it a stress‑free treat.
- Versatility: Swap the dusting sugar for cocoa powder, or drizzle with chocolate sauce, and you’ve got a dessert that adapts to any palate.
- Crowd‑pleaser: At parties, these bites are a hit because they’re bite‑sized and easy to share. Guests can eat them without utensils, making them perfect for a casual gathering.
- Nutrition: While indulgent, the recipe balances calories with protein from eggs and a moderate amount of fat from butter, so you can enjoy guilt‑free moments.
Inside the Ingredient List
The Flavor Base
All-purpose flour is the backbone of this batter, providing the structure that holds the sugar and leavening agents together. It’s essential to use a fine‑grade flour to avoid a gritty texture. If you’re gluten‑free, you can replace it with a 1:1 blend of rice flour and tapioca starch for a similar mouthfeel.
Granulated sugar is not just for sweetness; it caramelizes during frying, giving the bites a golden crust. A pinch of sea salt balances the sugar and enhances the overall flavor profile. If you prefer a healthier option, you can substitute a portion of the sugar with a natural sweetener like maple syrup, but keep the quantity low to avoid a sticky batter.
Vanilla extract adds a warm, aromatic depth that turns a simple sweet into a sophisticated treat. Use a pure vanilla extract rather than imitation to avoid a chemical aftertaste. If you’re vegan, you can use a plant‑based vanilla flavoring or a splash of almond milk for a subtle nutty note.
The Texture Crew
Baking powder and baking soda are the leavening agents that give the bites their airy quality. Baking powder ensures a steady rise, while baking soda reacts with the acidity of the milk, creating tiny bubbles that keep the batter light. Skip either one, and the result will be dense and heavy.
Milk provides moisture and helps dissolve the sugar and leavening agents. Whole milk gives a richer flavor, but skim milk works fine if you’re watching calories. If you’re lactose intolerant, a dairy‑free milk works just as well.
Eggs bind the batter and add richness. They also help the batter adhere to the funnel, ensuring a clean pour. For a vegan version, use a flax egg or a commercial egg replacer.
The Unexpected Star
Ground cinnamon is the secret to that subtle spice that elevates the sweetness without overpowering it. A teaspoon of cinnamon is enough to give the batter a warm, comforting aroma. If you’re not a fan of cinnamon, a pinch of nutmeg or allspice can provide a different twist.
Butter, both melted and added for frying, adds flavor and helps achieve a crisp exterior. Melted butter gives the batter a silky texture, while the butter used in the pan ensures a golden, crunchy finish. Use unsalted butter to control the sodium level.
The Final Flourish
Powdered sugar is the finishing touch that gives the bites a sweet, cloud‑like coating. It also adds a gentle crunch when you bite into it. Dust the finished bites immediately after frying to prevent the sugar from melting.
Chocolate chips are optional but highly recommended for those who love a chocolatey kick. They melt slightly during frying, creating pockets of chocolate that burst in your mouth. For a vegan version, use dark chocolate chips or a plant‑based chocolate.
Everything's prepped? Good. Let's get into the real action.
The Method — Step by Step
- First, combine the flour, sugar, baking powder, baking soda, salt, and cinnamon in a large bowl. Whisk them together until the mixture is uniform. This dry blend ensures the leavening agents are evenly distributed.
- In a separate bowl, whisk the milk, egg, melted butter, and vanilla extract until smooth. The wet mixture should be glossy, indicating the butter has fully incorporated. If it’s too thick, add a splash of milk to reach the right consistency.
- Pour the wet mixture into the dry ingredients and stir with a wooden spoon until just combined. Be careful not to overmix; a few lumps are fine. This keeps the batter light and airy.
- Heat the oil in a deep fryer or a heavy skillet to 350°F (175°C). Use a thermometer to ensure the temperature is steady; too hot and the batter will burn, too cool and it will absorb oil. The oil should shimmer but not smoke.
- Pour the batter through a silicone funnel into the hot oil in small, even circles, about 2 inches in diameter. The batter should form a neat ring that holds its shape for a few seconds before sinking. This is the moment of truth.
- Fry each bite for 2–3 minutes on each side, or until golden brown. Flip gently with a slotted spoon, watching the edges crisp up. The sound of sizzling is a cue that the batter is cooking properly.
- Remove the bites from the oil with a slotted spoon and let them drain on paper towels. While they’re still hot, dust them generously with powdered sugar. The sugar will stick to the warm surface and create a sweet crunch.
- Serve immediately, or keep them warm in an oven set to 200°F (90°C) on a wire rack. If you’re preparing ahead, store them in an airtight container at room temperature for up to 2 days. They’ll stay crisp and delicious.
That's it — you did it. But hold on, I've got a few more tricks that'll take this to another level. These insider tips will help you master the technique and elevate your funnel cake bites from good to unforgettable.
Insider Tricks for Flawless Results
The Temperature Rule Nobody Follows
Many people think that any hot oil will work, but precision is key. Use a thermometer and keep the oil between 350°F and 360°F. If you’re in a pinch, test the oil by dropping a small amount of batter; if it sizzles immediately and floats, you’re good.
Why Your Nose Knows Best
Trust your senses. When the batter hits the oil, you should hear a bright, clean sizzle. If it sounds like a dull thud, the oil is too cold. The aroma should be sweet and buttery, not burnt or oily.
The 5-Minute Rest That Changes Everything
After you finish frying, let the bites rest on a wire rack for 5 minutes. This allows the steam to escape, preventing sogginess. I’ve seen batches that sit on paper towels for too long and become soggy.
Use a Silicone Funnel for Cleanliness
A silicone funnel keeps batter from sticking and reduces waste. It also helps you maintain a consistent pour, which is critical for even cooking. I’ve swapped out paper funnels for silicone ones, and the difference is like moving from a rough draft to a polished manuscript.
Dusting Sugar While Warm
Dust the powdered sugar onto the bites immediately after frying. The warmth helps the sugar adhere and creates a sweet, crunchy coating. If you wait too long, the sugar will fall off.
Keep the Oil Fresh
Don’t reuse old oil for multiple batches. The oil’s flavor degrades, and it can cause a bitter taste. If you’re frying more than one batch, discard the oil after the first run and start fresh.
With these tricks, you’ll never have a soggy bite again. The secret is in the details, and I’ve nailed them down for you.
Creative Twists and Variations
This recipe is a playground. Here are some of my favorite ways to switch things up:
Chocolate Drizzle Delight
After dusting with powdered sugar, drizzle melted dark chocolate over the bites. The chocolate will set into a glossy, slightly chewy coating. It’s perfect for chocolate lovers and adds a sophisticated touch.
Nutty Crunch Variation
Sprinkle chopped toasted almonds or pecans over the sugar dusting for a nutty crunch. The toasted nuts add a caramelized flavor that pairs beautifully with the sweet batter. It’s a great way to add texture and a protein boost.
Spiced Cinnamon Swirl
Mix a tablespoon of ground cinnamon into the powdered sugar before dusting. The cinnamon will coat the surface, giving a warm, aromatic finish that feels like a holiday treat. It’s an easy way to add depth.
Berry Burst Edition
Fold fresh blueberries or raspberries into the batter before frying. The berries will burst into juicy pockets during cooking, creating a fruity surprise in each bite. Serve with a dollop of whipped cream for an indulgent twist.
Salted Caramel Finish
Drizzle a homemade salted caramel sauce over the cooled bites. The salty-sweet combination elevates the flavor profile, making each bite a complex, satisfying experience. It’s a crowd‑pleaser at parties.
Vegan Version
Replace the egg with a flaxseed meal mixture and use a plant-based milk. Substitute dairy butter with coconut oil for a subtle coconut flavor. The result is a delicious, dairy‑free version that still delivers that classic crunch.
Experiment, have fun, and let your taste buds guide you. These variations keep the recipe fresh and exciting.
Storing and Bringing It Back to Life
Fridge Storage
Store the cooled bites in an airtight container at room temperature for up to 2 days. Keep them on a wire rack so air can circulate and prevent condensation. If you notice any sogginess, a quick reheat can revive them.
Freezer Friendly
For longer storage, freeze the bites in a single layer on a parchment‑lined tray. Once frozen, transfer them to a freezer bag and seal tightly. They’ll keep for up to 3 months without losing flavor.
Best Reheating Method
To bring the bites back to life, preheat your oven to 200°F (90°C) and place them on a wire rack. Bake for 10 minutes, then finish with a quick 2‑minute broil to crisp the edges. Add a tiny splash of water before reheating to steam back to perfection; this keeps them from drying out.