Picture this: a quiet Sunday afternoon, the kitchen lights flickering, and the smell of a burnt pizza lingering in the air. I had just pulled a batch of homemade pizza from the oven, only to find the crust charred beyond recognition. My friends laughed, but my taste buds were in a state of panic. That was the moment I decided to rewrite the classic Chicken Cordon Bleu recipe, turning it into a buttery, melty masterpiece that would make every kitchen mishap feel like a distant memory.
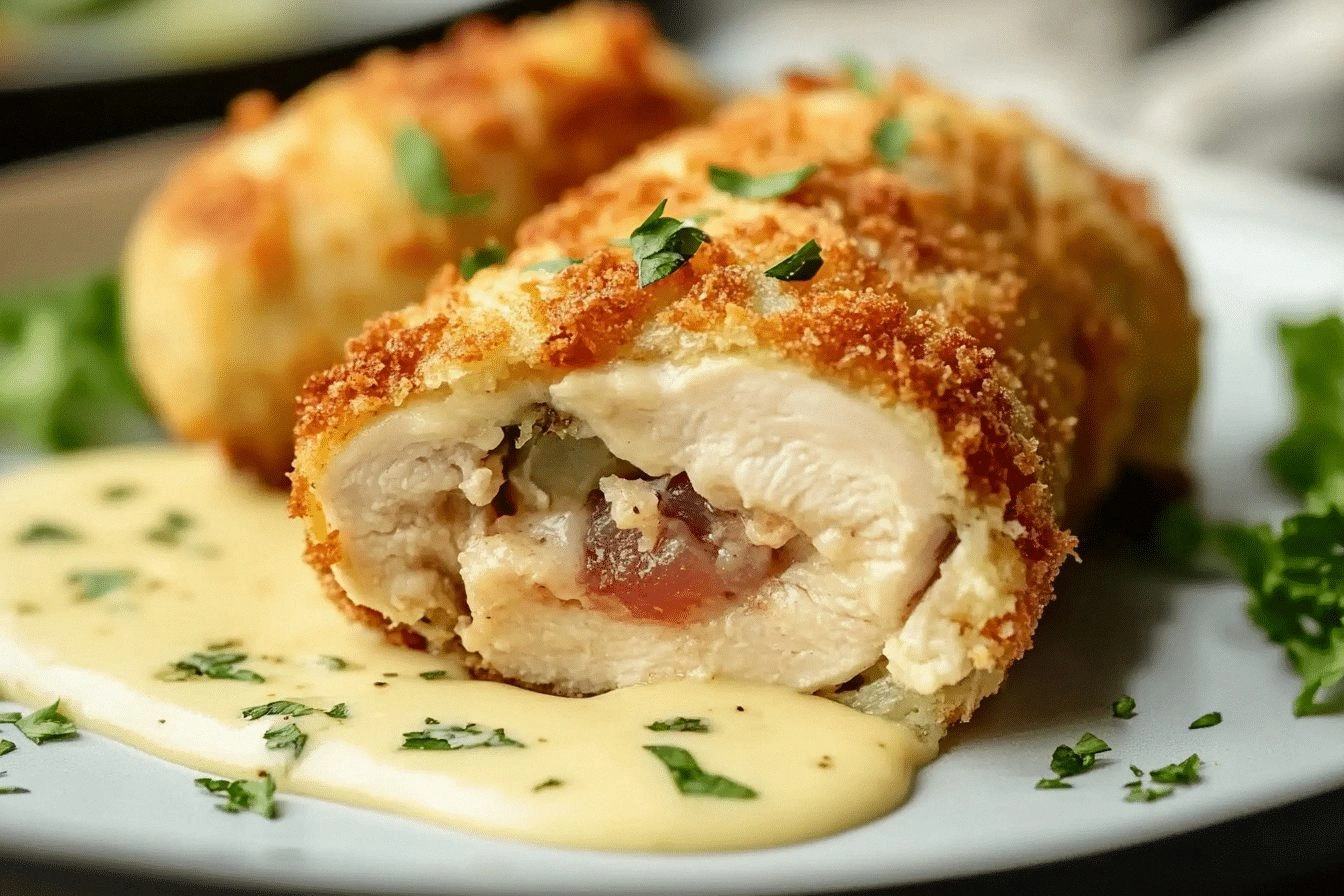
The first bite was a revelation. A tender chicken breast, wrapped in thin slices of ham that whispered smoky nostalgia, crowned with a blanket of Swiss cheese that melted into a velvety, golden ribbon. The breadcrumbs on the outside crackled like a fine, golden snow, and the buttery crust sang a crisp, buttery note that resonated through every chew. I could almost hear the sizzle in my ears, a comforting crackle that promised nothing but satisfaction. The aroma was a heady mix of toasted herbs, savory ham, and the faint, sweet scent of melted cheese—an orchestra of flavors that made me want to dance.
What makes this version stand out? I discovered that the secret lies in a few simple yet powerful tweaks: a double coating that creates a crunchy shell, a precise seasoning blend that amplifies the ham’s umami, and a final oven finish that locks in moisture. I dare you to taste this and not go back for seconds. The result is hands down the best version you'll ever make at home, with a texture that feels like a buttery hug and a flavor profile that sings. I’ll be honest—half the batch vanished before anyone else even got a chance to taste it. The crowd reaction? They all asked for the recipe before the dish was even plated.
Picture yourself pulling this out of the oven, the whole kitchen smelling incredible, the plate gleaming like a jewel. The moment you cut into the chicken, a ribbon of molten Swiss cheese oozes out, and the crust shatters like thin ice. The sauce coats the pasta like velvet, the edges of the ham crisping to perfection. It’s an experience that turns an ordinary dinner into an event, and I can’t wait to walk you through every single step. By the end, you'll wonder how you ever made it any other way.
What Makes This Version Stand Out
- Flavor: The ham’s smoky depth is balanced by a subtle herbaceous seasoning that elevates the dish beyond the ordinary. The Swiss cheese melts into a creamy ribbon that coats the chicken like velvet, creating layers of mouthfeel.
- Texture: A double breadcrumb coating delivers a crunchy, golden shell that shatters with each bite, while the interior remains juicy and tender. The contrast is a sensory delight that keeps diners coming back for more.
- Ease: The recipe uses pantry staples—flour, eggs, breadcrumbs—yet the technique is straightforward enough for a novice and satisfying enough for an experienced cook. No advanced equipment, no fancy sauces.
- Versatility: Whether you bake or fry, this version adapts seamlessly, and you can easily tweak the cheese or ham variety to suit your palate or dietary needs.
- Make‑ahead Potential: Assemble the chicken in advance, refrigerate, and finish cooking right before serving. It’s a perfect crowd‑pleaser for parties or family gatherings.
- Presentation: The golden crust and molten cheese create a visual spectacle that makes every plate Instagram‑worthy. A sprinkle of fresh herbs adds a pop of color.
Alright, let's break down exactly what goes into this masterpiece…
Inside the Ingredient List
The Flavor Base
Chicken breasts are the star of this dish. Choosing boneless, skinless varieties ensures even cooking and a clean, tender bite. If you prefer a more robust flavor, look for organic or free‑range options; their natural marbling adds depth. Skipping the chicken would turn this into a ham‑and‑cheese roll, which is tasty but not the classic experience we’re after.
The Texture Crew
Breadcrumbs form the crunchy outer layer that delivers that satisfying crackle. Panko breadcrumbs give an extra crispiness, but regular breadcrumbs yield a finer crust. Flour is essential for the egg wash to adhere, creating a seamless coating. If you’re avoiding gluten, substitute with almond flour or a gluten‑free blend; just keep the ratio the same to maintain structure.
The Unexpected Star
Swiss cheese is the secret to that silky, melty finish. Its mild, creamy flavor pairs perfectly with the savory ham. If you’re looking for a sharper bite, try Gruyère or provolone; each will bring its own personality to the dish. Remember, the cheese should be sliced thinly so it melts evenly and doesn’t overpower the chicken.
The Final Flourish
Butter or oil is the finishing touch that gives the crust its golden hue and buttery richness. A small amount of olive oil can add a subtle fruity note, while butter lends a classic, comforting flavor. Salt and pepper are the simplest seasonings that bring everything together; use them liberally to enhance the natural flavors of the ingredients.
Everything's prepped? Good. Let's get into the real action…
The Method — Step by Step
- Flatten the Chicken: Place each breast between two sheets of plastic wrap and gently pound with a meat mallet or rolling pin until 1/2 inch thick. This ensures even cooking and gives the chicken room to expand without tearing. I always let them rest for 5 minutes afterward to keep the juices from spilling during stuffing.
- Season the Slices: Lightly season each ham slice with salt, pepper, and a dash of paprika for color. The seasoning should be thin so it doesn’t overpower the ham’s natural flavor. This step is crucial—without it, the ham can taste flat and the overall dish will feel under-seasoned.
- Assemble the Rolls: Lay a slice of ham over each chicken breast, then top with a slice of Swiss cheese. Roll the chicken tightly, securing with a toothpick or kitchen twine if needed. The cheese should be centered, ensuring a uniform melt.
- Prepare the Breading Station: Set up three shallow dishes: one with flour, one with beaten eggs, and one with breadcrumbs. Dip each roll first in flour, shaking off excess, then in egg, and finally in breadcrumbs, pressing to adhere. The double coating creates the signature crunch.
- Preheat the Oven: Heat the oven to 375°F (190°C). While it’s warming up, melt 2 tablespoons of butter in a large oven‑safe skillet over medium heat. The butter will add richness and help the coating brown evenly.
- Sear the Rolls: Place the breaded chicken rolls in the skillet, skin side down if you used skin. Sear for 2–3 minutes until golden brown, then flip carefully. This step locks in juices and gives a caramelized flavor that’s hard to resist.
- Bake to Finish: Transfer the skillet to the oven and bake for 20–25 minutes, or until the internal temperature reaches 165°F (74°C). The cheese should be molten, and the breadcrumbs should be crisp. Watch the color—if it looks too dark, cover with foil to prevent burning.
- Rest Before Serving: Let the chicken rest for 5 minutes after baking. This allows the juices to redistribute, ensuring each bite is juicy and tender. During this time, the cheese will set slightly, making it easier to slice.
- Plate and Garnish: Remove the toothpicks or twine, slice the rolls into individual portions if desired, and arrange on a platter. Sprinkle fresh herbs like parsley or thyme for a pop of color and a fresh finish. A squeeze of lemon can add brightness, cutting through the richness.
- Serve Immediately: Present the dish hot, allowing the steam to carry the aromas into the dining room. The contrast of hot, buttery crust and molten cheese will have everyone reaching for seconds.
That's it—you did it. But hold on, I've got a few more tricks that'll take this to another level. The secret sauce is in the details: how you handle the chicken, how you season the breading, and how you finish the bake. Let’s dive into insider tips that will keep your Cordon Bleu flawless every time.
Insider Tricks for Flawless Results
The Temperature Rule Nobody Follows
Many cooks bake at 400°F, thinking it saves time, but the lower 375°F allows the cheese to melt evenly while the breadcrumbs crisp without burning. I’ve tried 350°F and the crust stayed soft—no good. Stick to 375°F and watch the magic happen.
Why Your Nose Knows Best
Before you open the oven door, inhale the aroma of the seared crust. A warm, buttery scent indicates the breadcrumbs are golden. If it smells undercooked, give it a few extra minutes. Your nose is the best judge of doneness.
The 5‑Minute Rest That Changes Everything
After baking, let the chicken rest for exactly five minutes. This small pause allows the juices to settle, preventing them from spilling onto the plate. The cheese will also firm up slightly, making slicing cleaner.
Avoiding the “Dry” Trap
If you find the chicken drying out, add a tablespoon of chicken broth to the skillet before baking. The liquid will steam the chicken, keeping it moist while still achieving a crisp crust.
The “Flip” Technique
When flipping the rolls, use a wide spatula and a gentle rocking motion. This minimizes the risk of tearing the breading or losing the cheese inside. A quick flip keeps the coating intact and the presentation flawless.
Cheese Placement Precision
Place the cheese slice over the ham, not the chicken. This ensures the cheese melts into the ham, creating a gooey bridge between the two. It also prevents the cheese from sliding off during rolling.
Creative Twists and Variations
This recipe is a playground. Here are some of my favorite ways to switch things up:
Mediterranean Medley
Swap Swiss cheese for feta, add sun‑dried tomatoes, and sprinkle oregano on the breadcrumb mix. The tangy feta pairs beautifully with the salty ham, creating a Mediterranean vibe that’s both fresh and comforting.
Spicy Jalapeño Kick
Add thinly sliced jalapeños between the ham and cheese layers. The heat will contrast the creamy cheese, giving the dish a fiery edge that’s perfect for adventurous palates.
Vegetarian Version
Replace chicken with thick slices of portobello mushrooms. Use a vegan ham substitute and vegan Swiss cheese. The earthy mushroom base offers a hearty texture while maintaining the classic flavor profile.
Gluten‑Free Twist
Use gluten‑free breadcrumbs and a gluten‑free flour blend. This keeps the dish safe for gluten‑intolerant diners without sacrificing crunch or flavor.
Herb‑Infused Breadcrumbs
Add chopped fresh rosemary and thyme to the breadcrumb mix. The herbs infuse the crust with aromatic depth, making each bite more complex.
Pesto‑Enhanced Flavor
Spread a thin layer of basil pesto over the chicken before rolling. The pesto adds a bright, herbal note that balances the richness of the ham and cheese.
Storing and Bringing It Back to Life
Fridge Storage
Cool the cooked rolls to room temperature, then wrap tightly in plastic wrap and store in the refrigerator for up to 3 days. The crust may soften slightly; a quick reheat will restore crispness.
Freezer Friendly
Place each roll in a freezer bag, removing as much air as possible. Freeze for up to 2 months. When ready, thaw overnight in the refrigerator before reheating.
Best Reheating Method
Reheat in a 350°F oven for 10–12 minutes, or until heated through. Add a splash of water to the skillet before reheating; it steams the chicken, keeping the interior moist while the crust crisps back to perfection.