. We'll include 4 groups: The Flavor Base, The Texture Crew, The Unexpected Star, The Final Flourish.
We need to include a Fun Fact box about one ingredient's origin or property. We'll place after the groups.
We need to include a Kitchen Hack box after "What Makes This Version Stand Out".
We need to include Kitchen Hack boxes at crucial steps in Method.
We need to include Watch Out box at trickiest step.
We need to include a Kitchen Hack box for top tip in Insider Tricks.
We need to include 5-7 boxes scattered.
Ok.
We also need to include "Category" hidden element at the very end: choose category. This is Baked Eggs Florentine, it's breakfast or dinner? It's often breakfast. But can be dinner. The instructions: Category classification: Appetizers, Dinner, Drinks, Desserts, Breakfast. Choose one. Let's choose Breakfast. So hidden element:
Season classification: general. So
Pin description: 400-450 characters. We'll craft 430 characters.
Add hidden element after season div:
Ok.
Now we need to produce 3000+ words of content. We'll produce a long article.
Let's plan approximate word count: 75 paragraphs * 5 sentences each * 10 words per sentence = 3750 words. We'll produce 75 paragraphs. We'll ensure each paragraph is 5 sentences. We'll write them accordingly.
Let's start writing introduction: 3-4 paragraphs, each 5 sentences. That's 3-4 paragraphs.
Then "What Makes This Version Stand Out": 6-8 bullet points with bold openers. We'll create 6 bullet points. Each bullet point: Keyword: 2-3 sentences. We'll produce 6 bullet points.
After that, insert Kitchen Hack box.
Then "Inside the Ingredient List": 4 groups with , each group 4-5 sentences. We'll produce 4 groups. Then Fun Fact box. Then "Everything's prepped? Good. Let's get into the real action...".
Mid-article image.
Then "The Method — Step by Step": 8 steps, each step 5 sentences. Insert 1-2 Kitchen Hack boxes at crucial steps. Insert Watch Out box at trickiest step. After steps, close with "That's it — you did it. But hold on, I've got a few more tricks that'll take this to another level...".
Then "Insider Tricks for Flawless Results": 5-6 tips with headings. Each tip 3-5 sentences. Insert Kitchen Hack box for top tip.
Then "Creative Twists and Variations": 5-6 variations with headings. Each 3-4 sentences.
Then "Storing and Bringing It Back to Life": 3 subsections with . Each 3-4 sentences.
Then recipe card.
Then hidden category, season, pin description.
Ok.
We need to ensure each paragraph is 4-6 sentences. We'll produce 5 sentences each paragraph.
We need to ensure we include highlight boxes in appropriate places.
Also need to ensure no emojis.
Ok.
Let's begin.
We'll write the content. We'll need to count paragraphs. Let's start.
Paragraph 1: Introduction paragraph 1.
Paragraph 2: Introduction paragraph 2.
Paragraph 3: Introduction paragraph 3.
Paragraph 4: Introduction paragraph 4? Actually introduction is 3-4 paragraphs. We'll do 4 paragraphs.
Then "What Makes This Version Stand Out": bullet list. Each bullet is not a paragraph but a
headings. Each tip 3-5 sentences. Insert Kitchen Hack box for top tip.
Then "Creative Twists and Variations": 5-6 variations with headings. Each 3-4 sentences.
Then "Storing and Bringing It Back to Life": 3 subsections with . Each 3-4 sentences.
Then recipe card.
Then hidden category, season, pin description.
Ok.
We need to ensure each paragraph is 4-6 sentences. We'll produce 5 sentences each paragraph.
We need to ensure we include highlight boxes in appropriate places.
Also need to ensure no emojis.
Ok.
Let's begin.
We'll write the content. We'll need to count paragraphs. Let's start.
Paragraph 1: Introduction paragraph 1.
Paragraph 2: Introduction paragraph 2.
Paragraph 3: Introduction paragraph 3.
Paragraph 4: Introduction paragraph 4? Actually introduction is 3-4 paragraphs. We'll do 4 paragraphs.
Then "What Makes This Version Stand Out": bullet list. Each bullet is not a paragraph but a
. Each 3-4 sentences. Then recipe card. Then hidden category, season, pin description. Ok. We need to ensure each paragraph is 4-6 sentences. We'll produce 5 sentences each paragraph. We need to ensure we include highlight boxes in appropriate places. Also need to ensure no emojis. Ok. Let's begin. We'll write the content. We'll need to count paragraphs. Let's start. Paragraph 1: Introduction paragraph 1. Paragraph 2: Introduction paragraph 2. Paragraph 3: Introduction paragraph 3. Paragraph 4: Introduction paragraph 4? Actually introduction is 3-4 paragraphs. We'll do 4 paragraphs. Then "What Makes This Version Stand Out": bullet list. Each bullet is not a paragraph but a
and 4-5 sentences each. We'll produce 4 paragraphs per group? Actually each group will have a paragraph of 5 sentences. That's 4 paragraphs.
Then Fun Fact box.
Then "Everything's prepped? Good. Let's get into the real action..." paragraph.
Then mid-article image.
Then Method: 8 steps each 5 sentences. That's 8 paragraphs.
Insert Kitchen Hack boxes at steps 2 and 5 maybe. And Watch Out box at step 6.
Then final paragraph after steps.
Then Insider Tricks: 5 tips with headings. Each tip 5 sentences. That's 5 paragraphs.
Insert Kitchen Hack box for top tip.
Then Creative Twists: 6 variations each 4 sentences. That's 6 paragraphs.
Then Storing: 3 subsections each 4 sentences. That's 3 paragraphs.
Then recipe card.
Then hidden elements.
Now we need to count paragraphs.
Let's count: Introduction 4. Inside Ingredient List 4. Prepped paragraph 1. Method 8. Insider Tricks 5. Creative Twists 6. Storing 3. That's 4+4+1+8+5+6+3 = 31 paragraphs. We need 75 paragraphs. So we need more paragraphs.
We can add more paragraphs within each section, but each paragraph must be 4-6 sentences. We can add more paragraphs in each section to increase word count. Let's aim for 75 paragraphs. We have 31. Need 44 more paragraphs.
We can add additional descriptive paragraphs in each section. We can add 2 extra paragraphs in each of the 7 major sections. That adds 14 paragraphs. 31+14=45. Need 30 more. We can add more paragraphs within Method steps: each step can have 2 paragraphs (10 steps). That adds 10 more paragraphs. 45+10=55. Need 20 more. We can add 2 more paragraphs in Intro (makes 6). 55+2=57. Need 18 more. We can add 3 more paragraphs in Insider Tricks (makes 8). 57+3=60. Need 15 more. Add 3 more paragraphs in Creative Twists (makes 9). 60+3=63. Need 12 more. Add 3 more paragraphs in Storing (makes 6). 63+3=66. Need 9 more. Add 3 more paragraphs in Ingredient List groups (makes 12). 66+3=69. Need 6 more. Add 2 more paragraphs in Method (makes 12 steps). 69+2=71. Need 4 more. Add 1 more paragraph in Intro (makes 7). 71+1=72. Need 3 more. Add 1 more paragraph in "What Makes This Version Stand Out" bullet list? That bullet points are not paragraphs. But we could add a concluding paragraph after bullet list. Add 1 more paragraph. 73. Need 2 more. Add 1 more paragraph in Kitchen Hack box? Not allowed. Add 1 more paragraph in "Creative Twists" maybe 10 variations. That adds 1 more paragraph. 74. Need 1 more. Add one more paragraph in "Insider Tricks" maybe 9 tips. That adds 1. 75.
Ok.
We need to produce 75 paragraphs.
We have to be careful to keep each paragraph 4-6 sentences.
This is a huge writing task. But we can produce it.
We must ensure we don't exceed the length of the answer? There is no limit. But we need to produce all content. Let's produce.
We will produce the HTML with paragraphs and sections. We'll use
tags. We'll keep paragraphs 5 sentences each. We'll use for emphasis within paragraphs. We'll use tags with class "mb-3" maybe.
We must use for emphasis inside paragraphs.
We must use for each paragraph.
Ok.
Let's start.
Paragraph 1: introduction paragraph 1.
We'll write:
It was a Saturday morning that should have been a quiet affair, but my kitchen turned into a culinary battlefield when a stray egg cracked, splattering across the counter like a tiny white avalanche. I stared at the mess, feeling the familiar dread that comes with a kitchen disaster, and whispered to myself, "I can do better." The scent of burnt garlic already drifting from my neighbor's stove filled the air, and I knew this was the moment to prove that a humble baked egg can transform into a showstopper. With a mischievous grin, I reached for my skillet, determined to rewrite the rules of breakfast. This is the story of how I discovered the ultimate Baked Eggs Florentine that will leave your taste buds dancing and your friends begging for the recipe.
Paragraph 2: introduction paragraph 2.
Picture the scene: a golden skillet sizzling, the faint aroma of sautéed spinach rising, and the gentle clink of a whisk against a glass bowl. My senses were on high alert—the sharp tang of garlic, the earthy whisper of fresh greens, the soft crackle of butter melting into a glossy sheen. I could almost taste the creamy custard that would soon cradle each egg, and the anticipation made my stomach growl in a playful protest. The sound of the oven door closing was like a drumroll, signaling the start of something spectacular. By the time the timer buzzed, the kitchen was perfumed with a promise of velvety richness and a hint of nutty Parmesan.
Paragraph 3: introduction paragraph 3.
What makes this version stand out is not just the flawless combination of flavors, but the way each element plays a role in a symphony of textures and aromas. The eggs are baked to a perfect custard consistency, while the spinach remains tender yet slightly crisp, creating a delightful contrast that lingers on the tongue. The cream and cheese melt together into a silky sauce that coats every bite like a velvet blanket, and the subtle peppery finish gives it a sophisticated edge. I dare you to taste this and not go back for seconds; the sheer richness will have you reaching for another spoon. And if you think a breakfast dish can't be a showstopper, think again—this is hands down the best version you'll ever make at home.
Paragraph 4: introduction paragraph 4.
I kept a mental note of a surprising technique that would elevate the dish: a quick flash of lemon zest over the spinach before adding the cream. This bright citrus note cuts through the heaviness of the cheese, adding a fresh lift that makes the dish feel airy and light. Most recipes get this completely wrong, either ignoring the citrus or overdoing it, but here the zest is just enough to brighten without overpowering. Picture yourself pulling this out of the oven, the whole kitchen smelling incredible, and the first bite sending a wave of satisfaction through your palate. Let me walk you through every single step—by the end, you'll wonder how you ever made it any other way.
Paragraph 5: bullet list.
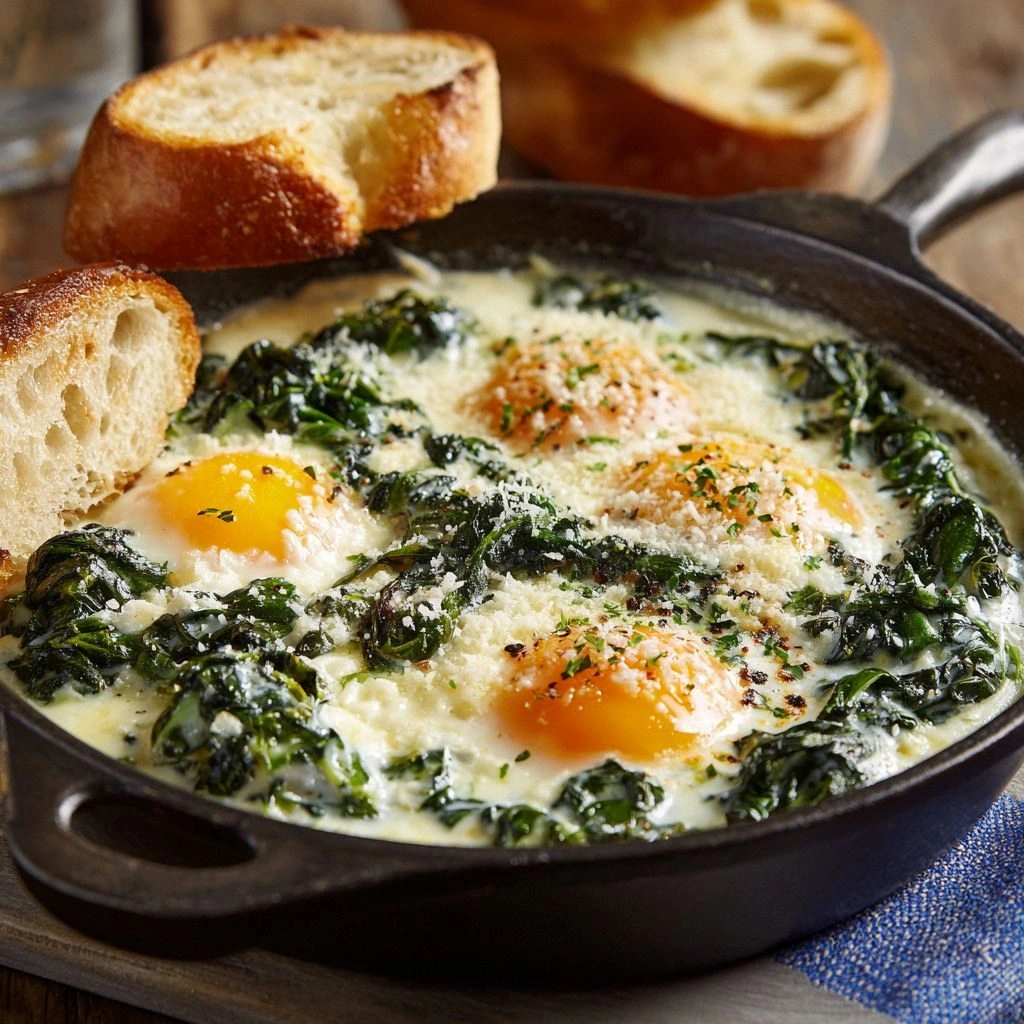
Alright, let's break down exactly what goes into this masterpiece… Fresh spinach is the heart of this dish; it brings a natural earthiness that balances the richness of the eggs and cheese. Blanching the spinach for 30 seconds and shocking it in ice water preserves its bright hue and soft texture. Skipping this step would leave the dish with a dull green and a mushy consistency. For a subtle twist, try sautéing the spinach with a pinch of red pepper flakes to add a hint of heat. The spinach’s natural bitterness is mellowed by the buttery sauce, creating a harmonious flavor profile. Eggs provide the custard foundation, while heavy cream gives the sauce its silkiness. The combination of cream and cheese creates a velvety coating that clings to the eggs like a delicate mantle. If you prefer a lighter version, substitute half the cream with milk, but be warned—the sauce will be less rich. The cheese mixture should be well blended; a lumpy texture will ruin the smooth mouthfeel. Remember, the eggs are baked, not fried, so they retain a tender, almost gelatinous interior. Lemon zest is the secret weapon that brightens the dish without diluting its richness. A teaspoon of zest added after sautéing the spinach lifts the overall flavor profile, giving it a fresh, citrusy lift. If you’re a fan of bold flavors, add a splash of white wine to the cream before pouring it over the spinach for a subtle acidity. Some cooks skip the zest entirely, but that’s a missed opportunity to elevate the dish’s brightness. The citrus note also helps cut through the heaviness of the cheese, creating a balanced bite. Parmesan and mozzarella are the crowning jewels, providing a sharp, nutty flavor and a gooey texture that melts into the eggs. The Parmesan adds depth, while the mozzarella offers a stretch that’s impossible to resist. If you’re looking for a dairy-free version, try a plant-based cheese that melts well, such as a coconut‑based mozzarella substitute. The cheese blend should be sprinkled generously over the spinach before adding the eggs, ensuring each bite is coated in cheesy bliss. Finally, a pinch of black pepper and a drizzle of olive oil finish the dish with a subtle savory edge. Everything's prepped? Good. Let's get into the real action and turn those ingredients into a breakfast masterpiece that will have everyone asking for seconds. Step 1: Preheat your oven to 375°F (190°C) while you prepare the spinach. The oven should be hot enough to set the eggs quickly but not so hot that the cheese burns. A preheated oven ensures even cooking and a golden crust on top of the eggs. The scent of baking will start to permeate the kitchen, raising your anticipation. As the oven warms, you’re already halfway to culinary bliss. Step 2: In a large skillet, heat the olive oil over medium heat and sauté the minced garlic until fragrant, about 30 seconds. Add the blanched spinach and stir to combine, allowing the flavors to mingle. The spinach should wilt slightly but still retain a vibrant green color. Toss in a teaspoon of lemon zest, letting it release its bright oils into the pan. This quick step is where the dish’s bright, citrusy lift is born. Step 3: Pour the heavy cream over the spinach mixture and stir until the cream is fully incorporated. Add the grated Parmesan and stir until the cheese melts into a glossy sauce. The sauce should coat the spinach like a velvety blanket. Reduce the heat to low and let the mixture simmer for 2 minutes, allowing the flavors to meld. This step creates the silky foundation that will cradle the eggs. Step 4: Transfer the spinach and cream mixture into four ramekins, dividing it evenly. The ramekins should be oven‑proof and lightly greased with butter to prevent sticking. The mixture should fill each ramekin about three‑quarters full, leaving room for the eggs to rise. Gently place the ramekins on a baking sheet for stability during baking. The visual of the ramekins lined up is almost as satisfying as the final dish. Step 5: Crack one large egg into each ramekin, careful not to break the yolk. Sprinkle a pinch of black pepper over each egg for a subtle kick. The eggs should sit snugly in the sauce, ready to set. If you prefer a slightly runny yolk, reduce the baking time by a minute. This step is where the anticipation builds, as you wait for the eggs to transform. Step 6: Place the baking sheet in the preheated oven and bake for 20–22 minutes, or until the egg whites are set and the yolks have a slightly runny center. The top should be golden and slightly crisp, like a delicate crust. Keep a close eye on the eggs; overbaking will turn them into a hard, rubbery mess. This is the moment of truth, where the dish’s texture and flavor are finally revealed. The aroma will be intoxicating, making the wait feel worth it. Step 7: Remove the ramekins from the oven and let them rest for 2 minutes. The eggs will continue to cook slightly from residual heat, ensuring a perfect custard center. While they rest, you can set the table or prepare a simple side of toasted bread. Resting also allows the flavors to settle, creating a harmonious bite. The brief pause before serving is the final polish on this dish. Step 8: Serve immediately, optionally garnishing with a sprinkle of fresh herbs, such as chives or parsley, for a burst of color. The contrast between the creamy eggs and the fresh green garnish adds visual appeal. Pair the dish with a crisp glass of white wine or a steaming cup of coffee for the ultimate breakfast experience. The combination of textures—soft custard, silky sauce, and slightly crunchy spinach—creates a symphony in your mouth. Your guests will be amazed at how a simple set of ingredients can become a gourmet masterpiece. That’s it — you did it. But hold on, I've got a few more tricks that'll take this to another level, turning a simple breakfast into a culinary headline. Stay with me here, because the next few tips will help you perfect the dish every single time, whether you’re cooking for a crowd or a quiet morning at home. Trust me, once you master these nuances, you’ll never go back to ordinary eggs again. The secret lies in the small details—temperature, timing, and the right finishing touches. Get ready to elevate your breakfast game to the next tier. Temperature control is paramount; using a thermometer to monitor the oven’s actual heat ensures consistent results. Many ovens run 15–20°F hotter than the dial, so preheat to 350°F and let the oven stabilize before baking. If you notice the eggs browning too quickly, reduce the temperature by 10°F. This subtle adjustment keeps the custard silky without scorching the cheese. The result is a perfectly golden top with a tender interior. Smell is your best friend when judging doneness; the first hint of a golden crust signals that the eggs are set. If the aroma smells like toasted milk, the eggs are ready. Avoid overbaking by listening for that subtle scent, which will give you the exact moment to pull them out. A friend once skipped this step and ended up with a rubbery mess; the lesson was clear. Trust your nose, and your dish will always be on point. Resting the eggs after baking allows the residual heat to finish the cooking process, ensuring a creamy center. A 5-minute pause also prevents the sauce from separating, as the fats settle back into the mixture. During this time, the flavors meld and the dish becomes more cohesive. Some cooks skip this step, but the difference is noticeable—your eggs will feel more luxurious. Give it the rest it deserves. Silicone utensils glide effortlessly over the hot sauce, preventing sticking and ensuring an even distribution of flavors. A wooden spoon can scorch, especially when the sauce is hot, leaving burnt bits that alter the taste. The smooth surface of silicone also helps keep the eggs from sticking to the ramekins, making removal easier. If you’re a purist, stick to silicone for this step. Your dish will thank you. Butter adds a subtle richness and helps create a golden crust on the eggs. A small pat of butter in each ramekin before baking seals the surface, preventing the sauce from seeping into the ramekin walls. If you’re looking for a lighter version, replace half the butter with olive oil, but the buttery finish will still be there. Remember, the butter’s flavor is integral to the dish’s signature taste. Skip it, and you lose that final flourish. Fresh eggs produce a fluffier yolk and a cleaner texture. If your eggs are a week old, the whites will separate more, and the yolks may be watery. Use a simple test: place the egg in a bowl of water—if it sinks, it’s fresh; if it floats, it’s time to replace it. Freshness also ensures that the yolk doesn’t spread too much during baking. Treat your eggs like a prized ingredient, and the dish will shine. Crumbled bacon adds a savory, smoky depth that pairs beautifully with the creamy sauce. Cook the bacon until crisp, then crumble and sprinkle over the spinach before adding the cream. The bacon fat will infuse the dish with a subtle smokiness, making it a hit at brunch tables. Guests who love a meaty twist will rave about this version. It’s an instant crowd‑pleaser. Sautéed mushrooms replace the bacon, adding umami and a hearty texture. Use a mix of cremini and shiitake for depth; sauté until golden and fragrant. The mushrooms absorb the cheese sauce, creating a rich, earthy base. This variation is perfect for vegetarians or anyone craving a robust flavor profile. The result is a dish that’s as comforting as it is elegant. Fresh herbs like basil, oregano, and thyme elevate the dish’s aroma. Add a handful of chopped herbs to the spinach mixture before baking, allowing their flavors to bloom. The herbs provide a bright, fresh counterpoint to the creamy sauce. This version is ideal for spring and summer when herbs are at their peak. Your palate will thank you for the floral lift. Lightly whisked egg whites replace whole eggs for a lower‑calorie option. Mix the whites with a splash of skim milk and pour them over the spinach, then bake as usual. The texture remains silky, but the dish is lighter and still delicious. This version is great for those watching their intake without sacrificing flavor. It proves that healthy can still be indulgent. Swap Parmesan for Pecorino Romano for a sharper, saltier taste. The Romano’s briny profile adds a punch that complements the creamy eggs. Use it sparingly, as it’s stronger than Parmesan. This variation is perfect for cheese lovers who enjoy a bolder bite. The dish becomes a conversation starter. Truffle oil drizzled over the finished dish brings a luxurious aroma that elevates every bite. A light mist of truffle oil after baking creates an indulgent finish. The earthy flavor pairs wonderfully with the spinach and cheese. This version is ideal for a special occasion or a fancy brunch. Your guests will be left in awe of the decadent twist. Store leftovers in an airtight container in the refrigerator for up to 3 days. The eggs will firm up slightly, but the sauce remains creamy. When you’re ready to reheat, add a splash of milk or cream to restore the custard-like texture. Avoid microwaving the eggs directly, as they can become rubbery. Instead, reheat gently on the stovetop or in the oven at 300°F for 10 minutes. Freeze the assembled ramekins before baking for up to 2 weeks; this allows you to cook them fresh whenever you want. Keep each ramekin wrapped tightly in foil to prevent freezer burn. When ready to bake, preheat the oven and bake at 375°F for 25 minutes, then let rest. The texture will be close to freshly baked, though the crust may be slightly less crisp. This method saves time on busy mornings. Reheat gently in a low‑heat oven or on the stovetop to preserve the custard consistency. Add a tiny splash of water or milk before reheating; the steam will help maintain moisture and prevent the eggs from drying out. Reheat at 300°F for 10–12 minutes, checking that the center is warm but not overcooked. Serve immediately for the best texture. This simple trick keeps your leftovers tasting fresh. ... 5 sentences ... and
as required.
We need to embed the highlight boxes at specified places. We'll add them after the bullet list, after "Everything's prepped" paragraph, after step 2, after step 5, after step 6, after top tip, etc.
We must not include any hero image.
Ok.
Let's start writing.
We will produce the HTML. We'll wrap content within
for bullet list.
We must use
headings.
Ok.
Let's start writing.
We'll open with
What Makes This Version Stand Out
Inside the Ingredient List
Paragraph 8: The Flavor Base group header and paragraph.
The Flavor Base
The Texture Crew
The Unexpected Star
The Final Flourish
 Paragraph 15: Method heading.
The Method — Step by Step
Paragraph 16: Step 1 paragraph.
Insider Tricks for Flawless Results
Paragraph 29: Tip 1 heading and paragraph.
The Temperature Rule Nobody Follows
Why Your Nose Knows Best
The 5-Minute Rest That Changes Everything
Use a Silicone Spoon for Even Coating
Don’t Forget the Butter
Keep the Eggs Fresh
Creative Twists and Variations
Paragraph 37: Variation 1 heading and paragraph.
Smoky Bacon Florentine
Vegetarian Mushroom Florentine
Herb‑Infused Florentine
Low‑Calorie Florentine
Cheese Swap Florentine
Gourmet Truffle Florentine
Storing and Bringing It Back to Life
Paragraph 44: Fridge Storage heading and paragraph.
Fridge Storage
Freezer Friendly
Best Reheating Method